
2D animation uses pictures drawn on paper or a computer program, played in sequence to create the illusion of movement. Examples include cartoons and anime shows.
2d Animation uses flat images, drawn by hand, or on a computer, to tell stories. It’s a popular form of animation because it’s easy to learn and can be used for a variety of purposes. 2d Animation is often used in cartoons, video games, and advertisements.
Animation has come a long way since the early days of hand-drawn characters and moving images. With the advent of digital technology, animators were introduced to a range of tools and techniques that make creating 2D animation faster and more efficient than ever before.
One of the key advantages of 2D animation is its ability to convey emotion and character development through subtle movements and expressions. Animators can use a range of techniques, such as squash and stretch, to exaggerate movements or create a sense of weight and gravity. This can help bring characters to life and make them feel more relatable to viewers.
Traditional hand-drawn animation involves drawing each frame by hand on paper (or acetate), which can be a time-consuming process. However, this method allows animators to have complete control over every aspect of the animation, from the character design to the Timing and pacing of each movement. With careful planning and attention to detail, hand-drawn animation can be highly effective in conveying complex stories and emotions.
Cut-out animation is another popular technique used in television shows or commercials where a quick turnaround time is necessary. This technique involves creating characters and items as individual pieces that can be moved around like puppets. While it may not have the same level of detail as hand-drawn animation, cut-out animation can still be highly effective in conveying movement and story. This technique was very popular in the early 2000’s with the popularity of Adobe Flash (now called Adobe Animate).
Digital animation using software like Brush Ninja, or Toon Boom Harmony has revolutionized the world of 2D animation. Animators can create images directly in the software using a variety of tools and techniques, such as vector graphics or bitmap images.
Regardless of the technique used, 2D Animation requires careful planning and attention to detail. Animators must consider factors such as timing, pacing, camera angles, and sound design in order to create a cohesive story that engages viewers. Sound design plays a crucial role in bringing an animated world to life, as it helps to create an immersive environment that draws viewers into the story.
2D Animation remains a popular form of storytelling due to its unique visual style and ability to convey complex emotions and character development. With a range of techniques available, from hand-drawn animation to digital software, animators have the tools they need to bring their stories to life in exciting and innovative ways. As technology continues to evolve, it will be exciting to see what new forms of animation emerge in the years to come.
3D animation creates lifelike images on a computer screen, giving them depth and movement in multiple directions. It's like stepping into a virtual world!
The animation industry has seen a significant shift towards 3D animation in recent years. It has opened up a whole new world of possibilities for animators, allowing them to create visually stunning and complex animations that were previously impossible with traditional 2D animation methods.
One of the main advantages of 3D animation is the ability to create lifelike characters with realistic movements and expressions. Achieving this level of realism is made possible through rigging, which involves creating a system of bones and controls within the digital model.
Additionally, 3D animation provides flexibility in terms of camera movements and lighting. Animators can move the camera around objects, fly through environments, and change angles seamlessly. The ability to manipulate lighting in real-time also allows for different moods and atmospheres within a scene.
However, there are challenges associated with 3D animation that animators must overcome. One of the biggest obstacles is the time-consuming nature of the process. Creating detailed 3D models can take a significant amount of time. Additionally, rendering (converting the image from a 3d shape to a 2d image that can be displayed on a screen) the finished product can take hours or even days depending on the complexity of the scene.
Another challenge is maintaining consistency throughout the animation process. With traditional 2D animation, it is easier to maintain a consistent style. However, with 3D animation, there is a risk that different artists may create models or textures that don’t match the overall style of the project, leading to inconsistencies within the finished product.
To overcome these challenges, many animators use specialized software such as Maya, Blender, or Cinema 4D. These programs provide powerful tools for creating detailed models and allow for real-time manipulation during the animation process.
If you are interested in trying 3d art and animation then Blender is a great choice since it’s totally free. You can download it from blender.org.
3D animation has revolutionized the animation industry, providing animators with powerful tools to create complex and visually stunning animations. The ability to create lifelike characters with realistic movements and expressions, coupled with the flexibility in camera movements and lighting, has opened up a whole new world of possibilities for animators.
An alpha channel is a code that blends an animated character or object with its background, making it look more realistic when moving. It's like a magic cloak for creating transparency.
Animation is the art of using images and motion to create the illusion of movement. It involves the manipulation of images to create the impression of motion, and it is achieved by displaying a sequence of images that minimally differ from one another. One essential feature of animation is the alpha channel, which allows artists and animators to combine images in layers.
The alpha channel is a special digital image channel that stores transparency information for an image. It contains a grayscale image that represents the transparency level of each pixel in the image. The alpha channel is used to create realistic effects such as shadows, reflections, and depth of field.
When animators create a character with transparent areas such as around the arms and body, these transparent areas are stored in the alpha channel. This allows animators to place the character onto different backgrounds or move elements around while keeping the transparent areas transparent. This process makes it easier for animators to composite various elements together seamlessly.
Alpha channels also play a crucial role in creating special effects like explosions and fire. These effects require layering several images on top of each other, with varying levels of opacity. The alpha channel allows animators to have precise control over how each layer appears with respect to other layers, making it easier for them to create realistic explosions or fire effects.
In addition to transparency, the alpha channel can store additional information such as matte data or object ID information. Matte data is used to separate an object from its background by defining a matte color; this technique is useful when compositing multiple elements together into one scene. Object ID information, on the other hand, identifies individual objects within an image, making it easier for post-production teams to apply specific effects or corrections on individual objects.
The use of alpha channels has become increasingly important in modern animation workflows due to their ability to streamline production processes and improve efficiency. Alpha channels enable artists and animators to work quickly and effectively without sacrificing quality or control over the final product.
In conclusion, the alpha channel is an essential feature of animation that allows artists and animators to create complex compositions and special effects. It is a powerful tool that enables animators to work efficiently, streamline their workflow, and create high-quality animations. As technology continues to advance, the use of alpha channels in animation will undoubtedly continue to grow and evolve.
Ambient sound adds depth and atmosphere to animated scenes, making them feel more lively and believable.
Ambient sound is super important in animation. It’s like the secret ingredient that brings the whole world to life. Just like how a painter adds layers of color to a canvas, animators carefully choose and mix ambient sounds to make their scenes feel real.
Think about a peaceful forest scene in a cartoon. You’d hear leaves rustling, birds chirping, and a stream flowing in the distance. These sounds make you feel like you’re right there in the forest. Without them, the scene would be kinda dull.
But ambient sounds do more than just set the scene. They also make you feel things. Like, the sound of thunder and rain instantly makes you feel tense in a stormy scene. And the busy sounds of a marketplace make you feel excited and alive in a city scene. It’s all about creating the right mood without saying a word.
For animators, ambient sound is like a magic wand. It helps them make worlds that feel real and grab your emotions. By using sound effects and background noise, animators can tell amazing stories and take you on epic adventures through their imagination.
Animation brings pictures to life by creating a series of slightly different drawings that, when flipped through quickly, create the illusion of movement. It can be done digitally or on paper. Think Toy Story or Spongebob Squarepants!
Animation is a unique art form that has come a long way since its inception in the early 1900s. It has evolved from traditional hand-drawn animation to computer-generated imagery (CGI) and other advanced techniques. The process of creating animated content has become more sophisticated and diverse, giving animators endless possibilities to showcase their creativity.
One of the earliest forms of animation is hand-drawn animation. This technique involves drawing each frame by hand on paper or using a digital drawing tablet. The frames are then printed onto film or digitized to create the final product. Hand-drawn animation has been used in classic Disney films such as Snow White and the Seven Dwarfs and The Lion King.
However, with the advent of computer technology, computer-generated imagery (CGI) has become increasingly popular. This process involves using computer software to create two-dimensional or three-dimensional objects and environments. The objects are then animated and rendered to create the final product. CGI has been used in films such as Toy Story, and Moana.
Stop-motion animation is another technique used to create animated content. This process involves taking photographs of real-life objects, or puppets, that are moved slightly between each photograph. When the frames are played back at a fast enough rate, it creates the illusion of movement. Stop-motion animation has been used in films such as Wallace and Gromit and Coraline.
Animation can be a powerful tool for storytelling, entertainment, education, and marketing purposes. Animated films such as Toy Story and Finding Nemo have captured the hearts of audiences worldwide with their engaging characters and compelling stories. Animated television shows like The Simpsons and SpongeBob SquarePants have entertained audiences for decades with their humor and wit.
Animated content can also be used for educational purposes, as seen in shows like Bill Nye the Science Guy and Dora the Explorer. These shows use animation to teach children about science, math, and other subjects in a fun and engaging way.
In addition, animation is often used in advertising to sell products. Animated commercials such as the Geico Gecko and the Coca-Cola polar bears have become iconic.
The possibilities for animation are endless, and with the use of new technologies and techniques, animation continues to evolve. With the rise of virtual reality (VR) and augmented reality (AR), there is potential for even more immersive animated experiences in the future.
The animation industry is growing rapidly, with more job opportunities than ever before. Animators can work on feature films, television shows, video games, advertisements, and many other forms of media.
Animation is an art form that has come a long way since its inception. It has evolved from traditional hand-drawn animation to computer-generated imagery (CGI) and other advanced techniques. Animation has the power to entertain, educate, inspire, and sell products. With new technologies and techniques emerging all the time, the future of animation looks bright.
Anti-aliasing smooths jagged edges of computer-drawn characters and objects by blending pixels together.
Animation is a form of art that involves creating moving images by manipulating static images in quick succession. It has become an integral part of the entertainment industry, with animations being used for various purposes such as movies, television shows, video games, and advertisements. However, one issue that animators face while creating digital graphics is aliasing.
Aliasing is a phenomenon that occurs when an image or graphic is displayed at a low resolution or high magnification. Due to the limited number of pixels available to render the image, jagged edges or stair-step-like lines are formed around the edge of shapes. This makes the overall image look rough and unfinished. To overcome this issue, anti-aliasing techniques are employed.
Anti-aliasing works by adding pixels with varying transparency around the edge of shapes to create a smoother transition from the edge to the background. The added pixels blend with the background color and reduce the appearance of jagged edges. The technique can be applied through software filters or hardware-based smoothing.
There are different types of anti-aliasing techniques available for animators and graphic designers to choose from based on their requirements and preferences. One common type is spatial anti-aliasing, which smooths out jagged edges by taking into consideration neighboring pixels during rendering.
Another type is temporal anti-aliasing (TAA), which smooths out flickering in animation caused due to motion blur or other factors. TAA works by analyzing multiple frames in sequence and blending them together to create a smoother final image.
In addition to improving image quality, anti-aliasing also helps reduce eye strain for viewers who may otherwise find it difficult to view jagged-edged images for extended periods.
Anti-aliasing has become an essential tool for animators and graphic designers who want their work to appear polished and professional-looking. It ensures that even when images are rendered at lower resolutions or magnified highly, they still look smooth and refined. With advancements in technology, anti-aliasing techniques are becoming more sophisticated and efficient, allowing animators to create high-quality animations with greater ease and precision.
Anticipation in animation: characters use movements or expressions to show what they'll do next. It adds realism and excitement for viewers.
Anticipation is not just limited to physical movements or actions, but can also be applied to facial expressions and dialogue. A character’s facial expression can give a clue to what they are thinking or feeling before they even speak. This helps to create a more nuanced and complex character that the viewer can empathize with. Similarly, anticipation in dialogue involves setting up the context for what a character is about to say. For example, if a character is about to reveal a secret, they may pause for a moment before speaking, building anticipation for the audience.
To create effective anticipation in animation, it is important to pay attention to timing and spacing. The preparation or anticipation phase should be longer than the primary action itself. This allows the viewer to fully understand what is about to happen and builds up the suspense. Spacing refers to the distance and speed of movement between poses. By using slow-in and slow-out techniques, animators can create a more natural and fluid movement that enhances the anticipation phase.
Anticipation can also be used in combination with other animation principles such as squash and stretch, exaggeration, and secondary action. Squash and stretch involves distorting the shape of an object or character during movement to emphasize weight and force. Exaggeration involves pushing movements beyond what is realistic or expected for comedic effect or emphasis. Secondary action refers to additional movements that occur alongside the primary action, such as hair bouncing or clothing swaying.
Anticipation is an essential principle of animation that adds depth, meaning, and realism to characters’ movements and actions. It helps to build up tension and excitement for the viewer, making the main action more impactful when it occurs. Anticipation can be used for comedic effect or exaggeration, adding personality and style to characters’ movements. To create effective anticipation in animation, it is important to pay attention to timing, spacing, and other animation principles such as squash and stretch, exaggeration, and secondary action. By incorporating anticipation into every movement, animators can create engaging and believable animations that capture the viewer’s attention.
Aspect ratio is the shape of a picture, important in animation for proper screen fit. Common ratio is 16:9 - 16 units wide and 9 units tall.
Aspect ratio is an essential aspect of animation that can have a significant impact on the final product’s overall look and feel. In animation, aspect ratio refers to the relationship between the width and height of the animation frame and is usually expressed as a ratio such as 4:3 or 16:9. Choosing the appropriate aspect ratio is crucial in creating an optimized animation that suits its intended display format.
The aspect ratio of an animation can significantly affect how a scene looks and feels. For example, a wider aspect ratio like 16:9 can give animators more space to showcase scenic landscapes or panoramic shots. This can be useful in creating an immersive experience for viewers by allowing them to take in more visual information at once. On the other hand, a narrower aspect ratio like 4:3 may be better suited for close-ups or portraits, allowing animators to focus on important details without overwhelming the audience with too much visual information.
One common aspect ratio used in modern animation is 16:9, which has become increasingly popular due to its compatibility with modern devices like smartphones, laptops, and TVs. However, it’s important to note that not all animations are created equal, and choosing the right aspect ratio largely depends on the content being created.
For instance, traditional hand-drawn animations often have a 4:3 aspect ratio since it was widely used during the era of analog TV sets. On the other hand, digital animations created for modern devices may require a wider aspect ratio like 16:9 or even 21:9 to ensure optimal viewing experiences across different devices.
Moreover, some animators may choose non-standard aspect ratios to create unique visual experiences. For example, an animator may opt for a square aspect ratio instead of a rectangular one to create an Instagram-friendly animation that looks great on social media.
The aspect ratio of a video is most clearly visible when watching a movie at home, since Cinema screens often have very different ratios to home televisions. When you watch these movies at home you will get black bars at the top and bottom of the screen. Older movies and television had a squarer ratio and this introduces black bars at the sides of the screen.
In addition to determining the overall look and feel of an animated scene, choosing the right aspect ratio can also impact the animation’s budget and production timeline. For example, a wider aspect ratio may require more time and resources to render since there is more visual information to process. Therefore, animators must carefully consider the aspect ratio and its impact on their production workflow.
Bezier curve: used in animation to create smooth shapes. Named after mathematician Pierre Bezier. Control points adjust line curvature for various shapes like circles, waves, or hearts.
Bezier curves are a fundamental mathematical concept in the animation industry that has revolutionized the way we create smooth, curved lines and shapes.
When animating the use of Bezier curves has made it possible to achieve precise control over motion paths for objects in an animation. The movement path is defined by a set of control points that determine the objects direction making it easy to create complex animations with multiple layers.
Bezier curves are also widely used in font design and vector illustrations, where they are used to create scalable letterforms and intricate shapes. In font design, Bezier curves are used to maintain the quality and shape of letters even when enlarged or reduced. Similarly, in vector illustrations, they are used to create complex shapes that can be easily scaled without losing detail.
Another advantage of Bezier curves is their ability to provide precise control over animation timing and easing. Timing refers to how fast an object moves along its path, while easing refers to its acceleration or deceleration as it moves along its path. With Bezier curves, animators can adjust both timing and easing with great precision, making it possible to create more realistic and dynamic animations.
A bitmap is a picture made of tiny pixels, each with its own color. When zoomed in, you can see the individual pixels that create the image.
Animation relies heavily on the use of various types of digital images. One such type is a bitmap. Bitmaps are digital images that represent an image as a grid of pixels, where each pixel is assigned a specific color value. They are also known as raster graphics and are commonly used in animation because they can be easily edited and manipulated using software tools.
Bitmap animation is a technique that utilizes a sequence of bitmap images to create the illusion of motion. Each image, known as a frame, is displayed in rapid succession, resulting in a smooth and flowing animation. By manipulating and displaying these individual frames, bitmap animation brings life and vibrancy to digital artwork, games, and other visual media.
To create a bitmap, an image is drawn, captured, or scanned and converted into a matrix of pixels. The resolution of a bitmap image is determined by the number of pixels per inch (PPI) or dots per inch (DPI). Higher resolutions result in more detailed images with smoother lines and curves, but also require more memory and processing power to display.
Bitmaps are often used in animation for creating backgrounds, textures, and other detailed visual elements. They can also be used to create animated sequences by combining multiple bitmap frames into a sequence of images that are played back rapidly to create the illusion of motion.
Bitmamp file formats include:
(More file formats);

There are some limitations to using bitmaps in animation. Because bitmap images are made up of individual pixels, they can become pixelated or blurry when scaled too large or too small. This can result in a loss of detail and quality in the image.
To avoid this issue, animators may choose to use vector graphics instead of bitmaps for certain elements in their animations. Vector graphics are created using mathematical equations to define lines and shapes instead of individual pixels. This means that they can be scaled up or down mathematically, which in turn means they do not lose quality, or becoming pixelated.
Brush Ninja Animator uses vector graphics for the brush strokes and stickers. It also has the option to add bitmap images as backgrounds, and members can use their own bitmap images to animate with.
Bitmap images offer a high level of flexibility and control over the appearance of an image and can be easily edited and manipulated using tools like Photoshop. By understanding the strengths and weaknesses of different types of digital images, animators can make informed decisions about which type to use for different elements in their animations.
Blue screen is a special background in film, aiding animators to add images and characters. It can be easily replaced, making animations more dynamic!
Blue screen, also known as Chroma Keying or Green Screen (and sometimes other clours), is a technique commonly used in stop-motion animation and filmmaking to create scenes that would normally be impossible or too expensive to shoot in real life. The technique involves replacing a specific color (usually blue or green) in the background with a different image or footage. This allows animators and filmmakers to composite different layers of animation and create special effects.
In animation, blue screen is often used when animating characters that need to interact with real-life objects or people. By filming the scene with a blue screen background, animators can easily select and remove the background and replace it with a different background. This process requires careful planning and attention to detail to ensure that the final product looks seamless and realistic.
The blue colour is used because it is not a common colour in nature, making it easier to remove from the background. It also contrasts well with most other colours, making it easier to replace with a different background. The different colours are selected based upon the scene being filmed and the colours it contains. If the characters or environment uses a lot of blue then a green screen may be used instead.
One example of blue screen being used in animation is in the popular children’s show Sesame Street. The show uses blue screen technology to create scenes where the human actors interact with animated characters such as Elmo or Cookie Monster. By using blue screen, the show’s producers are able to seamlessly blend live action footage with animated characters, creating a magical world for children.
Another example of blue screen being used in animation is in the 2009 film Avatar. The film used a combination of live-action footage and computer-generated imagery (CGI) to create its lush alien world of Pandora. To achieve this, the filmmakers used blue screen technology extensively throughout production. By filming actors against a blue screen, they were able to replace the background with CGI environments that perfectly matched the performance.
Using blue screen in animation requires both technical and creative skills. Animators must plan their shots and lighting carefully to ensure that the characters match the background that will be inserted.
Bone animation creates movement in animated characters by using a skeleton inside the character. Each bone represents a body part, allowing animators to create realistic movements. It's like playing with a computerized puppet!
Bone animation is a technique is used to create realistic, fluid movements of characters or objects in video games, films, and television shows. The technique involves creating a hierarchical structure of bones that are attached to a mesh or skin of the character/ object.
The bone structure acts as a framework for deformation of the mesh/ skin, allowing for precise control over how the character/ object moves. Each bone has its own pivot point, and when moved, it affects the position and orientation of the surrounding bones and the mesh. This allows animators to manipulate the position, rotation, and scale of each bone to achieve the desired movement of the character/ object.
One of the benefits of using bone animation is that it allows for complex movements that would be difficult to achieve through traditional methods. For example, in video games, characters can jump, run, and fight with realistic movements thanks to bone animation techniques.
Another advantage of using bone animation is that it allows animators to save time by reusing animations across different characters by simply adjusting the bone structure. This means that animators can create a library of animations that can be used for multiple characters or objects.
Bone animation has evolved significantly over the years with advancements in technology and software tools. Nowadays, most 3D modeling and animation software includes tools for creating bone structures quickly and easily. These tools also allow animators to adjust the weight or influence each bone has on the surrounding mesh/ skin.
Despite its many benefits, bone animation does have some limitations. One limitation is that it requires significant planning before any actual animation takes place. Animators need to carefully consider how they will create their bone structure so that it supports all possible movements required for their character/object.
Another limitation is that if not done correctly, bone animation can result in unnatural-looking movements. Animators need to take care when adjusting each bone’s position/ rotation/ scale to ensure that the movement looks realistic and fluid.
Bounce in animation adds energy and personality by making characters or objects move up and down repeatedly, like a bouncing ball. It makes animation lively and playful, as seen with Tigger from Winnie the Pooh.
In animation, a bounce can be considered a significant aspect of movement and motion. It adds a unique and lively touch to the scene, making it more attractive and captivating for the viewers. A bounce is an essential element of animation that involves an object or character hitting a surface and rebounding back with elasticity.
The use of bounce animation in cartoons and animated films can create a sense of energy and playfulness in the scene while also providing information about the weight, physics, and realism of objects in motion. This effect can serve to enhance the overall quality of the animation, making it more realistic and engaging for the audience.
To achieve an effective bounce effect in animation, timing, spacing, and easing of motion must be carefully considered. The animator must have an in-depth understanding of how objects react to forces acting upon them. They should also take into account the size and shape of the object being bounced as well as the properties of the surface it is bouncing off.
Timing is one of the vital factors that contribute to creating an effective and realistic bounce effect. The timing should reflect how fast or slow an object rebounds after hitting a surface. For instance, if an object hits a hard surface like a wall or floor, it should rebound quickly with less hang time. Conversely, if it hits a softer surface like a cushion or pillow, it will rebound slower with more hang time.
Spacing is another crucial aspect that must be considered when designing a bounce effect in animation. Spacing refers to how much distance an object covers during its motion. To create a convincing bounce effect, the spacing should be consistent throughout the entire motion.
The easing of motion refers to how smoothly an object moves through space during its motion. Easing can add depth to an animation by creating subtle variations in speed during movement. A good animator will use easing techniques to adjust timing and spacing effectively, resulting in a more realistic bounce effect.
Broadcast standards ensure that cartoons on TV are suitable for all ages. This includes no violence or inappropriate language, and promoting kindness and respect between characters.
In addition to technical specifications, broadcast standards in animation also cover content guidelines. These guidelines ensure that the content is appropriate for the intended audience and adheres to any legal or regulatory requirements.
For example, children’s animated shows must adhere to stricter content guidelines than adult-oriented shows. Violence, sexual content, and language are typically monitored more closely in children’s programming. Additionally, broadcasters may have their own specific content guidelines that must be followed.
Following broadcast standards in animation is not only important for television broadcast but also for streaming platforms such as Disney+, Netflix and Hulu. These platforms have their own technical specifications and guidelines that must be followed to ensure that the content is compatible with their systems.
In terms of content guidelines, streaming platforms typically have more lenient restrictions compared to traditional broadcasters. However, they still have their own standards that must be followed. For example, Netflix has a strict policy against nudity and explicit sexual content in its original programming.
Following broadcast standards in animation is crucial for ensuring that the content meets the technical requirements necessary for broadcast on television or streaming platforms. Adhering to these standards helps maintain consistency in terms of quality and ensures that the content is appropriate for the intended audience. As technology continues to evolve and new platforms emerge, it will be important for animators to keep up with changing technical specifications and guidelines to ensure that their work can be seen by audiences around the world.
The .brushninja file format is a project file used to save work-in-progress animations so they can be reopened and edited later.
It is specific to the Brush Ninja Animation Maker.
It stores everything needed to reopen an animation exactly as it was left, including frames, drawings, and timing. Unlike an exported GIF or image, a .brushninja file may not be a finished animation. It is designed for editing, not for sharing as final work.
More file formats;
A .brushninja file allows an animation to be continued later, moved between devices, or reopened after closing the browser. Teachers often use these files to prepare starter projects, and students can use them to continue longer pieces of work across multiple lessons.
Because the file keeps the animation editable, changes can still be made to drawings, frames, and timing.
This format is most useful while an animation is still being worked on. It is ideal for saving progress, resuming work on another device, or sharing an editable project with someone else.
When an animation is finished and ready to be shared, it should be exported as a GIF or image instead.
To save a project, use the Save option in Brush Ninja. This downloads a .brushninja file to the device being used.
To continue working later, open Brush Ninja again and use the Open option to load the file. The editor will restore the animation so that editing can continue.
.brushninja files only open inside Brush Ninja and cannot be viewed like images or videos. They should be named clearly so they can be identified easily, especially when working on shared devices.
A .brushninja file is an editable project file, not a finished animation. It is used to save progress, move work between devices, and continue editing later. Final work should always be exported as a GIF or image for sharing or submission.
A call sheet is an organizational tool in animation production that communicates daily goals and responsibilities.
A Call Sheet is a detailed document distributed to the animation team (and often other departments) that outlines the specific work expected to be completed during a particular day or production period. It is modeled after similar documents used in live-action film and TV production.
A call sheet helps keep the animation production organized and on track by clearly communicating daily goals and responsibilities. It ensures that everyone knows what they need to work on, when it’s due, and who to contact for questions or issues. This is especially important in larger productions where many artists are working on different parts of the project simultaneously.
Camera angle in animation captures the scene. It affects how we perceive and feel about the story, like taking a picture from different angles.
The camera angle in animation refers to the position of the camera in relation to the subject or object being filmed. It is a fundamental tool used by animators to convey different emotions, perspectives, and meanings to the audience.
Camera angles are not specific to 3d animation. Whilst there is no camera to manipulate in 2d animations, the same principles apply. The camera angle is the position of the viewer relative to the subject.
There are several types of camera angles used in animation, including:
The use of different camera angles can greatly affect how an audience perceives a scene in an animated film or TV show.
Camera shake in animation creates a shaky or moving camera effect for excitement or chaos. It immerses the audience in action scenes by manipulating angles and movements.
Camera shake is a crucial visual effect in animation that has the power to enhance and elevate the impact of a scene. It is widely used across various genres of animation, including action movies, horror films, and other genres where the goal is to create an intense and immersive viewing experience for the audience. The effect is used to create the illusion that the camera is shaking or vibrating, simulating the movement of a handheld camera or generating a sense of chaos and instability in a scene.
In traditional animation, camera shake was achieved by manually shaking the camera during filming. This technique was quite effective but had its limitations as it was difficult to control the intensity and duration of the shake. However, with advancements in technology, digital animation has made it much easier for animators to create camera shake using software.
Digital animation provides animators with more control over camera shake as they can add motion blur, distortion, and other visual effects. The software allows animators to manipulate various elements of the scene, such as lighting, textures, and colors, to create a realistic shaking effect that enhances the overall mood and tone of the scene.
Camera shake is an effective technique that can be used to enhance action sequences or create suspense in a scene. In action movies, camera shake is often used during fight scenes or explosions to give viewers a sense of being in the middle of all the chaos and violence. In horror movies, camera shake can be used to create a sense of tension and fear by making viewers feel like they are experiencing what is happening on screen.
Additionally, camera shake can also be used creatively to achieve different effects in animation. For example, it can be used to show the impact of something heavy hitting the ground or simulate an earthquake or tremor. Camera shake can also be used as a transition effect between scenes or shots.
Camera shake is an important visual effect in animation that plays a critical role in enhancing scenes’ overall impact. With advances in technology, animators can now use digital animation software to create camera shake effects that are more controlled and effective than traditional methods. When used correctly, camera shake can create a powerful, immersive viewing experience for the audience, making it an essential tool for any animator.
Casting in animation is the process of selecting voice actors who can infuse personality, emotion, and authenticity into the characters they portray.
Casting in animation is all about picking the right voices to bring characters to life. The casting director plays a big role in finding actors who match the project’s vibe and can make characters feel real.
They listen to auditions from voice actors to see how well they fit the character. Things like voice range, acting skills, and past work help decide who’s best for each role.
Good casting is super important in animation. Talented voice actors make characters memorable and keep viewers hooked. They add depth to the story and make emotions feel real, from happiness to sadness and everything in between.
Choosing the right voices sets the tone for the whole project. When animators pick actors who nail their characters, they create worlds full of personality that people love. Casting in animation is a special mix of talent and creativity that makes or breaks a production.
Cel animation is hand-drawn pictures on transparent sheets layered and photographed to create movement. It's like a flipbook, used in classic cartoons.
Cel animation is a highly intricate and time-consuming process that requires a great deal of skill and patience from the animators involved. Each individual frame of animation must be carefully planned and executed in order to ensure that the movement of the characters and backgrounds is smooth and fluid. This means that even a short animated sequence can take weeks or months to create.
The hand-drawn nature of the animation allows for a level of detail and nuance that is difficult to achieve with digital techniques, which can often feel cold or sterile by comparison. This is why many classic animated films such as Snow White and the Seven Dwarfs, Bambi, and The Little Mermaid continue to be loved by audiences today.
Despite its popularity in the early days of animation, cel animation has largely been replaced by digital techniques in recent years. This shift has been driven in large part by advances in technology that have made digital animation faster, cheaper, and more versatile than traditional methods. However, there are still some animators who prefer to work with cel animation for its unique look and feel.
There is also a trend towards trying to replicate cel animation styles using modern techniques. Cartoon Saloon are particularly adept at this making Song of the Sea, Wolfwalkers, and The Secret of Kells. They work digitally, using Moho animation software, but they have developed a style that looks like it was created using traditional cel animation techniques.
In addition to its use in animated films and TV shows, cel animation has also been used in other forms of media such as video games, commercials, and music videos. One notable example is the popular video game Cuphead, which was created using traditional cel animation techniques to give it a distinctive 1930s cartoon style.
While cel animation may no longer be as widely used as it once was, it remains an important part of the history and evolution of animation as an art form. Its unique look and feel continue to inspire new generations of animators, who are constantly finding new ways to push the boundaries of what is possible with this timeless technique.
Character animation brings cartoon characters to life through movement and actions. It involves creating poses, expressions, and actions through drawings or digital images, which are then combined to make the character appear alive on screen.
Character animation is a critical aspect of animated content. Animators, with their technical and artistic abilities, bring life to characters and make them appear believable.
In 3d cartoons this process involves creating models of characters, rigging them with skeletons, and then animating them by manipulating these digital assets frame by frame. In 2d cartoons the process is a lot more laborious, involving drawing each frame by hand, over and over again.
Whatever the technology the end goal is to create a seamless performance that appears as if the character is alive. It is used in various media forms, such as movies, television shows, video games, and commercials.
The process of character animation begins with the concept art stage. Here, artists create designs for characters based on the requirements of the project or story. The designs should be appealing to the audience, and they should reflect the personality and characteristics of the character.
When designing characters it’s important to think about the silhouette. The silhouette is the outline of the character, and it’s what makes them recognizable. It’s important to make sure that the silhouette is clear and easy to read, so that the character can be identified from a distance. This is the reason characters in animated films often have exaggerated features, such as large eyes or ears.
Character animation is a complex process that requires technical skills and artistic abilities. Animators bring characters to life by creating models, rigging them with skeletons, and animating them frame by frame. The end result is a seamless performance that appears lifelike and believable. It is an essential aspect of animated content and is used in various media forms such as movies, television shows, video games, and commercials.
Character Design Sheets are crucial for animators. They provide detailed drawings of a character ensuring consistency throughout the show.
Character Design Sheets, also known as model sheets, are essential tools used in the animation industry to maintain consistency and provide detailed information about a character’s appearance, proportions, and personality. These sheets act as a visual reference for animators, artists, and other team members involved in the production process.
Examples of Disney Character Design Sheets:
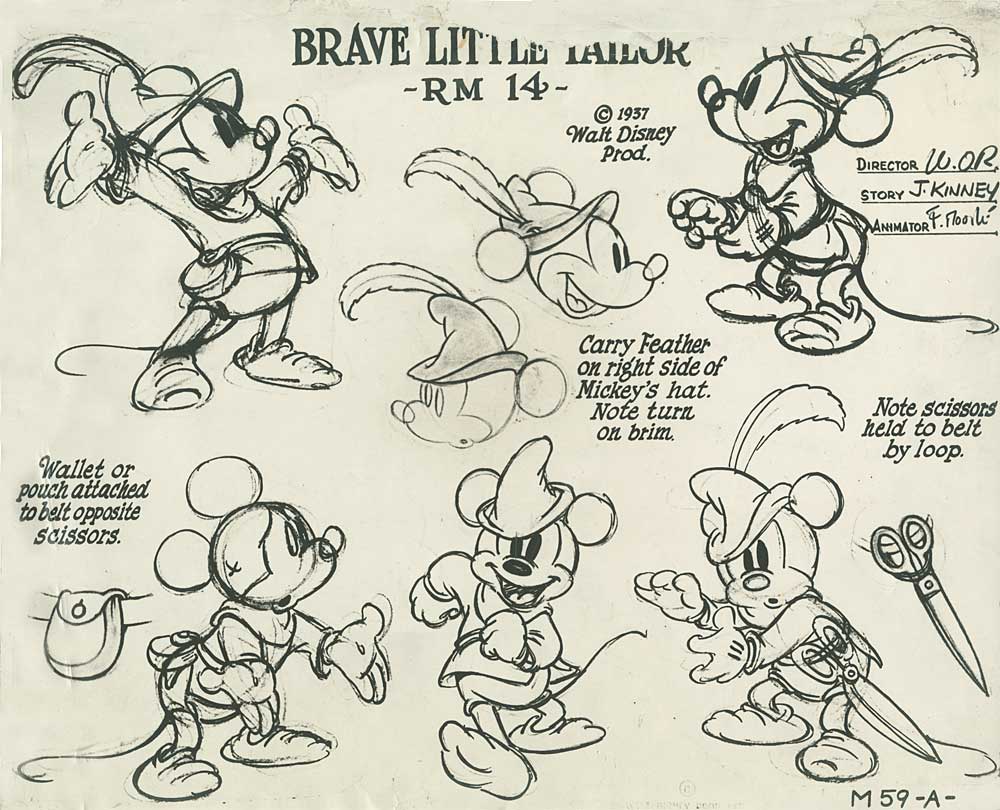
Mickey Mouse Character Sheet for the Brave Little Tailor
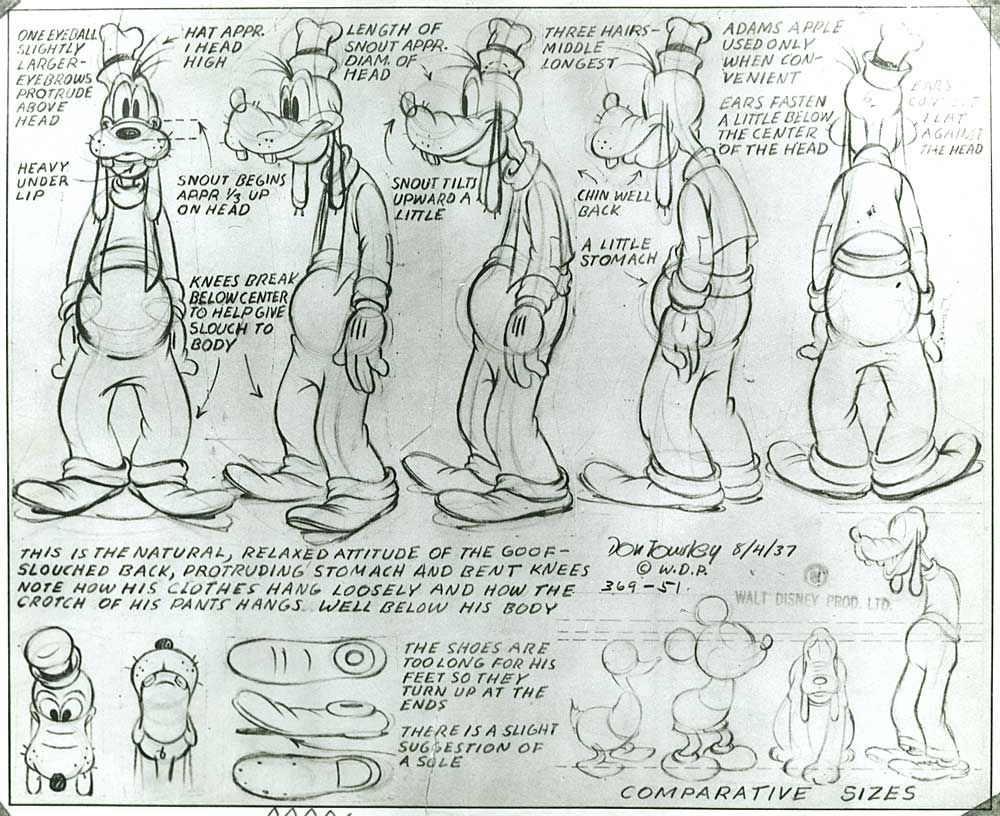
Goofy Character Model Sheet
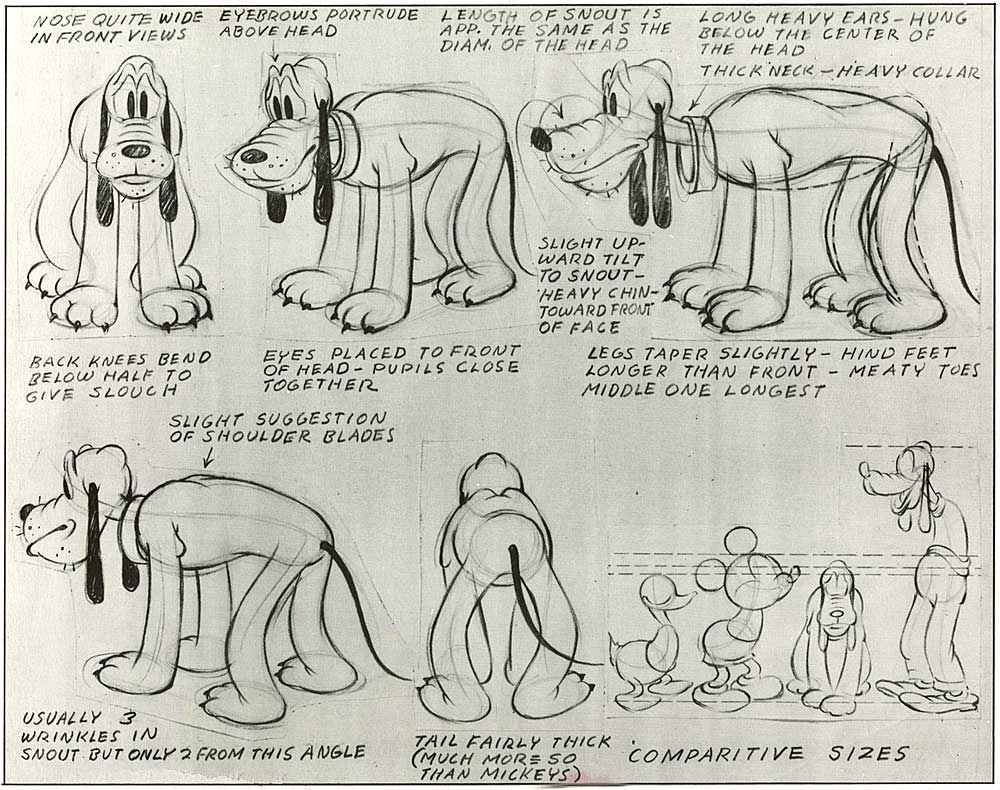
Pluto Design Sheet
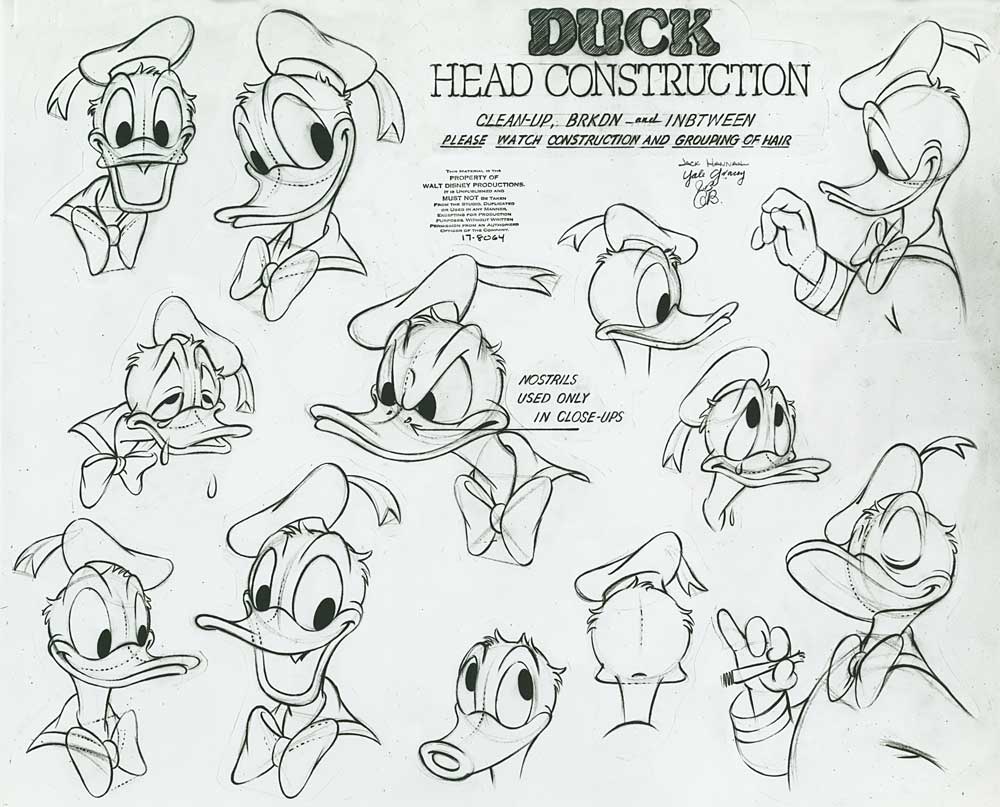
Donald Duck Head Construction Sheet
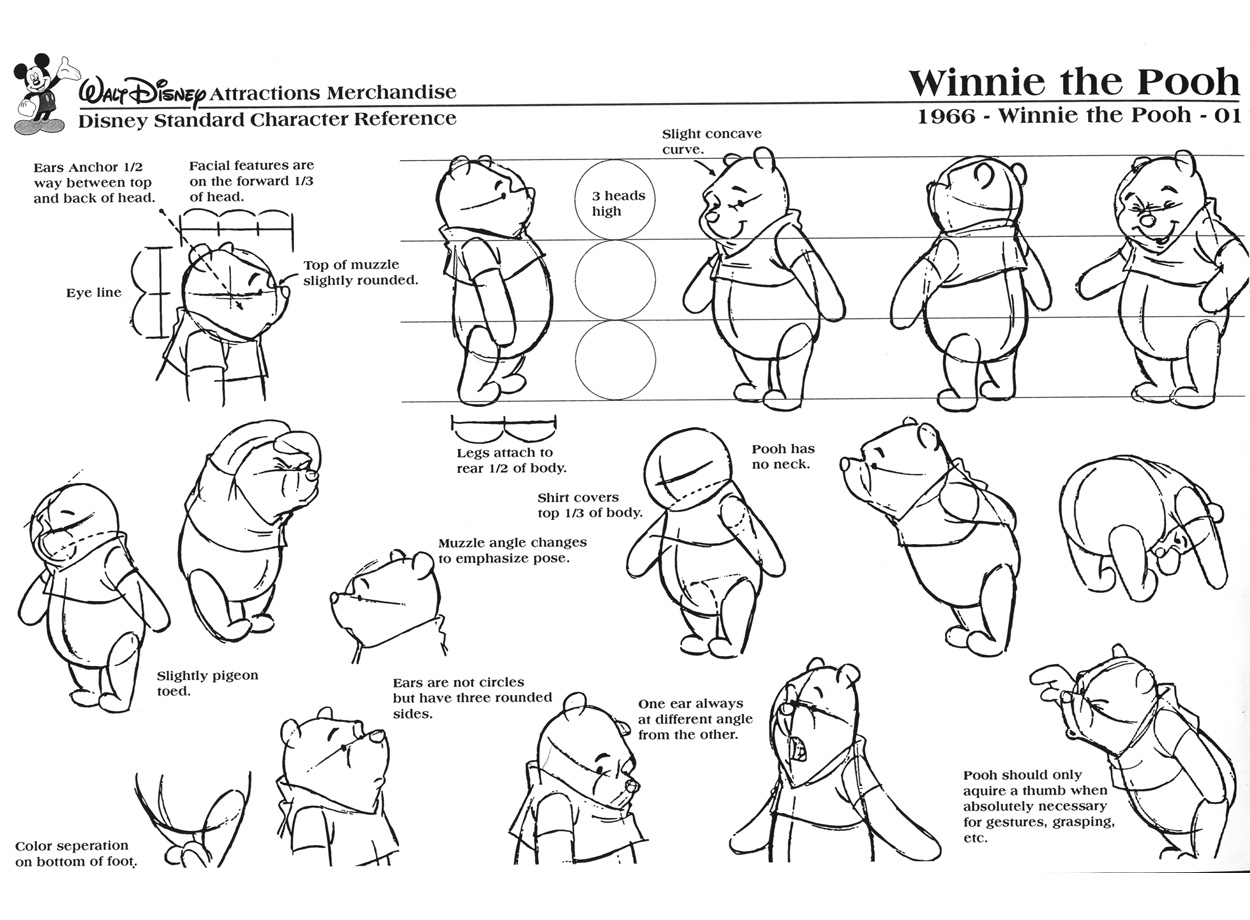
Whinnie the Pooh Character Reference Sheet
Here are some key aspects of Character Design Sheets:
Appearance: Character Design Sheets showcase various angles and poses of a character, including front, back, side views, and close-ups of important features such as face expressions or special body parts like hands or feet. These details help artists maintain consistency while drawing the character throughout the animation.
Proportions: It is crucial to establish consistent proportions for characters within an animated project. Character Design Sheets provide accurate measurements and guidelines for body proportions to ensure that characters appear consistent from one frame to another.
Color Palette: The sheets often include color swatches or guidelines indicating the specific colors to be used for different parts of the character’s design. This helps in maintaining uniformity across all animations featuring that particular character.
Costume and Accessories: Character Design Sheets display different outfits or costumes that a character might wear during specific scenes or situations. Additionally, any accessories like hats, glasses, jewelry are also shown to ensure continuity throughout the animation.
Personality: Character Design Sheets also provide information about a character’s personality, including their likes and dislikes, hobbies, and other traits. This helps animators create more realistic characters by giving them a better understanding of the character’s background and motivations.
Character Design Sheets are an essential part of the animation process. They provide detailed information about a character’s appearance, proportions, and personality, which helps animators maintain consistency throughout the animation. These sheets also help artists create more realistic characters by giving them a better understanding of the character’s background and motivations.
Cinematic lighting in animation is all about creating a visually captivating scene.
Cinematic lighting is key in animation for setting the scene. It’s like painting with light to create the right mood and vibe. Animators borrow techniques from movies to make their visuals pop.
They use different types of lights strategically:
By tweaking the intensity, color, and direction of these lights, animators can create just the right atmosphere for each scene.
But cinematic lighting isn’t just about making things bright. Special effects like volumetric lighting add depth by showing how light interacts with the air. Lens flares make scenes feel real, and effects like fog or haze add drama.
In animation, cinematic lighting is like magic paintbrushes that make worlds come to life. It’s all about creating the perfect look and feel for every scene.
By combining these techniques thoughtfully, animators can create immersive worlds that captivate viewers’ attention and evoke powerful emotions. For example, using harsh shadows and high-contrast lighting can convey tension or mystery in a scene, while soft, diffused lighting may evoke a sense of tranquility or romance.
Claymation: characters made of clay moved incrementally to create movement. Like playing with clay and telling stories with your own characters!
Claymation, a form of stop-motion animation, has been around for over a century and has been used in various forms of media. The technique involves creating characters and scenes out of clay or other malleable materials, such as plasticine or silicone, and manipulating them frame by frame to create the illusion of movement.
One of the most significant advantages of Claymation is its versatility. It can be used to create both whimsical and serious works, and it can be combined with other styles of animation or live-action footage. This flexibility has allowed Claymation to be used in various mediums, including feature films, television shows, music videos, commercials, and even video games.
One of the most iconic examples of Claymation is the Wallace and Gromit series created by Aardman Animations. The series follows the adventures of an eccentric inventor named Wallace and his intelligent dog Gromit. The show’s popularity led to several spin-offs, including a feature-length film called “Wallace & Gromit: The Curse of the Were-Rabbit,” which won an Academy Award for Best Animated Feature.
Another popular example is “Chicken Run,” also created by Aardman Animations. The film tells the story of a group of chickens trying to escape from a farm before they are turned into pies. Like Wallace and Gromit, “Chicken Run” was well-received critically and commercially.
Creating Claymation requires a lot of patience and attention to detail. Animators must carefully plan each shot before beginning to manipulate the clay figures. They often use armatures or wire skeletons to give the characters stability and allow for more complex movements. Once everything is in place, they take a photo of the scene and carefully adjust the clay figures before taking another photo. This process is repeated hundreds, if not thousands, of times until the desired animation is achieved.
Clean-up in animation is the process of refining sketches to create polished and professional final drawings, ensuring smooth and precise visuals.
Clean-up is an essential part of the animation process to ensure that the rough sketches or storyboards are refined and polished into a final professional-looking animation. This step involves cleaning up the rough lines, erasing unnecessary marks, and adding additional details. The primary goal of clean-up is to create a final drawing that is clear, concise, and visually appealing.
There are two primary methods of clean-up in traditional hand-drawn animation. The first method involves tracing the rough sketches onto a new sheet of paper using cleaner lines. This method is commonly used for animations created with pencil and paper. The second method involves using a lightbox to trace the rough sketches onto a clean sheet of paper using ink or paint.
Clean-up in digital animation can be done using various software tools such as vector-based drawing programs or specialized animation software. These software tools allow animators to create precise and clean drawings quickly and efficiently.
Vector-based drawing programs such as Adobe Illustrator or Inkscape allow animators to create scalable vector graphics that can be easily edited and manipulated. These programs are commonly used for creating character designs, backgrounds, or props that need to be integrated into an animation.
Specialized animation software such as Toon Boom Harmony or Anime Studio Pro offers a more comprehensive set of tools for creating animations. These software tools allow animators to create frames, add keyframes, control timing, and adjust colors and lighting within a single application.
Clean-up is an essential step in creating high-quality animations because it ensures that the final product looks polished and professional. Without clean-up, animations can appear rough and unfinished, which can detract from their overall impact and effectiveness. Clean-up also helps to ensure consistency in style, design, and color throughout an animation.
A close-up shot in animation zooms in on a specific detail or part of a character, object, or scene.
Close-ups in animation zoom in on specific details, like a character’s face or an important object. They’re great for showing emotions and grabbing the audience’s attention without using words.
By focusing on expressions or actions, animators make viewers feel connected to the characters and the story. Close-ups also help highlight important things in the scene, like clues or objects that are key to the plot. This makes it easier for the audience to understand what’s going on and enjoy the animation.
Color correction adjusts colors in an animated show to enhance their appearance and match the story's mood, making the animation more captivating for viewers.
Color correction is an essential part of the animation process as it helps to convey the intended message of the animated content. It is a delicate process that requires careful consideration and attention to detail. Animation color correction can be done in various ways, and this article will explore some of the techniques used in the industry.
One of the most common techniques used in animation color correction is adjusting the white balance. This technique involves removing any unwanted color casts that may have occurred during filming or post-production. A color cast is when white areas in an image appear to have a tint of color. Adjusting the white balance ensures that all colors in the animation are accurate.
Another important technique used in animation color correction is increasing contrast. Color contrast involves changing the difference between the colours, making the blacks blacker and the whites whiter. This technique makes colors pop more and enhances the overall visual appeal of the animation. Increasing contrast also helps to create depth, making the animation look more lifelike.
Color desaturation is another popular technique used in animation color correction. This technique involves reducing the amount of color in an image (making colours closer to grey) to create a more muted or subtle look. Desaturating colors can help to create a specific mood or atmosphere, such as a somber or melancholic feel.
Tweaking hue and saturation levels is another technique used in animation color correction. This technique allows animators to adjust specific colors, such as skin tones, to achieve the desired look or feel. For example, tweaking hue and saturation levels can help to make skin tones appear warmer or cooler.
There are various software tools available that can assist animators with color correction. Adobe Premiere Pro and DaVinci Resolve are two popular software tools used in the industry. These tools offer a wide range of features and options for adjusting colors, including automatic color correction tools that can save time and effort.
Color grading is used to enhance the visual storytelling experience in animation by adjusting colors, tones, and contrast to create specific moods, atmospheres, and styles.
Color grading is super important in animation. It’s like painting with colors to make the story come alive. Animators use it to create moods, show different places, and keep everything looking consistent.
They tweak things like brightness, contrast, and saturation to set the right vibe for each scene. For example, a spooky forest might have dull colors to make it feel mysterious.
Color grading also helps distinguish between different places or times in the story. By using different color schemes, animators can guide viewers through the plot and make scene changes clear. Warm colors might show a busy market, while cool colors might represent a futuristic city.
Keeping colors consistent is key too. It makes the animation flow smoothly and brings everything together visually. Plus, it adds a unique style to the animation, reflecting the animator’s creative vision.
In short, color grading is like adding the finishing touches to an animated masterpiece, making sure every frame looks just right.
Compositing in animation combines various elements to create a complete picture, similar to solving a puzzle with different colored and shaped pieces.
In the world of animation, compositing can make or break a project. It is the final step in the animation pipeline and requires meticulous attention to detail. Compositing involves taking all of the individual elements that have been created throughout the production process and combining them into a cohesive scene.
When it comes to compositing, there are several key elements that need to be taken into consideration. Firstly, there is the background or environment. This is often created separately from the characters and other objects. The background might be a simple image or a complex 3D environment, but regardless of its complexity, it needs to be integrated seamlessly into the final scene.
Next, there are the characters themselves. These will have been created separately from the background and may have their own unique lighting and shading properties. The challenge in compositing is to ensure that all of these elements come together naturally and realistically.
Special effects are another important part of compositing in animation. These can include explosions, fire, smoke, and other visual effects that add drama and excitement. When adding special effects, attention must be paid to how they interact with the other elements in the composition.
One of the most important aspects of compositing is lighting. This can make or break a scene, as it has a huge impact on how objects are perceived by the viewer. Lighting can create mood and atmosphere in a scene, as well as highlighting certain elements and creating depth.
When compositing elements you need to make sure the lighting matches across the characters, environment and objects. If it doesn’t match, the scene will look unnatural and disjointed.
While compositing may seem like a complicated process, modern software tools have made it easier than ever before for animators to create stunning scenes. Programs like Adobe After Effects and Nuke allow for precise control over every element in a composition, from the timing of individual frames to the opacity and blending mode of each layer.
Composition is arranging elements in an image to make it attractive. Animators do the same with their animations to create a visually appealing story.
Composition in animation is an essential part of creating visually engaging stories that convey the intended message effectively. It is a technique used to arrange visual elements within a frame or scene in a way that creates depth and dimensionality. When done correctly, it can help elevate the quality and impact of an animation.
One of the key aspects of composition in animation is framing. This involves selecting the appropriate camera angle and distance to capture the scene effectively. The chosen frame should be able to capture the important elements of the scene and convey the intended message effectively.
Another important technique used in composition is the rule of thirds. This involves dividing the frame into thirds, both horizontally and vertically, with important elements placed at the intersections. The rule of thirds helps to create balance within the frame while also guiding the viewer’s eye towards important elements.
Balance is another crucial element in composition. This involves distributing visual elements evenly across the frame to create a sense of harmony. A well-balanced scene can help draw viewers’ attention to important elements within the frame.
Contrast is another technique used in composition that can be used to create visual interest and draw attention to specific parts of the frame. This involves using contrasting colors, shapes, and textures to make certain elements stand out.
Overall, composition plays a vital role in creating visually appealing animations. When done well, it can help convey emotions, set moods, and guide viewers’ attention towards important elements within a scene. Animators who understand the importance of composition are better equipped to create animations that resonate with audiences and leave a lasting impact.
Concept art is the pre-animation design process for characters, backgrounds, and objects in an animation. It helps make the cartoon world feel real and exciting!
In animation, the importance of concept art cannot be overstated. It sets the tone for the entire project and is essential in bringing the director’s vision to life. Concept art can also be used as a tool to pitch an idea or secure funding for a project. In this way, it serves as a crucial step in the pre-production process.
Character designs are an integral part of concept art. They are often the first thing that comes to mind when people think of animation. Character designs must be both visually appealing and functional. The design should reflect the character’s personality and traits while also allowing for ease of movement and expression. This is where concept artists come in, creating sketches and illustrations that give animators a clear idea of what the character should look like.
Concept art is often not final art, a lot of it can be ideas that are never used. It’s a way for the director to get their ideas out there and see what works and what doesn’t. Sometimes designs will be made for one thing, and then used for something totally different.
Background art is another important aspect of concept art. It helps establish the world in which the characters live and creates a sense of atmosphere and mood. Background artists must consider factors such as lighting, color schemes, and perspective when creating their work.
Props are another element that concept artists create designs for. They include objects such as weapons, vehicles, furniture, and other items that characters interact with in the story. These designs must be consistent with the overall style of the animation.
Color schemes are also key in concept art. The colors used can evoke emotions and set the tone for a scene or even an entire project. Color theory plays an important role here, as certain colors have specific meanings and associations.
Concept art is an essential part of animation production. It provides direction for animators and ensures consistency in design throughout a project. Concept artists use various techniques and tools to create highly detailed artwork that reflects the director’s vision for the project. Whether it’s character designs, background art, props, color schemes or lighting, concept art plays a vital role in bringing an animation project to life.
Continuity editing is a style of film editing that aims to maintain a smooth and seamless flow of visual information, ensuring that the action in a scene appears logical and coherent to the viewer.
Continuity editing is a style of film editing that aims to maintain a smooth and seamless flow of visual information, ensuring that the action in a scene appears logical and coherent to the viewer. This editing technique is commonly used in animation to create a sense of continuity and realism within the animated world.
In continuity editing, the editor pays close attention to the spatial and temporal relationships between shots. This means ensuring that there is consistency in terms of characters’ positions, movements, and actions from one shot to the next. For example, if a character is shown holding an object in one shot, continuity editing would require that the object be present in subsequent shots to maintain visual consistency.
Additionally, continuity editing involves maintaining consistent visual elements such as lighting, props, costumes, and set design throughout a scene or sequence. This helps to create a sense of coherence and believability for the viewer, allowing them to become fully immersed in the animated world without being distracted by inconsistencies.
Cross-cutting allows animators to show multiple events unfolding simultaneously in different locations.
Cross-cutting, also known as parallel editing, is a key technique in filmmaking, used in both live-action and animation. It shows different events happening at the same time in different places. By switching between these scenes smoothly, cross-cutting lets viewers see what’s happening in different places all at once, making the story more exciting.
In animation, cross-cutting is done by carefully putting together different shots or sequences that show different actions happening at the same time. This involves using editing tricks, sounds, and other cinematic elements to keep the audience interested and help them follow the story.
Cross-cutting in animation is great for showing connections between characters and different parts of the story. By giving different perspectives, it keeps viewers engaged throughout the animation.
In animation, a "cut" is a bridge that connects different scenes smoothly, helping the story flow.
In animation, a “cut” is a bridge that connects different scenes smoothly, helping the story flow. It’s important for keeping viewers engaged and making sure they can follow along easily. Animators use different types of cuts to make their stories more interesting and visually appealing.
One common type is the straight cut, which simply moves from one shot to another. It’s great for keeping the story moving and making everything feel connected. Straight cuts can be used in lots of ways, like changing locations or focusing on different characters.
Match cuts are more advanced. They link elements from one shot to the next, making connections between scenes. This adds depth to the story and helps convey emotions or themes.
Jump cuts are a bit different. They create sudden changes that might seem jarring at first. But they can be used to build tension, make things feel urgent, or highlight important moments in the story. Even though they break the usual rules of editing, jump cuts add excitement and surprise to animations.
The type of cut animators choose depends on what they want to achieve in the story. Whether it’s keeping things smooth, adding depth, or creating tension, animators have lots of options to make their animations captivating and meaningful.
Cutout animation uses cut-out pieces of paper or materials to create characters and objects that are moved to give them life. It's similar to a puppet show and is seen in TV shows and movies.
Cutout animation has become a popular technique in the world of animation for its unique aesthetic and ease of production. This technique involves creating characters, props, and backgrounds using separate pieces of materials such as paper or cardstock. These pieces are then cut out with precision and assembled to create the desired image.
One of the benefits of cutout animation is that it can be done either traditionally or digitally. Traditional cutout animation involves physically cutting out the pieces of paper or other materials and manipulating them by hand. This method requires a lot of skill and patience but can produce beautiful results.
On the other hand, digital cutout animation involves using software to create and manipulate the cutout images. This method is faster and more efficient than traditional cutout animation, and allows for more complex animations to be created.
One of the benefits of cutout animation is that it allows for quick production times and cost-effective animation while still creating visually appealing results. It is particularly useful for television shows that need to produce episodes on a tight schedule and budget.
Cutout animation is a unique technique that has become increasingly popular in the world of animation. Its ability to create visually appealing results while being cost-effective and efficient has made it a popular choice for television shows and short films. Whether done traditionally or digitally, cutout animation is a versatile technique that is sure to continue to be used in the future.
Depth of field in animation controls the blur of objects based on their distance from the camera, adding realism and focusing viewer's attention.
In animation, Depth of Field (DOF) can be used to add a cinematic feel to a scene. It can also be used to create a sense of scale and distance by emphasizing the size of objects in relation to their surroundings. For example, if an animator wants to show a character walking down a long hallway, they might use a shallow DOF to blur out the walls and focus only on the character, creating a feeling of distance.
Depth of field is also useful in creating mood and atmosphere in a scene. A shallow DOF can be used to create a dream-like or romantic feel, whereas a deep DOF can create a sense of clarity and realism. By carefully controlling the depth of field, animators can make their scenes more visually appealing and enhance the emotional impact of their stories.
In addition to camera settings, DOF can also be controlled through post-processing techniques such as compositing and depth maps. These techniques allow animators to adjust the depth of field after the scene has been rendered, giving them greater flexibility and creative control.
One challenge with using DOF in animation is balancing realism with artistic expression. While a deep depth of field might be more realistic, it may not always be the best choice for telling a compelling story or creating an emotional impact. Likewise, too much blurring or focus on irrelevant details can detract from the overall effect of the scene.
Ultimately, the effective use of depth of field in animation requires careful consideration of factors such as camera settings, storytelling goals, and artistic vision.
Animation dialogue: characters' spoken words in a story, helping us understand the plot.
Dialogue is a crucial element in the success of an animated series or movie. It sets the tone for the story, develops characters, and engages the audience. The dialogue is written by a scriptwriter who carefully crafts each line to convey meaning and evoke emotions.
In animation, dialogue is often used to define the personality of the characters. It helps to create a unique voice for each character, allowing them to stand out from one another. For example, in the popular animated movie “Shrek”, the protagonist Shrek’s dialogue is often sarcastic and humorous, reflecting his nonchalant and carefree attitude. On the other hand, his companion Donkey’s dialogue is more upbeat and excitable, highlighting his energetic nature.
Another essential aspect of dialogue in animation is its ability to convey emotions. Animated characters are often exaggerated in their expressions and movements, making it easier for audiences to connect with them emotionally. However, it is through dialogue that they can express their feelings and thoughts more explicitly. For instance, in Disney’s “The Lion King”, Mufasa provides wise guidance to his son Simba through his dialogue, teaching him about courage, responsibility, and respect.
Timing and delivery of dialogue are critical in animation. Animators must ensure that the character’s mouth movements match the audio precisely. They use software that analyses sound waves to sync up with the movements of animated characters’ lips accurately. This synchronization creates a convincing performance that enhances the believability of the story.
Dialogue is an essential component of animation that helps bring stories and characters to life. It allows writers to convey emotions, ideas and information effectively while animators ensure that the dialogue is synchronized with the character’s mouth movements. Moreover, sound effects and music add depth to on-screen actions, making them more engaging for the audience. Without dialogue, animated characters would be lifeless and uninteresting, making it challenging for viewers to connect with them emotionally.
Dissolves are a cool trick in animation that smoothly connect different scenes by fading one scene out while another fades in.
Dissolves are a cool trick in animation that smoothly connect different scenes. They work by fading one scene out while another fades in, making the transition between them really smooth and seamless.
Animators use dissolves in lots of ways. They can show time passing, like hours or days going by, without needing to explain it all. This helps keep the story moving along nicely.
Dissolves can also show changes in location. By blending scenes together, animators can move viewers from one place to another without any bumps. This makes sure the story keeps flowing smoothly.
And they’re great for setting the mood too. By fading from one scene to another, animators can create emotional contrasts that make key moments stand out. Whether it’s going from happy to sad or the other way around, dissolves help make the story more powerful.
Using dissolve transitions makes animated stories feel richer and more polished. They keep viewers hooked, make the animation more interesting, and make sure everything fits together nicely. Whether showing time passing, changing locations, or setting the mood, dissolves are a handy tool for making animated content even better.
Rendering is the process of creating a stunning image from 3D data by calculating lighting, materials, and atmosphere. Distributed rendering speeds up this process by splitting the data into smaller parts rendered simultaneously by different computers.
Distributed rendering has become an essential technique in the world of 3D animation. In traditional rendering, a single computer is responsible for processing all the information required to create a high-quality image. However, as the complexity of animation projects continues to increase, rendering times have become longer and longer. This has led to the development of distributed rendering, which divides the workload among multiple computers or servers.
The primary benefit of distributed rendering is speed. By breaking down the scene into smaller tiles and assigning them to different machines, each computer can render its assigned tiles simultaneously. This significantly reduces the time required to render the entire scene. For example, a complex animation project that would take a single computer several days to render can be completed in just a few hours using distributed rendering.
Another advantage of distributed rendering is cost savings. Rendering requires a lot of computing power, which can be expensive to maintain. By utilizing less powerful computers to render specific parts of the scene, studios can save money on expensive hardware without sacrificing quality.
However, there are some challenges associated with distributed rendering. The most significant challenge is managing communication between the different machines involved in the process. Each computer must communicate effectively with one another to ensure that all tiles are rendered correctly and efficiently. Additionally, setting up a distributed rendering system can be complex and time-consuming.
To overcome these challenges, studios have developed specialized software that streamlines the process of distributing tiles and managing communication between machines. This software allows animators to focus on creating high-quality content while leaving the technical details of rendering to the software.
Distributed rendering has become an essential technique in modern 3D animation. It offers significant benefits such as faster rendering times and cost savings while allowing studios to create high-quality content without sacrificing quality. While there are challenges associated with implementing distributed rendering systems, specialized software has made it easier than ever before for studios to take advantage of this powerful technology. As animation projects continue to become more complex, distributed rendering will undoubtedly play an increasingly critical role in the industry.
Dolby Atmos is an audio technology that makes sound in movies and animations feel incredibly real.
Dolby Atmos is an audio technology that makes sound in movies and animations feel incredibly real. Unlike older methods, Dolby Atmos treats each sound as its own thing, floating around in a 3D space.
In animation, Dolby Atmos makes the experience way better. It lets animators and sound designers put sounds exactly where they want them, so it feels like you’re right there in the action. Imagine hearing the rustle of leaves or the roar of a dragon like it’s happening all around you - that’s Dolby Atmos.
It’s not just about making things sound real though. Dolby Atmos adds emotion to animated scenes too. By blending sounds into the story, it makes character interactions more intense, dramatic moments more exciting, and emotional scenes even more powerful. It’s like adding an extra layer of depth to the animation.
In short, Dolby Atmos is a game-changer for animation. It helps creators make audio that’s as immersive and captivating as their visuals. With Dolby Atmos, animations become unforgettable experiences that grab your attention and stay with you long after the movie’s over.
A dope sheet is a grid chart for animators to track animation details. It helps plan and synchronize movements, dialogues, and actions accurately.
Animation is a complex and time-consuming process that requires careful planning and organization. One of the most important tools for animators is the “dope sheet”. A dope sheet is essentially a timeline that shows each frame of the animation and the actions that occur in each frame. This tool allows animators to plan the timing of different elements in the animation, such as character movements and dialogue, and to keep track of important notes and instructions.
Note: A dope sheet can also be called a time sheet or exposure sheet.
One of the key benefits of using a dope sheet is that it enables animators to work more efficiently. By having a clear timeline of the animation, they can plan out each element in advance, making sure that everything fits together seamlessly. This can prevent mistakes and ensure that the final product is of high quality.
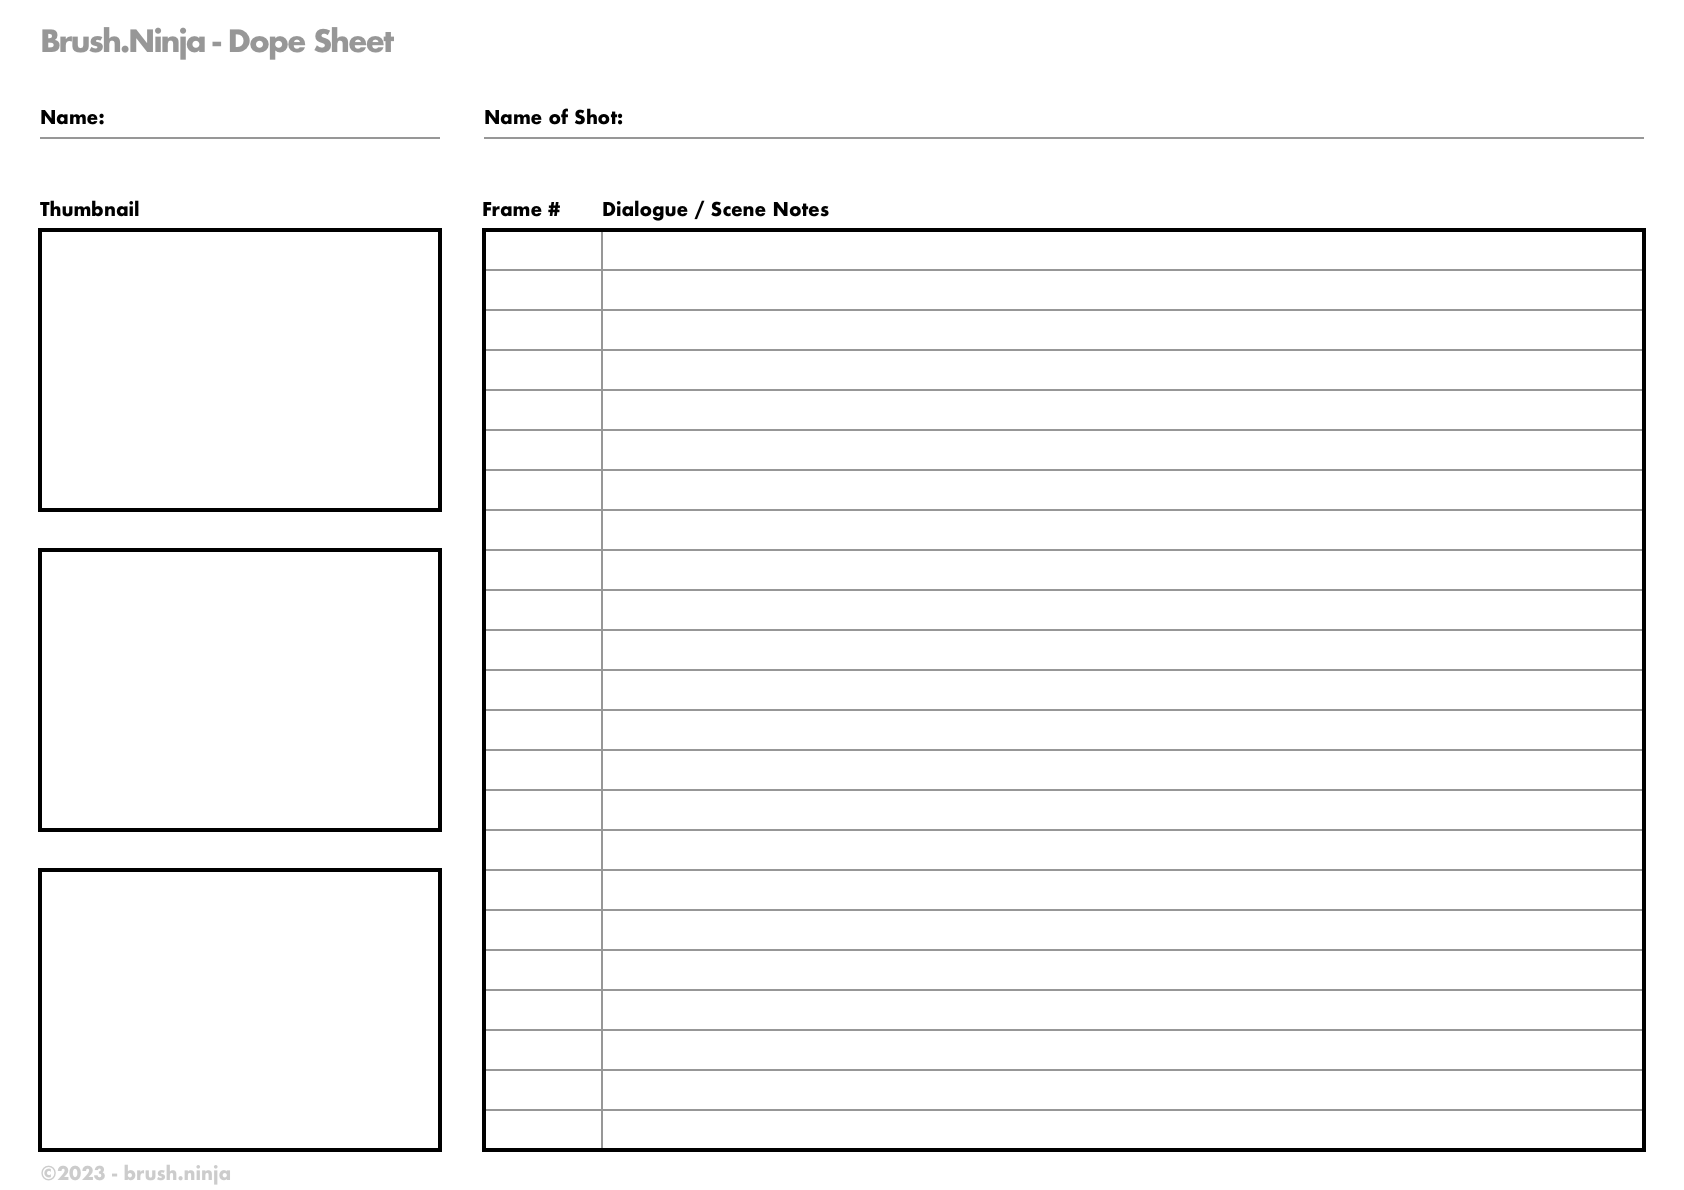
Example Dope Sheet layout
Download a free dope sheet template to help you plan your animation.
A big benefit of using dope sheets is that it allows multiple animators to work on different parts of the project at the same time. By sharing a digital version of the dope sheet, all team members can see what has been done and what needs to be done. They can also make comments and suggestions that can be incorporated into the project.
While most dope sheets today are created digitally using specialized software, there are still some traditionalists who prefer to use physical sheets of paper. These sheets are often numbered with frames and have instructions written on them. While this may seem outdated, there is something to be said for the tactile nature of physical sheets.
A dope sheet is an essential tool for any animator working on an animation project. Whether it is created digitally or using physical sheets, it provides a clear timeline of the animation and allows for efficient planning and organization. By using this tool, animators can work more efficiently, collaborate more effectively, and create a high-quality final product.
Dutch angles, also known as Dutch tilts, are a trick in animation that adds drama and intensity to scenes. By tilting the camera within the frame, animators can create different feelings and tell stories in interesting ways. They’re not just for live-action films – they work great in animation too, making viewers feel uneasy, tense, or excited.
One big plus of using Dutch angles in animation is how they mess with the viewer’s sense of space and perspective. Tilting the camera makes shots look dynamic and grabs the audience’s attention. The skewed angles add a sense of excitement and uncertainty to the scene, making it more interesting to watch.
In action scenes, Dutch angles really shine. They make everything feel faster and more chaotic, pulling viewers into the action. These angles are perfect for showing energy and movement in animated sequences, especially during intense moments.
They’re also perfect for horror or thriller scenes, where you want to make viewers feel scared or on edge. The tilted camera creates a feeling of unease and suspense, adding tension to the scene. In animation, Dutch angles can be used to build suspense, hint at danger, or set the mood for spooky events. They help animators create immersive and emotional stories that stick with the audience.
Dutch angles are a great tool for animators to make scenes more exciting and emotional. Whether it’s adding action to sequences or making viewers feel scared, these angles add depth and interest to animated storytelling. With Dutch angles, animators can take their work to the next level, captivating audiences with both visuals and emotions.
Easing is a term animators use for smooth movement. It's like gradually slowing down on a bike instead of suddenly stopping.
Easing is a crucial aspect of animation that can make or break the overall quality of an animated project. In fact, it is one of the fundamental principles of animation.
In traditional animation, easing was achieved by drawing each frame by hand. As the animator progressed through the frames, they would adjust the timing and speed of each movement to create a smooth and fluid motion. This process was time-consuming but ultimately produced high-quality results.
However, with digital animation, easing has become even more important. Without proper easing, movements in digital animation can appear stiff and robotic. This is because digital animations are usually created using keyframes, which are points in time where the animator sets specific attributes for an object such as its position, rotation, or scale. The software then generates the frames between these keyframes based on the settings that were inputted.
To achieve proper easing in digital animation, it is important to understand the different types of easing curves that are available. There are three main types: ease-in, ease-out, and ease-in-out.
It’s worth noting that different types of objects require different types of easing curves. For example, a ball bouncing off the ground would require a different easing curve than a character walking across the screen.
Fortunately, most animation software comes equipped with tools that allow animators to adjust the easing of their animations. These tools typically allow animators to adjust the timing, speed, and interpolation of keyframes, giving them full control over the motion of their objects.
Easing is a vital aspect of animation that can make a significant difference in the quality of an animated project. It’s important for animators to understand the different types of easing curves available to them. With proper use of easing techniques, digital animation can look just as smooth and fluid as traditional hand-drawn animation.
An emitter in animation creates fire, smoke, or stars. Animators use it to add cool effects by drawing a shape once and emitting it multiple times.
In the world of animation, an emitter plays a vital role in creating different effects. An emitter is essentially a tool or object that generates particles, which can be used to create various effects like smoke, fire, sparks, dust, and more. The particles generated by the emitter are released into the scene from a point or area that animators define within the animation software.
Emitters are commonly used in video games to create several dynamic effects, such as explosions, gunfire, and more. These effects can provide feedback to the player and make the game feel more engaging and immersive. In movies, emitters are typically used for creating weather effects like rain, snow, and fog. By using emitters with different properties such as speed, direction, size, color, and other attributes, animators can create realistic-looking weather effects that can enhance the overall look and feel of a scene.
The properties of an emitter can be adjusted (animated) over time to create dynamic animations that capture the viewer’s attention. For example, if you want to create an explosion effect you can adjust the number of particles generated by the emitter based on the intensity of the explosion.
One of the significant benefits of using emitters is their flexibility. They can be customized according to individual requirements and can be used to create various effects that suit different scenes. Animators can also use multiple emitters in a single scene to create complex visual effects like firework displays or magical spells.
Emitters play a crucial role in creating visually stunning animations that grab viewers’ attention.
Exaggeration in animation makes things larger, smaller, or more extreme than reality. This adds interest and fun - like big eyes or exaggerated facial expressions to convey emotions.
Exaggeration is one of the most powerful techniques used in animation to add interest to a character’s personality and emotions. It helps create memorable and expressive characters that are relatable to the audience. One of the primary reasons for using exaggeration in animation is to give life to characters that otherwise might come across as flat or dull.
Animators use exaggeration to emphasize or amplify certain actions, poses, expressions, or movements beyond their natural limits. This technique is not just about making things bigger or more prominent. It involves adding an extra layer of expressiveness and personality to the character’s animation. In fact, a good animator knows how much exaggeration is needed and where it should be used in order to create a balance between realism and entertainment.
One of the most common uses of exaggeration in animation is to convey emotions. For instance, if a character is surprised, animators might use exaggerated facial expressions such as bulging eyes, raised eyebrows, and an open mouth to make the emotion more pronounced. Similarly, if a character is angry, they might use exaggerated movements such as clenched fists or stomping feet to show their frustration.
Another way that animators use exaggeration is by playing with timing and spacing. By adding or reducing time or space between actions and poses, animators can create anticipation or surprise for the viewers. For example, if a character is about to jump over a hurdle, animators might add extra frames right before the jump to build up suspense.
Physics are also an area where exaggeration can be used effectively in animation. Animators can alter the laws of physics like gravity and weight to create a sense of weightlessness or impact that adds an extra level of interest and entertainment value to the animation. For instance, if a character falls from a high place, animators might slow down the fall and exaggerate the bounce at the end to make it more comedic.
Exaggeration is an essential technique in animation that adds depth and interest to characters and their emotions. It can be used in various aspects of animation, including timing, spacing, and physics, to create memorable and expressive characters that are relatable to the audience. A good animator knows how to use exaggeration effectively to create a balance between realism and entertainment.
An Eyedropper is a tool in animation to pick colors from a picture and apply them elsewhere. It's like reusing a color!
In animation, color is an important aspect that can make or break the overall look and feel of a project. It can set the mood, create depth, and convey emotion. However, choosing the right colors can be a daunting task, especially when there are so many hues to choose from. This is where the eyedropper tool comes in handy.
The eyedropper tool is a simple yet powerful feature that allows animators to select colors from existing objects or images. This tool works by selecting the color of a pixel and then allowing you to apply that exact color to another area of your image or animation. It is a quick and easy way to ensure consistency in your color scheme and saves time by not having to manually track colors.
One of the main advantages of using the eyedropper tool is that it helps maintain a consistent color palette throughout your animation. By selecting colors from already established objects or images, you can easily match shades and tones without having to estimate or guess. This helps create seamless transitions between scenes and maintains a cohesive look throughout your project.
Another great advantage of using the eyedropper tool is that it saves time. Rather than spending hours trying to find the right shade of blue for your character’s eyes, you can simply use the eyedropper tool to select the color from their shirt and apply it to their eyes.
Moreover, using the eyedropper tool allows animators to experiment with different color combinations without having to spend too much time experimenting. In just a few clicks, you can try out different shades and tones until you find the perfect setting for your project.
Eyedropper tools are commonly found in animation software such as Brush Ninja, Adobe Animate, and Toon Boom Harmony. These tools are user-friendly and easy to access within the software’s interface. In addition, most software allows users to customize the tool’s settings, such as sample size and tolerance, to suit their specific needs.
The eyedropper tool is a valuable asset for animators. It helps maintain consistency in color schemes, saves time, and allows for experimentation with different color combinations. By utilizing this simple yet powerful feature, animators can create stunning visuals that capture the essence of their project.
When working with digital tools like Brush Ninja, files are saved in different formats. Each format is designed for a specific purpose, such as animation, images, or printable documents.
This page gives a simple overview of the main formats used in Brush Ninja and links to more detailed explanations for each one.
A file format describes how data is stored inside a file. It determines what the file contains, how large it is, and which programs can open it.
File formats are usually identified by their file extension, such as .gif, .png, or .pdf.
Different formats are suited to different tasks.
Brush Ninja uses a small number of well-known formats so files are easy to open, share, and submit in school environments.
File formats define how digital work is saved and shared. Brush Ninja uses common, widely supported formats so student work is easy to manage in school settings.
By understanding which format to use and when, students can export their work confidently and submit it without problems.
Foley: art of creating sound effects for movies. Uses everyday objects to match on-screen actions, like using rocks to mimic walking on gravel.
The art of Foley is a crucial aspect of animation that often goes unnoticed by the audience. It involves creating and recording sound effects that match the actions and movements of characters on screen. These sounds can be as simple as footsteps or as complex as the roar of a dragon.
Foley artists have an important role in animation because they bring life to otherwise silent characters. They use props such as shoes, clothing, or instruments to create sounds that match the movements of the characters on screen. For example, if a character is walking on a wooden floor, the Foley artist might use wooden planks to create the sound of footsteps. This attention to detail helps to create a more believable world for the audience.
Foley artists typically work in a studio where they have access to a variety of props and recording equipment. They watch the animation footage carefully while performing the sound effects live. This allows them to synchronize their actions with those of the characters on screen, creating a seamless audio experience for the viewer.
In addition to creating sound effects for characters, Foley artists also create sounds for objects and environments. For example, they might create the sound of wind blowing through trees or water rushing down a river.
Once the Foley artist has recorded all of the necessary sounds, they are edited and mixed with other elements such as dialogue and music. This process can be time-consuming but is essential for creating a final soundtrack that is both believable and emotionally engaging.
Foley is an important aspect of animation that often goes unnoticed by viewers. It involves creating and recording sound effects that match the actions and movements of characters on screen. Without Foley, an animated character might seem oddly quiet and lifeless. With Foley, however, the audience can hear the sounds of their surroundings and become more immersed in the story. Foley artists are an essential part of the animation process, bringing life to otherwise silent characters and creating a believable world for the viewer.
Follow through in animation is when an object or character keeps moving after the main action stops, making it more realistic and natural.
Animation is an art form that has evolved significantly over the years. From hand-drawn to computer-generated animation, it has come a long way. One of the key principles of animation is follow through. It is the continuation of movement after the main action has ceased. Follow through adds a level of realism and fluidity to animated characters and objects.
In order to understand follow through, it is important to understand the concept of momentum. When an object is set in motion, it tends to continue moving even after the force that set it in motion has stopped. This is because of momentum. In animation, follow through is used to show how different parts of an object or character react to the main action.
For example, if a character suddenly stops running, their hair, clothing, and other loose objects will continue to move forward due to momentum. This creates a more realistic effect that helps bring the character to life. Similarly, a bouncing ball will continue to bounce slightly after it hits the ground due to its elasticity.
Follow through can be exaggerated or subtle depending on the desired effect. In some cases, animators may choose to exaggerate follow through for comedic effect. In other cases, they may choose to use subtle follow through for a more realistic effect.
Follow through can also be used in combination with other animation principles like squash and stretch and anticipation. Squash and stretch refers to the stretching or compressing of an object as it moves. Anticipation refers to preparing the audience for an action before it happens. By using these principles in combination with follow through, animators can create more engaging and believable animations.
Forward Kinematics is a method to animate objects by moving their parts one by one, from the base to the end. Similar to building a robot, where you move legs, arms, and head sequentially.
Forward Kinematics is a method in animation that provides a way to determine the position and orientation of an animated object or character. It is an important aspect of animation that allows artists to create realistic movements for their characters. There are two main types of kinematics used in animation: forward kinematics and inverse kinematics.
Forward Kinematics involves calculating the position and movement of an object’s endpoints based on the movement and rotation of its joints. This process is often used in situations where the animator has full control over the movement of each part, such as in 2D animation or some types of 3D animation.
In Forward Kinematics, each joint is treated as a separate entity, and the animator specifies how they should move. The objects are linked in such a way that moving one, moves another. For example the hand would be linked to the arm; when the arm is moved or rotated the hand will follow.
One significant advantage of Forward Kinematics is that it allows animators to have full control over every aspect of their character’s movements. This level of control can be useful when creating complex animations or when trying to achieve specific movements or poses.
One disadvantage of Forward Kinematics is that it can be time-consuming since animators have to specify the movement for each individual joint. This process can be tedious and prone to errors, especially when working with complex characters with many joints.
Inverse Kinematics works differently. The objects are still linked together but you can specify the end position of the object, such as where their hand should be placed. The software then calculates how each joint should move so that the arm follows automatically, but has it’s own drawbacks.
Forward Kinematics is a valuable method used in animation to create realistic movements for characters. It allows animators to have full control over each joint’s movement, resulting in fluid and precise animations. However, it can be time-consuming and prone to errors. In contrast, Inverse Kinematics is useful for creating natural-looking movements but may not provide the same level of control as Forward Kinematics.
Animation frames are individual pictures that, when played rapidly, create the illusion of movement. Each frame shows a different image or pose to bring the animation to life.
When it comes to animation, the concept of frames is crucial. Without frames, there would be no animation at all. A frame is essentially a single image that makes up a sequence of images. In animation, these sequences are played in rapid succession to create the illusion of movement.
Each frame captures a moment in time and contains all of the visual information needed to create the next frame in the sequence. This means that every detail, from the position of each character to the background scenery, needs to be accounted for in each individual frame. The more detailed and intricate the animation, the more frames will be required to create a smooth and seamless sequence.
The number of frames per second (fps) is an important factor in determining how smooth the animation appears to be. Typically, more frames per second result in a smoother animation, but also require more time and resources to create. The standard rate of fps for traditional animation is 24 frames per second. However, this can vary depending on the style of animation and the specific project requirements.
One technique for creating frames is hand-drawn animation. This involves creating each frame by hand using traditional mediums such as pencil and paper or paint on cels. Hand-drawn animation has been a staple in the industry for decades, with classics like Snow White and the Seven Dwarfs and The Lion King being prominent examples.
As an aside - whilst the Lion King was mostly hand drawn, it did use computer animation for the stampede scene.
Computer-generated (CG) animation is another popular technique for creating frames. This involves using software programs such as Maya or Blender to create each frame digitally. CG animation has become increasingly popular over the years due to its versatility and ability to create complex visuals.
Stop-motion animation is yet another technique for creating frames. This involves physically manipulating objects or puppets and taking photographs of each individual movement or pose. When played back in rapid succession, these photographs create a seamless sequence of movement.
In conclusion, frames are an essential component in creating any form of animation. They capture every detail of a moment in time and are crucial in creating the illusion of movement. Whether it’s hand-drawn, computer-generated, or stop-motion animation, frames are at the heart of every animated sequence. The number of frames per second determines the smoothness of the animation, with more frames resulting in a smoother sequence but requiring more time and resources to create.
Frame rate determines the number of frames shown per second in animation, affecting how smooth it appears. Higher frame rates result in smoother animation.
An animations frame rate is an essential element as it determines the quality, fluidity, and overall impact of the final output. Hence, it is crucial for animators to understand the concept of frame rate and its implications on their work.
On Brush Ninja, the default frame rate is 6 Frames Per Second. This can be changed with the speed dial under the drawing area.
In traditional hand-drawn animation, each frame is drawn by hand with intricate details and precision. The animator has to create 24 frames for every second of animation, which is a time-consuming process. However, the advantage of this method is that it gives a unique character and charm to the final output. The natural imperfections in hand-drawn frames add a human touch to the animation that are hard to replicate using digital tools.
On the other hand, computer-generated animation provides new possibilities and flexibility in creating animations. Animators can use software like Maya or Blender to create frames digitally, which saves time and allows for precise control over every aspect of the animation. However, creating high-quality digital frames requires specialized skills and knowledge of complex software.
The intended use of an animation also determines its optimal frame rate. For instance, video games require a faster frame rate to ensure smooth gameplay performance while maintaining acceptable visual quality. Most video games aim to run at between 30 and 60 fps depending on their complexity and hardware requirements.
Movies typically run at 24 frames per second, however with the advent of digital technology faster frame rates are being experiementd with some films being shot at up to 120fps. This extra frame speed creates a significantly smoother image, but not everyone likes it. It can make the film look like a soap opera, or a home video, so these things have to be decided carefully.
The Frame rate of an animation plays a crucial role in determining the quality and fluidity of an animation. Animators need to consider various factors such as the intended use, tools used, and artistic vision while deciding on the optimal frame rate for their work. Whether it is traditional hand-drawn animation or computer-generated animation, the right frame rate can make all the difference in creating a visually stunning and engaging final output.
Framing in animation involves the deliberate arrangement of visual elements within a shot to convey specific emotions, guide the viewer's attention, and enhance the storytelling experience.
In animation, framing is super important. It’s all about how you set up the shot on the screen. This helps tell the story, create the mood, and keep the audience interested. You’ve got to decide what to include in the shot and how to arrange everything. It’s very similar to composition.
Framing is great for showing emotions and getting reactions from the audience. A close-up shot zooms in on a character’s face or movements, making you feel what they’re feeling. It’s like you’re right there with them. But a wide shot is different - it gives you the big picture, showing the surroundings and relationships between characters.
And framing helps guide the viewer’s eyes. By putting things in certain spots on the screen, animators can make sure you see what’s important. They can even make the scene feel like it’s moving in a certain direction.
There are lots of framing tricks to play with. For instance, Dutch angles can be used to convey tension or disorientation, while symmetrical framing can create a sense of balance within a composition. Plus, moving the camera around with tracking shots or zooms adds energy and excitement.
So, framing isn’t just about making things look good. It’s about making you feel something and keeping you hooked on the story. Mastering framing is key for animators to make awesome, immersive worlds that people love.
A freeze frame pauses animation briefly, highlighting important moments or allowing viewers to absorb what's happening on screen.
Freeze frame (or Frame Hold) is an animation technique that can be used to add extra meaning, or emphasis, to a particular moment. It allows animators to control the pace of the story, create emphasis on certain aspects of the scene, and give viewers time to digest what they have just seen.
In Brush Ninja freeze frames can be added by adjusting the duration of individual frames. This is done by clicking the multiplier button above the frame image in the timeline. The higher the multiplier the longer the animation will freeze on this frame.
One way freeze frames are used in animation is to create tension or suspense. For example, in a horror film, when a character is about to be attacked by a monster, the animator may use this technique to pause the scene at the critical moment before the attack. This not only builds suspense but also gives viewers time to absorb the tension and fear of what is about to happen.
Freeze frames can also be used to create humor or comedic effect. In a cartoon scene where a character slips on a banana peel, the animator may use freeze frame to capture the character’s expression at the exact moment they realize they are falling. This freezes the moment for comedic effect and allows viewers time to appreciate the slapstick humor of the situation.
Another way freeze frame is used in animation is to emphasize an emotional moment. For instance, in a heartfelt scene where two characters express their love for each other, the animator may use this technique to capture their expressions and hold them for an extended period. This not only creates emphasis on that particular moment but also gives viewers time to connect with the characters’ emotions.
Lastly, freeze frame can be used as an ending technique. As mentioned earlier, it allows viewers time to reflect on what they just saw before moving on to the next scene. This is especially useful in animations where there are complex themes or messages that need processing.
Freeze frame is a powerful tool in animation that can be used in various ways. It allows animators to control pacing, create emphasis, build tension or suspense, add humor or comedic effect, and provide viewers with time for reflection. When done effectively, the technique can be used to enhance the overall storytelling experience.
GIF: picture that moves like a video. Used for memes and animations online. GIF stands for Graphics Interchange Format.
Animated images have been around for quite some time, allowing people to express their creativity and convey messages in a unique way. One of the most popular file formats used for animations is the GIF (Graphics Interchange Format). Created by CompuServe in 1987, this format has become a household name, widely adopted as an industry standard.
The GIF format is a type of image file that supports up to 256 colors, making it ideal for creating simple animations with a small file size. Unlike video files that require specialized software to play them back, GIFs can be easily shared and viewed on almost any platform without additional software. This makes them incredibly versatile and accessible to anyone who wants to create or share animated content.
One of the reasons why GIFs are so popular is because they can loop endlessly, making it perfect for showcasing short actions or movements. For example, an artist could use a GIF to showcase their drawing process step-by-step, giving the viewer a glimpse into their creative process. Similarly, businesses could use animated GIFs to demonstrate how their products work or highlight key features.
Another advantage of using GIFs over other animation formats is their compatibility with social media platforms such as Twitter and Facebook. With the rise of social media marketing and digital advertising, businesses and individuals alike have found great success with incorporating short animated clips into their posts or ads. Since these platforms support the use of GIFs natively, it’s easy to create engaging content that captures attention and generates interest.
Despite all the benefits of using GIFs for animations, there are some limitations to consider as well. Due to its limited color palette and resolution capabilities compared to other formats like MP4 or WebM files; creating high-quality animations can be challenging. Additionally since they’re designed primarily for smaller resolutions; scaling up may result in pixelated images that don’t look as good as they should.
Check out our Gif to MP4 converter to convert your animated GIFs to MP4 videos.
One other thing you have to remember is that GIFs are images, not movies. As such they do not support sound or music. If you want to add audio to your animation, you’ll need to use a different format such as MP4 or WebM files.
In conclusion, while there are limitations to using GIFs, they remain an incredibly popular and accessible format for creating animations. Their compatibility with various platforms, ease of use, and ability to loop endlessly makes them ideal for showcasing certain actions or movements. Whether you’re an artist looking to showcase your work or a business trying to create engaging content; animated GIFs can be a valuable tool in your arsenal.
Ghosting in animation is a technique where a semi-transparent copy of an object or character is created and moved slightly out of sync with the original, creating a smoother, more fluid effect.
Ghosting in animation, stemming from the persistence of vision, can be intentional for motion blur or stylistic effects, or unintentional due to timing inconsistencies. In anime, it’s regulated to prevent epilepsy triggers, leading to dimming or subtle ghosting effects.
Ghosting in animation is the phenomenon where objects leave faint trails as they move, intentional for effects or unintentional due to timing errors. In anime, it’s regulated to prevent seizures, resulting in dimming or subtle ghosting.
Ghosting is a common visual phenomenon in animation that is caused by the “persistence of vision”. This effect occurs when an object or character appears to have a faint remnant trail following it as it moves across the screen. Animators can use ghosting intentionally to create stylistic effects or unintentionally when there are inconsistencies in the timing of movements.
One way that animators can use ghosting intentionally is to create a motion blur effect. This technique is often used in action scenes to give the impression of speed and movement. By adding a slight blur to fast-moving objects, animators can create a more dynamic and exciting scene. The amount of ghosting used in this effect will depend on the desired level of realism or stylization.
Ghosting in anime is a similar effect for a different reason. Anime Ghosting is a response TV regulations that aim to prevent epilepsy triggers. This can lead to “ghosting” on screen, which varies from subtle to quite noticeable. The regulation was introduced in 1997 after a Pokemon episode (Episode 38, Electric Soldier Porygon) caused seizures in 685 Japanese children. The episode was later banned from airing in Japan.
A similar effect is Dimming which was introduced in 2013. Dimming is a response to the same regulations, but it is less noticeable than ghosting. Dimming is a technique that reduces the brightness of the screen to prevent epilepsy triggers. This can lead to a dimmer image, which is less noticeable than ghosting.
Generally the only way to see the unedited animations is to buy the home media versions on DVD or Blu-ray. These versions are not subject to the same regulations as TV broadcasts and are therefore not subject to the same restrictions.
Another way that animators can use ghosting intentionally is to create a dream-like effect. This technique is often used in more surreal or abstract animations where the goal is to evoke an emotional response rather than depict reality accurately. By using ghosting to create ethereal or otherworldly effects, animators can engage the audience’s imagination and create a more immersive experience.
However, unintentional ghosting can occur when there are inconsistencies in the timing of movements or not enough time between frames. This can result in distracting visual artifacts that detract from the overall quality of the animation. To avoid unintentional ghosting, animators must ensure that each frame has enough time to be fully displayed before moving onto the next one. They must also pay close attention to the timing of movements and make sure that they are consistent throughout the animation.
Ghosting is a common visual phenomenon in animation that can be used intentionally or unintentionally. When used intentionally, ghosting can be a powerful tool for creating stylistic effects or evoking emotional responses from the audience. However, unintentional ghosting can detract from the overall quality of an animation and should be avoided through careful attention to timing and consistency. With proper technique and attention to detail, animators can use ghosting to create stunning and memorable animations that captivate and inspire their audiences.
The Golden Ratio is a special number found in nature, art, and animation. It creates pleasing visuals and helps achieve balance in characters and scenes.
The use of the Golden Ratio in animation is not a new concept, but it is still relevant to this day. The Golden Ratio, also known as the Divine Proportion or Phi, has been used by artists and architects for centuries to create aesthetically pleasing designs. In animation, this mathematical concept can be applied to various aspects of the production process to create more visually appealing compositions.
One way that animators can use the Golden Ratio is in the placement of objects within a frame. By aligning important elements with the Golden Ratio, animators can create a more balanced and harmonious composition. This means that objects should be placed at specific points within the frame that correspond to the ratio of 1:1.618. For example, if an animator wants to place a character in a scene, they may choose to position them at a point within the frame that aligns with the Golden Ratio.
Another way that animators can use the Golden Ratio is in determining the proportions of characters. The ratio of 1:1.618 can be used as a guide for creating characters with appealing proportions. This means that certain body parts such as arms, legs and torsos should be sized according to this ratio.
The use of the Golden Ratio in animation is not limited to these examples alone. Animators can use this mathematical concept in a variety of ways to create more visually appealing compositions. For example, the ratio can be used to create more interesting camera angles or to determine the placement of background elements within a scene.
The use of the Golden Ratio in animation is a valuable tool for animators who want to create more attractive compositions. By using this mathematical concept, animators can create balanced and harmonious images that feel natural.
A graph editor is a tool that helps animators create smooth and natural movements in cartoons by adjusting lines and dots to control speed.
Animation is an art form that involves the creation of moving images. Animators use various software tools to create animations that appear natural and fluid. One such tool that animators rely on is the Graph Editor.
The Graph Editor is a powerful tool that enables animators to manipulate the curves of an animated object’s motion. This editor displays keyframes and allows the animator to adjust the timing and easing of the animation by manipulating the curves between those keyframes. Keyframes are points in time where specific changes occur in an animation.
One of the primary uses of the Graph Editor is to fine-tune the motion of objects in animations, making them look more realistic and polished. By adjusting the graph curves, animators can control how fast or slow an object moves, how it accelerates or decelerates, and how it arcs through space.
The Graph Editor has several features that make it easy for animators to use. The first feature is the ability to view and edit individual keyframes. Animators can select a keyframe and make adjustments to its position, rotation, and scale using handles. The second feature is the ability to adjust the tangents of a curve. Tangents control how quickly an object moves from one keyframe to another, giving animators full control over an object’s motion.
The Graph Editor is a powerful tool that enables animators to create smooth, fluid animations with natural movements. It allows for precise control over an object’s motion, making it an essential tool for any animator. By using the Graph Editor, animators can create custom animations that suit their needs, saving them time and effort in the animation process.
High key lighting in animation involves using a very bright light to create a happy and optimistic vibe by filling the scene with soft light and minimizing shadows.
High key lighting in animation is like turning on the sunshine to create a happy vibe. By filling the scene with bright, soft light and minimizing shadows, animators can make viewers feel cheerful and optimistic.
One important thing about high key lighting is that it gets rid of harsh shadows, making everything look clear and simple. This lets viewers see all the details in the characters and background, like their expressions and movements.
To make high key lighting work, animators use lots of lights placed carefully around the scene. They adjust them to shine on specific parts, like characters’ faces or important objects. This makes sure everything looks balanced and draws viewers into the story.
High key lighting is perfect for scenes that aim to make viewers feel happy or excited. Whether it’s a funny moment or a triumphant scene, the bright and cheerful lighting boosts the mood and makes the emotions feel even stronger.
Plus, high key lighting makes animations look vibrant and lively. The bright colors and well-lit scenes make everything look dynamic and interesting. This adds energy to the animation and makes viewers feel positive and optimistic.
In short, high key lighting is a great tool for animators to create scenes that are happy, emotional, and visually stunning. By using light to set the mood and bring out emotions, animators can make their stories unforgettable.
Hue is the name for colors. Saturation is the strength of a color. Like adding food coloring to water, more drops make it darker. Hue is the color, saturation is its intensity.
Color is a fundamental aspect of animation that can significantly impact the audience’s perception of a scene. Hue and saturation are crucial concepts that animators must understand to achieve the desired mood and atmosphere in their work.
Hue refers to the actual color of an object. In animation, hues can be adjusted to reflect different emotions or moods. For instance, using warm colors such as red and orange create a sense of energy and excitement, while cool colors like blue and green generate a more calming effect. Additionally, hues can be used to differentiate between different settings in an animated project. For example, a sunny day scene may feature bright yellows and oranges, while a nighttime setting may include cooler hues like dark blues and purples.
Saturation is another critical aspect of color in animation. It refers to the intensity or purity of a color. Highly saturated colors are vibrant and eye-catching, while desaturated colors are muted or dull tending to be more grey. Saturation can be used to create contrast between different elements in a scene or draw attention to specific objects or characters. For instance, a character with highly saturated clothing will stand out from the background, making them more visually striking.
Moreover, hue and saturation work together to create an overall visual style for an animated project. A brightly saturated cartoon may have bold primary colors to emphasize its playful nature, while a darker-toned anime may feature more muted hues with less saturation for a more mature feel.
Understanding hue and saturation is crucial for animators in creating the desired mood and atmosphere in their animated projects. By carefully selecting the right hues and saturations for each scene, animators can create unique visual styles that enhance the narrative and engage the audience’s emotions.
Inertia is an object's tendency to stay still or keep moving unless acted upon. It explains why animated characters require force to start, stop, or change their movement.
Inertia is a fundamental concept in animation that allows animators to create realistic and believable movements. It plays a crucial role in creating the illusion of weight, mass, and gravity, making the animations more immersive and engaging.
One of the primary uses of inertia in animation is to simulate the movement of objects. When an object is set into motion, it continues to move with the same speed and direction until an external force acts upon it. This principle is known as Newton’s first law of motion, and it applies to both real-world physics and animation.
For example, when animating a ball rolling down a slope, the animator needs to take into account the ball’s initial velocity and momentum. The ball will continue to roll down the slope until it reaches a flat surface or encounters an obstacle that slows it down or changes its direction. By incorporating these physical principles into their animations, animators can create more realistic and believable movements.
Another way animators use inertia in their work is by giving characters weight and mass. When an animated character moves, its body parts will continue to move for a short time before coming to a complete stop because of inertia. This effect is particularly noticeable when characters perform quick movements such as jumping or running.
By adding weight and mass to their characters, animators can make the movements more convincing and grounded in reality. For example, if a character jumps off a high platform, they will fall faster than if they jumped off a lower platform due to gravity. Similarly, if a character runs too fast on a slippery surface, they might lose their balance and slide for some distance before coming to a stop.
Inertia also plays a significant role in simulating collisions and impacts. When two objects collide in real life, they will bounce off each other or crumple depending on their relative masses and velocities. Animators can replicate this effect by using physics simulations that take into account the objects’ physical properties such as mass, elasticity, and friction.
By incorporating inertia into their animations, animators can create more realistic and believable movements that accurately reflect how objects and characters behave in the real world. This makes the animations more immersive and engaging for viewers, enhancing the overall quality of the animation.
Infographic animation: Fun, easy-to-understand visuals using pictures, charts, and graphs to convey information. Great for learning and fun!
Infographic animation is a powerful tool for businesses and organizations who want to present complex information and data in an engaging and easy-to-understand way. With the rise of digital media, more and more companies are turning to infographic animation to communicate their message to their target audience.
One of the key benefits of infographic animation is that it allows businesses to present data in an engaging way. Unlike traditional text-based reports or presentations, infographic animations use motion graphics, illustrations, and typography to create a dynamic and engaging experience for the viewer. This can be especially useful when presenting complex or technical information that might otherwise be difficult for people to understand.
Another benefit of infographic animation is that it can be used in marketing or on social media to help businesses stand out from their competitors. In today’s competitive marketplace, companies need to find creative ways to grab the attention of their target audience. Infographic animations are a great way to do this, as they offer a unique and visually appealing way to present information.
Infographic animations can also be used to tell a story. Whether it’s explaining how a product works or showcasing statistics and trends. By combining visuals with narration or voiceover, businesses can create an emotional connection with their audience that goes beyond the facts and figures.
In addition to marketing materials, infographic animations can also be used in educational settings. For example, teachers can use infographic animations to teach complex concepts or explain scientific processes in a way that is easy for students to understand.
Infographic animation is a powerful tool that can help businesses communicate complex information and data in an engaging and easy-to-understand way. By using motion graphics, illustrations, and typography to present information, businesses can create a dynamic and visually appealing experience for their target audience. Whether it’s used in marketing materials or educational settings, infographic animation can help businesses stand out from their competitors and tell their story in a compelling way.
Inverse Kinematics is a method to animate characters realistically by moving one part, which in turn moves the rest. It simplifies movement control for more lifelike motion.
Inverse Kinematics (IK) animation is a technique used to determine the position and orientation of a jointed structure, such as an arm or leg, based on the desired position of the end effector, such as the hand or foot. In contrast, forward kinematics (FK) is a method that determines the position and orientation of the end effector based on the angles of the joints.
The main difference between FK and IK is that in FK, the motion of each joint is explicitly defined, whereas in IK, the joint angles are calculated based on the desired position of the end effector. This makes IK particularly useful for animating complex structures with many joints, as it allows the animator to move the end effector (hand/ foot etc) without having to manually adjust each joint angle.
One of the main benefits of using inverse kinematics in animation is the ability to create more natural-looking movements. When a character moves their arm, for example, their shoulder and torso will also adjust to maintain balance and stability. By using inverse kinematics, an animator can create movements that are more realistic and fluid, as the software automatically adjusts the rest of the body based on the movement of the end-effector.
However, there are also some limitations to using inverse kinematics in animation. One potential issue is that it can be difficult to achieve precise control over a character’s movements when using this technique. This is because the software is calculating the movement of multiple joints based on a single input (the movement of the end-effector), which can sometimes result in unexpected or unwanted movements.
Another limitation of inverse kinematics is that it may not always be suitable for certain types of animation. For example, if an animator wants to create a deliberately unnatural or exaggerated movement (such as a cartoon character stretching their arm to an impossible length), inverse kinematics may not be the best technique to use.
Despite these limitations, inverse kinematics remains a popular and widely used technique in animation. With its ability to create more natural-looking movements and save time and effort in animating complex actions, it has become an essential tool for many animators working in 3D animation software. As technology continues to advance, it will be interesting to see how techniques like inverse kinematics evolve and improve in the years ahead.
JPG/JPEG is a file format for saving images.
JPEGs are a popular file format for saving and sharing images, in particular online. They have a small file size and are supported by many different programs and devices. However, they do not support transparency or animation.
JPEG images are compressed (made smaller) using a lossy compression method, which means that some information is lost during the compression process. This means that some detail is lost from the image. JPEGs can be saved at different compression levels. At 99% the image will be almost perfect, but at 10% compression the file size will be tiny, but a lot of data will have been lost and the image will look very bad.
One key benefit of using JPEG files in digital animation is their compatibility with most software programs and devices. Regardless of the software used or the device on which an animation is viewed, JPEG files are easily accessible and viewable across various platforms.
In addition to its compatibility, JPEG’s small file size makes it an ideal format for sharing animations with clients or collaborators over email or cloud storage services. Animators can easily send multiple frames of an animation without overwhelming email servers or exceeding storage limitations.
Despite its popularity, some animators may opt for alternative file formats that offer higher levels of compression while maintaining image quality. For example, PNG (Portable Network Graphics) files use a lossless compression method that preserves all image data while still achieving small file sizes.
However, PNG files may not be as compatible across various software programs and devices as JPEGs are. As such, animators must consider their specific needs when choosing between file formats.
While JPEG’s lossy compression method may result in some loss of information during compression, its benefits have made it a go-to option for many animators looking to create efficient yet high-quality animations. Its compatibility with various software programs and devices as well as its ability to achieve small file sizes make it a valuable tool in the world of digital animation.
Animation joints connect body parts, aiding realistic movement and facilitating lifelike animation.
Joints in animation are very similar to joints in the real world, they are the foundation of movement and articulation. They are the points where two or more bones connect to create a range of motion that makes characters come to life.
Animating joints involves manipulating the position and rotation of each bone in relation to its neighboring bones. Animators use software programs like Autodesk Maya or Blender to create these movements. They manipulate the values associated with each joint to enable different kinds of movement and control how much weight is given to each movement.
Joints play an integral role in creating realistic movement in animated characters. Without them, characters would be stiff and unable to perform even the most basic movements. Animators have mastered the art of animating joints so that they create fluid movements that look natural and realistic.
Animating joints is an essential part of creating animated characters that seem lifelike. The different types of joints available provide animators with versatile tools that can be manipulated using software programs like Autodesk Maya or Blender. Therefore, it is safe to say that without joints, any animation project would fall short of its goal.
A jump cut in animation is when the scene suddenly changes to a different shot without any smooth transition.
Instead of smoothly moving from one scene to the next, animators make sudden cuts that grab viewers’ attention and make the story more interesting.
Using jump cuts is all about breaking the rules and surprising the audience. Animators can jump between scenes that don’t seem to fit together logically, playing with time, space, and ideas in creative ways. This fresh approach lets viewers see familiar stories in a whole new light.
One big advantage of jump cuts is how they make scenes feel immediate and intense. By suddenly shifting time or space, animators make viewers sit up and take notice of key moments in the story. This makes emotional scenes even more powerful and memorable.
Jump cuts also add a cool visual flair to animations. By breaking up the smooth flow of the story, animators create a sense of energy and excitement that keeps viewers hooked. Mixing different images or scenes with jump cuts creates tension and mystery, making viewers want to figure out what’s going on.
In the end, using jump cuts in animation is a bold move that can make storytelling more exciting and creative. By embracing this unconventional technique, animators can break free from the usual rules and make animations that really stand out. Whether it’s adding surprise, energy, or just a new perspective to a scene, jump cuts are a versatile tool for making animations more engaging and memorable.
Keyframes in animation determine the appearance and movement of characters or objects. They mark the beginning or end of a motion.
Animation is an art form that has been around for decades. It has evolved from hand-drawn images to computer-generated graphics, but the basic principles remain the same. One of the most important aspects of animation is keyframes. A keyframe is a significant point of change in an animated sequence that helps create a smooth and fluid motion.
In traditional animation, keyframes were drawn by hand. The animator would draw the starting and ending points of an action or movement, and then other artists would fill in the frames between these two points, a process called inbetweening, or tweening. This process was time-consuming and required a lot of skill and talent. However, with modern technology, keyframe animation has become much easier.
In computer-generated animation, an animator will create a set of keyframes that represent the beginning and end of an action or movement. The software will then automatically generate the frames between each keyframe to create a smooth motion. The animator can then use a graph editor to edit these inbetween frames to achieve the desired effect.
One of the benefits of using keyframes in animation is that it allows animators to create complex movements with precision and accuracy. For example, if an animator wanted to create a character walking, they would create keyframes for each step. The software would then generate the frames between each step to create a natural-looking walking motion.
Another benefit of using keyframes is that it allows animators to easily make changes to their animations. If they want to adjust the timing or speed of an action, they can move the keyframes around to achieve the desired effect.
Keyframes are not just for motion, they can animate properties as well. For example, if an animator wanted to create an explosion, they could use keyframes to control the size and shape of the explosion as it grows and dissipates.
Overall, keyframe animation is an essential aspect of creating high-quality animations. It allows animators to create complex movements with precision and accuracy while also providing them with flexibility and control over their animations. With modern technology, keyframe animation has become much easier and more accessible, making it possible for anyone to create stunning animations.
Keyframe interpolation smooths movement between poses/positions in animation, making it natural. It's crucial for creating smooth transitions in cartoons/games.
Animation is a technique that has been used for decades to bring stories and characters to life. It is a process that involves creating a sequence of images that, when played in rapid succession, create the illusion of motion. One of the most important aspects of animation is keyframe interpolation.
Keyframe interpolation refers to the process of generating intermediate frames between two keyframes. Keyframes are frames that mark the beginning and end of a motion or change in an animated object’s properties such as position, rotation, scale, and opacity. The interpolation algorithm fills in the gaps between keyframes to create smooth and fluid motion. In traditional animation this process is done by hand and is known as tweening.
There are different types of keyframe interpolation techniques that animators can use. These include linear interpolation, ease-in/ ease-out interpolation, and spline interpolation.
Keyframe interpolation is an essential aspect of animation as it allows animators to create dynamic and realistic movement in their designs. By manipulating the timing and path of intermediate frames, they can bring their characters or objects to life and convey emotions and actions in an engaging way.
In addition to the types of keyframe interpolation techniques mentioned above, there are also other factors that can affect how smoothly an animation plays out. These include frame rate, easing curves, and timing. Animators must take all of these factors into account when creating their animations to ensure that they are smooth and fluid.
Kinetic typography: words move, dance or jump on screen for cool visual effect. Found in music videos, movie credits and educational videos!
Kinetic typography is a fun way to add creativity to projects, making it more engaging and memorable for viewers. With the ability to bring words to life, kinetic typography has become a popular technique in a wide range of industries.
One of the key benefits of kinetic typography is the ability to highlight key words and phrases. By animating specific words or phrases in a video, animators can draw the viewer’s attention to important information, making it more likely that they will remember it. This is especially useful in educational content, where complex concepts can be broken down into smaller, more digestible pieces using animated text.
Another benefit of kinetic typography is its ability to convey emotion and tone. With the use of color, font, and animation speed, text can be made to feel playful, serious, or anything in between. This is particularly effective in music videos, where lyrics can be brought to life through animated text that reflects the mood and tone of the song.
In addition to these benefits, kinetic typography can also be used to create visual interest and enhance storytelling. By combining moving text with other elements such as images or video footage, animators can create dynamic compositions that hold the viewer’s attention and convey complex ideas in a visually compelling way.
Of course, creating effective kinetic typography requires skill and creativity. Animators must carefully consider factors such as font choice, color palette, and animation speed to ensure that their work effectively communicates the desired message. They must also be able to synchronize the movement of the text with any accompanying sound or music.
Kinetic typography is a versatile technique that can be used to enhance videos in a wide range of contexts. Whether it’s used to highlight key information, convey emotion and tone, or create visual interest, the power of animated text cannot be denied. As such, it has become an essential tool in the world of animation, one that is sure to continue playing a key role in the years ahead.
Animation layers are like stacked sheets of paper. Each layer holds a different part of the image, allowing for easy editing and movement without affecting others.
Layering also enables animators to make changes to specific components of the animation without having to redo the entire image. For instance, if the character’s facial expression needs to be altered, it can be done on a separate layer without affecting the rest of the animation.
Layers are also important when it comes to creating motion graphics and visual effects. In motion graphics, layers are used to create different elements that make up the overall design of the animation. For example, in a logo animation, different layers can be used for each element of the logo such as the text, shape, and color. This allows for more precise control over each individual element and how it moves or interacts with other elements in the animation.
Visual effects such as explosions or particle effects require multiple layers to create a realistic effect. Each layer contains a different part of the effect such as smoke, fire, or debris. By animating each layer independently, animators can create an intricate effect that looks realistic and believable.
Furthermore, layers are not limited to just 2D animations. In 3D animations, layers are used to separate different parts of the render into individual sections that can be manipulated independently. For example, different layers can be used for a character’s body, clothing, and hair.
Layers are a crucial component in animation as they allow for greater control over individual elements in an image or animation. Animators use layers to separate different parts of an image so that they can be easily manipulated without affecting other elements. Layers enable animators to add depth and complexity to their animations and create stunning visual effects. Whether it is 2D or 3D animation, using layers is essential in creating high-quality animations that captivate audiences.
Lens distortion in animation is the stretching or bending of images due to the camera lens. It alters perspective and can be intentional for visual style or corrected for realism.
Lens distortion is a common issue that animators face and can greatly impact the final product. Understanding the two main types of lens distortion, barrel distortion and pincushion distortion, can help animators create intentional effects or avoid unwanted distortions.
Barrel distortion occurs when the edges of the frame appear to be bulging outwards. This effect can be used intentionally to create a fisheye lens effect, which can add a sense of urgency or disorientation to a scene. Fisheye lenses are often used in action sequences or horror movies to create an unsettling feeling for the viewer.
Pincushion distortion, on the other hand, appears as if the edges of the frame are being pulled inwards. This effect can give a more natural look to images captured by cameras with lenses that have this type of distortion. However, in animation, pincushion distortion is often not desired as it can make objects appear compressed and distorted.
In order to avoid unwanted lens distortion in animation, it is important for animators to carefully select their camera lens and adjust accordingly. For example, using a wider lens may lead to barrel distortion while using a longer lens may lead to pincushion distortion. Additionally, adjusting the position of the camera or changing the angle at which shots are taken can also affect lens distortion.
It is also important for animators to consider how lens distortion will affect their final product and whether it will contribute to their desired aesthetic. While fisheye lenses can add an interesting effect to certain scenes, overusing this effect can become distracting and take away from the overall quality of the animation.
In some cases, post-production techniques such as digital correction or compositing can be used to correct unwanted lens distortion. However, it is always best for animators to strive for proper camera selection and adjustment during filming in order to produce high-quality work.
Understanding lens distortion and its effects on animation is crucial for animators who wish to create intentional effects or avoid unwanted distortions. Careful consideration and adjustment of camera lenses during filming can greatly impact the final product and contribute to a professional and polished aesthetic.
Animation uses varying levels of detail to depict characters and objects based on their significance. Background characters have less detail compared to those in the foreground.
In the world of animation, LOD (Level of Detail) is an essential technique that is used to streamline the rendering process. It’s all about optimizing the complexity of an object or scene based on its proximity to the viewer. By reducing the level of detail in far-off objects, we can conserve resources and increase the render speed.
As a general rule, objects that are farther away from the viewer appear smaller and less detailed. This means that they don’t need to be rendered with as many polygons as their close-up counterparts. By using LOD techniques, animators can reduce the computational load on their graphics processors without sacrificing visual quality.
The benefits of LOD are particularly evident in real-time applications such as video games and simulations. In these scenarios, high frame rates are essential for creating a smooth and immersive experience. Without LOD, it would be much more difficult to maintain a consistent frame rate since there would be too many polygons to render.
Another way that LOD can be used in animation is by reducing the level of detail in large, complex scenes. For example, if there’s a sprawling cityscape in the background of a shot, it may make sense to use lower-detail models for buildings and other objects that are far away from the camera. This allows animators to conserve resources while still maintaining visual fidelity.
There are several different techniques that animators can use to implement LOD in their work. One approach is to use pre-made models at different levels of detail and switch between them depending on proximity to the camera. Another option is to dynamically adjust the level of detail based on factors like distance and angle.
Level of detail can also be used as a stylistic choice. In 2d animation drawing simpler images in the background will keep the focus on the elements in the foreground.
Overall, LOD is an essential technique for any animator or game developer who wants to create high-quality work that runs smoothly and looks great. By optimizing the level of detail in their scenes and objects, they can achieve a balance between visual fidelity and performance that will keep audiences engaged and immersed in their work.
Lighting in animation creates shadows, highlights, and depth. It sets the mood and style, enhancing realism or stylization.
In the world of animation, lighting can make all the difference in creating a captivating and memorable scene. Lighting is used to create a certain mood or atmosphere that can evoke emotions from the audience. Whether it be a suspenseful moment or a romantic scene, lighting can set the tone for what’s happening on screen.
One of the most common types of lighting in animation is ambient lighting. This type of lighting provides an overall illumination throughout a scene. It’s often used to create a base level of light that can be built upon with other types of lighting. Ambient lighting can also be used to create an even distribution of light so that no area is too dark.
Directional lighting is another type of lighting that is commonly used in animation. As the name suggests, this type of lighting comes from a specific direction and can be used to highlight certain objects or characters within the scene. A common example of directional lighting is sunlight. When animating a sunny day, it’s important to use directional lighting to emphasize the shadows created by the sun.
Spot lighting is another type of lighting that’s used in animation. This technique involves creating a focused beam of light that draws attention to specific areas within the scene. Spotlights are often used to highlight key moments or characters within a scene.
When animating a scene, it’s important to consider how shadows will play into the final product. Shadows can add depth and dimensionality to a scene and make it feel more realistic. They can also be used to create contrast and help certain elements stand out more. Shadows are particularly important in 2d animation since they can be hard to animate, but they add a lot of atmosphere to a scene.
Finally, color plays an integral role in setting the mood for any given scene. As mentioned before, warm colors like red and yellow can create a sense of warmth and intimacy, while cooler colors like blue and green can create a sense of distance or detachment. When selecting colors for your scenes, think about what you’re trying to convey emotionally, or atmospherically, and choose colors accordingly. Colors can also be used to tell the story, letting you know where you are in the story, or what’s happening.
Lighting is an essential aspect of animation that can make or break a scene. By using different types of lighting, creating shadows, and selecting the right colors, animators can create captivating scenes that evoke emotions from their audience.
The "Line of Action" guides animators to show movement direction, aiding in creating smooth and dynamic animations.
Animation is a complex and intricate art form that requires careful attention to detail and a deep understanding of human movement. One of the key concepts that animators rely on is a line of action, which is an imaginary line that runs through the main axis of a character’s body.
The line of action serves as a guide for animators, helping them to create movement that is consistent and believable. By following this line, animators can ensure that all other movements are built around the character’s spine, giving them a sense of weight and balance.
In addition to providing a foundation for movement, the line of action can also be used to convey a character’s emotional state and personality. For instance, if a character is feeling sad or defeated, their line of action might be slumped and drooping. On the other hand, if a character is confident and energetic, their line might be more upright and dynamic.
By focusing on the line of action, animators can create performances that are more convincing and engaging for viewers. This is because movement that follows a clear line of action looks more natural and fluid, drawing viewers into the story and helping them to connect with the characters on an emotional level.
One way that animators use the line of action in practice is by sketching out rough poses before creating final animations. By starting with simple stick figures or basic shapes, they can experiment with different lines of action to see how they affect the overall movement of the character. This process allows animators to refine their designs and create more appealing performances.
Another important aspect of working with the line of action is understanding how it relates to other elements of animation such as timing, spacing, and weight. Animators must carefully consider these factors when creating movement so that it looks convincing and realistic.
The line of action is an essential concept in animation that helps animators create believable movement for their characters. By following this imaginary spine, they can create performances that convey emotion, personality, and weight, drawing viewers into the story and creating a more engaging experience.
Lip syncing: animator makes character's mouth move with words. Makes it seem like character is talking. Must match words for realism and believability.
Good lip requires a great deal of skill and attention to detail. Animators must have a thorough understanding of the human mouth and how it moves to create realistic lip movements that match the words being spoken. They also need to have a keen ear for sound so that they can accurately time each movement to the dialogue.
There are several techniques that animators use to achieve lip sync in their work. One popular method is to use reference footage of voice actors (or the animators themselves) performing the dialogue. This allows animators to study the movements of the actor’s mouth and use them as a guide for creating their own animation. Another technique involves using phoneme charts, which provide a visual representation of each sound in a language. Animators can use these charts to ensure that each phoneme is correctly timed and shaped.
Regardless of the technique used, lip syncing requires a great deal of practice and patience. Animators often spend hours studying reference footage or working on individual frames to ensure that every movement is perfectly synchronized with the dialogue. Even the slightest mistake can be noticeable and distracting, so attention to detail is essential.
Lip syncing is an important aspect of animation that requires skill, patience, and attention to detail. It helps to make characters appear more realistic and believable while also enhancing the overall quality of an animation. Despite its challenges, lip syncing is an essential tool for any animator who wants to create high-quality work that accurately reflects the intended dialogue or sound.
A looping animation is an animation that repeats continuously, with the last frame flowing naturally into the first.
Looping is commonly used in short animations, games, icons, and digital illustrations. It allows a small number of frames to create the impression of ongoing movement without needing a long video.
A well-made loop feels smooth and natural. The viewer should not notice where the animation restarts.
For an animation to loop successfully, the final frame must connect clearly to the first frame.
This means that:
If the first and last frames do not match, the animation will appear to “jump” when it restarts.
In tools like Brush Ninja, loops are created by arranging frames so that the sequence flows back to the beginning.
Many everyday animations are loops.
Examples include:
These movements repeat naturally, making them easy to loop smoothly.
Good loops are planned from the start.
When designing a looping animation, it helps to:
One common technique is to make the first and last frames identical. This guarantees a smooth transition, although it is not always necessary.
Another approach is to design the movement as a cycle, such as a walk or bounce, where the ending naturally leads back to the beginning.
Low key lughting in animation is a technique that uses dark shadows to create intense and dramatic scenes.
Low key lighting is an important technique in animation that helps create intense and dramatic scenes. By carefully using light and shadow, animators make certain parts stand out while keeping others mysterious. This adds depth and emotion to the animation, drawing viewers in.
Low key lighting is great for scenes that need to feel suspenseful or tense. By lighting up specific areas, animators make viewers feel curious and engaged. They can also play with shadows to add layers to the visuals and make the story more interesting.
Using low key lighting isn’t just about setting the mood; it also helps tell the story visually. Animators can use light and shadow to show characters’ emotions, highlight important moments, or make scenes feel dramatic. By controlling the lighting, they guide viewers’ attention and create captivating scenes.
In contrast to low key lighting, high key lighting floods scenes with bright, even light to create cheerful and optimistic atmospheres. It’s great for making animations feel vibrant and lively, with clear details and a positive vibe.
In the end, low key lighting is a valuable tool for animators to make their animations more exciting and expressive. It adds emotion, depth, and intensity to scenes, making them unforgettable for viewers.
MP3 files are a compact and widely used format for storing music and sound.
When it comes to animation, sound effects and background music are crucial components that help enhance the overall visual experience. These audio files are often saved and distributed in the popular MP3 file format, allowing for easy sharing and playback across various devices and platforms.
Without the inclusion of sound effects and music, animations can feel incomplete or lacking in depth.
Sound effects play a vital role in creating a sense of realism within animations. Whether it’s the subtle rustling of leaves or the booming explosion of a rocket launch, sound effects help immerse viewers into the animated world by adding audio cues that reinforce what they see on-screen. The use of MP3 files allows for efficient storage and distribution of these sound effects without compromising their quality.
Background music is another essential aspect of animation that helps set the mood, evoke emotions, and guide the narrative. From suspenseful orchestral scores to catchy tunes that accompany dance sequences, music adds an extra layer of depth to animated scenes. By using MP3 files for background music, animators can easily incorporate their chosen tracks into their projects while ensuring compatibility across different devices.
Moreover, MP3 files offer significant advantages in terms of file size compression while maintaining high audio quality. This is particularly important when considering bandwidth limitations for online streaming platforms or when distributing animations through digital channels like social media or websites. By utilizing MP3 files for audio elements in animations, creators can strike a balance between delivering excellent sound quality while keeping file sizes manageable for easy distribution.
If you have an MP4 file that you would like to extract the audio from, converting it into an MP3 then we have an MP3 extractor tool you can use for free.
MP4 files store animated videos in a compact format for easy sharing and viewing on various devices.
The MP4 file format has become an important part of the animation industry. Animation studios and professionals rely on this versatile multimedia container format for storing, sharing, and transmitting their creations.
One of the major advantages of using MP4 for animation is its ability to compress audio and video data efficiently using codecs like H.264 or AAC. This compression technology ensures that high-quality playback is achieved while keeping the file size relatively small. This is particularly important when it comes to streaming media over the internet or storing content on portable devices with limited storage capacity.
In addition to its efficient compression capabilities, MP4 also supports a wide range of multimedia features. For instance, it allows for the inclusion of subtitles, images, and metadata within the same file. This means that animators can conveniently package all relevant elements together in one container without having to deal with separate files.
Furthermore, being widely supported across various platforms and devices makes MP4 an ideal choice for animation professionals. Whether it’s viewing animations on smartphones, tablets, computers, or smart TVs, users can easily access and enjoy MP4 files without compatibility issues.
If you have MP4 files and want to convert them to a different format then you can use our collection of file format convertors.
Match cuts are a technique for linking two scenes smoothly. They work by connecting similar elements between shots, like movement or colors.
Match cuts are a handy tool in animation for linking two scenes smoothly. They work by connecting similar elements between shots, like movement or colors. This keeps the story flowing well and helps viewers stay engaged.
One great thing about match cuts is how they keep the story consistent. They’re perfect for moving between different places, times, or emotions without confusing the audience. Instead, they guide viewers from one scene to the next seamlessly.
Match cuts also add depth to the story by showing connections between seemingly unrelated scenes. By lining up visuals in different shots, animators can create parallels or differences that make the story more interesting. This gets viewers thinking and engaged in the story.
In animation, where every detail is important, match cuts show off animators’ skills and attention to detail. The precision needed to sync up elements in different shots highlights animators’ dedication to making animations look polished and captivating.
Besides being technically impressive, match cuts can also stir emotions in the audience by setting the rhythm and mood of a scene. They’re great for building tension, showing feelings, or smoothly moving between moments, adding depth to the story.
Match cuts are a tool for animators to connect different parts of a story smoothly. With careful attention to detail, thematic exploration, emotional impact, and technical skill, animators use match cuts to tell captivating stories that stick with audiences long after they’ve watched them.
Matte painting: detailed art used in movies and animations. It creates unreal places like fantasy worlds or futuristic cities on large canvas.
Matte painting is an important technique in the animation (and movie) industry that allows animators to create realistic and immersive environments for their characters and stories. This technique is a cost-effective way of creating backgrounds and settings that would otherwise be too expensive or impossible to construct in real life.
One of the main advantages of matte paintings is its ability to create convincing backdrops that can seamlessly blend with live-action footage or 3D animation. This is achieved by creating a painting or digital image that accurately represents the environment, incorporating elements such as mountains, buildings, and other large structures.
In traditional animation, matte paintings were created on glass plates using oil paints or other materials. These plates were then placed in front of the camera during filming to create the illusion of a realistic environment. However, with the rise of digital technology, many animators now use computer software to create their matte paintings.
Another advantage of matte painting is the ability to save time and money during production. Instead of building expensive sets or traveling to different locations for filming, animators can simply create a digital painting that accurately represents the environment they want to depict. This not only saves money on production costs but also allows for greater creative freedom in designing unique or impossible environments.
Matte painting is a crucial technique in the animation industry that allows animators to create immersive environments for their characters and stories. Whether done using traditional techniques or digital software, matte painting offers many advantages in terms of cost-effectiveness, flexibility, and creative freedom. As the animation industry continues to evolve, it is likely that matte painting will remain an important tool for animators looking to create visually stunning and engaging environments for their audiences.
Montages in animation are fast-paced story snippets that compress time.
Montages in animation are fast-paced story snippets that compress time. They are often used to show character growth, although that’s not the only use. They’re a handy tool for animators to quickly share information and feelings with viewers.
Montages work by showing a series of quick scenes or images that move the story along without getting bogged down in every little detail. Animators use rapid cuts to blend these scenes together smoothly, keeping the audience hooked on the evolving storyline.
They’re also great for showing how characters change over time. By putting together a sequence of images or scenes, animators can show how a character grows in skills, relationships, or personality traits. Whether it’s a hero going from beginner to expert or experiencing big emotional moments, montages capture these transformations with depth and detail.
Montages help with smooth transitions between different parts of the story, too. By creatively editing scenes and adding music or narration, animators can move the story forward seamlessly, even when jumping between different times or places. This keeps viewers engaged and connected to the story.
Plus, montages are excellent at stirring up emotions in viewers without needing lots of talking. By combining images, colors, and music in just the right way, animators can create sequences that make viewers feel joy, sadness, excitement, or triumph. This deepens the audience’s connection to the story.
Montages are a fun way for animators to tell engaging stories in animation. They’re a way to condense time, show character growth, transition smoothly between scenes, and evoke strong emotions in viewers. With careful editing and thoughtful choices, animators use montages to craft stories that captivate audiences and stay with them long after the animation ends.
Morphing is the slow transformation of one object or character into another, like a butterfly becoming a bird or a person turning into an alien.
Morphing is a popular animation technique that has been used in various forms of media, from movies and television shows to video games and advertising campaigns. The process involves transforming one image into another gradually, creating a seamless transition between the two images.
To achieve this effect, animators typically create a sequence of intermediate images between the start and end images. Each image in the sequence is a blend of the previous and next image, resulting in a gradual transformation over time. This can be done manually, but most modern animation software includes automatic morphing tools that make the process easier.
In addition to its use in animation, morphing has also been used in a variety of other applications. For example, medical imaging software often uses morphing techniques to create 3D models of organs or other structures within the body. By gradually transforming one image into another, doctors can get a better sense of how different structures are related to one another.
Morphing has also been used extensively in special effects for movies and television shows. By using advanced compositing techniques, visual effects artists can seamlessly blend together different elements to create realistic and believable effects. For example, they might use morphing to transform an actor’s face into that of a monster or alien creature.
Overall, morphing is an incredibly versatile technique that has been used in many different contexts over the years. Whether you’re an animator looking to create smooth transitions between scenes or a doctor trying to visualize complex medical data, morphing can be an incredibly useful tool.
Motion blur is a visual effect in animation that creates the illusion of fast movement by making object edges appear blurry, similar to capturing a photo of a runner with blurred legs.
Motion blur is a crucial aspect of animation that can make or break the quality of the final product. It is used to create the illusion of movement by blurring or smearing the image of an object across multiple frames.
Creating motion blur involves blending multiple frames together to produce a trail or streak behind moving objects. The amount of blur applied can be adjusted to produce different effects, from subtle blurs for slow movements to more pronounced blurs for fast movements. This technique conveys a sense of speed and momentum that would be difficult to achieve with static images.
There are several methods for creating motion blur in animation, including vector blur, pixel blur, object blur, and camera blur.
Camera blur is another popular method used in animation that simulates the effect of a camera capturing a moving object. This technique involves adjusting the shutter speed of the virtual camera to capture multiple frames per second, which are then blended together to create motion blur.
Motion blur is an essential aspect of animation that enhances the realism and fluidity of movement. It helps convey a sense of speed and momentum that would be difficult to achieve with static images alone. Animators have several methods at their disposal for creating motion blur, and the appropriate method will depend on the desired effect and the specific requirements of the animation. Without motion blur, an animation can appear choppy and incomplete, detracting from its overall quality.
Motion capture is a tech where real movements are recorded and used to animate characters in movies, games, and TV shows. Sensors on a person pick up their movements and cameras record them, then the data is applied to animation.
Motion capture has revolutionized the animation industry by allowing animators to quickly create realistic movements that are true to life. Instead of spending hours trying to animate each movement frame by frame, motion capture technology can capture the movements of real-life actors and use that data to create digital animations.
One of the biggest advantages of motion capture is that it allows animators to create complex movements that would be difficult. For example, imagine trying to animate a character doing a backflip or a martial arts sequence. These movements require precise timing and coordination between different parts of the body, which can be challenging to simulate using traditional animation techniques. With motion capture, however, an actor can perform these movements in real life, and their movements can be translated into digital animations with ease.
Another advantage of motion capture is that it allows for greater consistency in character movements. When animating by hand, it can be difficult to maintain consistent movements across different scenes or episodes. With motion capture, however, the same actor can perform the same movements multiple times, ensuring that the resulting animations are consistent and cohesive.
However, motion capture is not without its challenges. One of the biggest challenges is ensuring that the data captured from the actor’s movements is accurate and reliable. Even slight errors in tracking or calibration can result in animations that look unnatural or jerky. Additionally, motion capture technology can be expensive to set up and operate, which may limit its accessibility for smaller studios or independent animators.
Motion capture is a powerful tool that has transformed the animation industry. By capturing the movements of real-life actors and objects, motion capture technology allows animators to create realistic and believable animations that would be difficult or impossible to achieve using traditional animation techniques. While it does have its challenges, the benefits of motion capture make it an essential tool for any animator or game developer looking to create immersive and engaging experiences for their audiences.
Motion graphics are moving pictures and words that tell stories or convey information in a fun and engaging manner. They enhance cartoons, videos, and films by adding excitement and improving our understanding of ideas.
Motion graphics is a rapidly growing field in the world of animation, thanks to its ability to convey complex information and ideas through visually stunning animations. It combines graphic design, animation, and video production techniques to create animations that are both engaging and informative. The use of moving graphics, text, and other visual elements helps to communicate a message or tell a story in a way that is both captivating and memorable.
One of the primary goals of motion graphics is to hold the audience’s attention. This is achieved through the use of dynamic visuals that are designed to draw the viewer’s eye and keep them engaged.
Another key aspect of motion graphics is its ability to convey information in an easily digestible format. By using visual elements such as charts, graphs, and diagrams, complex data can be presented in a way that is easy to understand. This makes motion graphics an ideal tool for explaining complex concepts or processes, such as those found in scientific or technical fields.
Motion graphics can be used in a variety of contexts, including advertising, marketing, entertainment, education, and more. In advertising and marketing, motion graphics can be used to promote products or services by creating visually striking advertisements that capture the viewer’s attention. In entertainment, motion graphics are often used in opening titles for films or TV shows to set the tone.
One area where motion graphics has proven particularly effective is in online content creation. With the rise of social media platforms like YouTube, Instagram and TikTok, there has been an explosion in demand for short-form video content that can be consumed quickly and easily on mobile devices. Motion graphics are ideal for this type of content.
Overall, motion graphics is an exciting and rapidly evolving field that blends creativity with technology to produce eye-catching visuals that help bring concepts to life. As the demand for high-quality online content continues to grow, it is likely that motion graphics will continue to play an increasingly important role in the world of animation and video production.
A motion path is a line that depicts character or object movement in animation.
In animation, motion paths play a crucial role in bringing characters and objects to life. Motion paths can be thought of as the backbone of any animated scene, providing a framework for the movement that takes place.
One of the primary uses of motion paths is to create complex and dynamic movements that would be difficult or impossible to achieve manually. For example, if an animator wanted to create a scene where a bird flies across the screen, they could use a motion path to define the bird’s flight path. The motion path would allow them to control the bird’s speed, direction, and altitude, creating a realistic flight pattern that would be difficult to achieve through manual animation.
In most animation software, motion paths can be adjusted and manipulated in a variety of ways. Animators can alter the shape and orientation of a path using curve handles or other tools, allowing them to fine-tune the movement of an object. They can also adjust the timing and speed of an object’s movement along the path, creating smooth and natural-looking animations.
One important consideration when working with motion paths is the concept of easing. Easing refers to the way an object accelerates and decelerates as it moves along a path. In real life, objects rarely move at a constant speed - they usually start out slow, accelerate as they gain momentum, then slow down again as they come to a stop. Animators can replicate this effect by adjusting the easing on their motion paths, creating more natural-looking movement.
Motion paths are a fundamental part of animation, providing a way to create complex movements and interesting visual effects. They allow animators to fine-tune the movement of objects and characters, creating immersive and engaging animated scenes. By understanding the principles of motion paths and how to manipulate them, animators can take their work to the next level and create animations that truly come to life.
Motion trails are stylish effects that display the trajectory of a moving object on screen.
A motion trail is created by displaying a series of ghost images or “frames” of an object as it moves through space. Each frame is slightly transparent and offset from the previous one, creating a motion trail effect that shows the path of the object’s movement. The motion trail also helps in visualizing the speed and momentum of an object.
Motion trails are often used in video games to show the path of a moving object, such as a bullet or a character. They can also be used in animation to create a sense of speed and motion. They are closely related to Motion Blur.
The creation of motion trail effects requires an understanding of timing and spacing in animation. Timing refers to the number of frames that are used to depict a specific action, while spacing refers to the amount of distance and speed covered by an object between each frame. By adjusting both timing and spacing, animators can create realistic and visually appealing animations.
In addition to traditional animation, motion trails have become increasingly popular in video game development. In video games, motion trails are often used to display the path that a player has taken or to show where an enemy is moving on the screen. These make the motion easier to see, especially in fast-paced games where objects move quickly.
Motion trails are a popular technique for animators who want to create exciting animations that look realistic and visually engaging. They provide a clear understanding of how objects move through space and time, helping animators create animations that feel natural and believable. With their many applications in animation, motion trails will continue to be an important part of the animator’s toolkit for years to come.
Mouth shapes are positions and movements in animation used to match sounds made by characters when they talk. Different shapes represent different sounds.
Animation is a process of bringing inanimate objects to life. It is a medium that makes use of technology and creativity to tell stories, convey emotions, and create memorable characters. One of the key elements of animation is the use of mouth shapes or phonemes. These shapes are used to create the illusion of speech and make characters appear more lifelike.
Mouth shapes are specific positions that the mouth makes when pronouncing different sounds in speech. In animation, these shapes are used to create dialogue for characters.
There are several common mouth shapes used in animation, each representing a specific sound or phoneme. The first and most basic shape is the neutral shape. This is the default position of the mouth with lips closed and teeth slightly apart. Animators use this shape as a starting point for all other mouth shapes.
By using a combination of these mouth shapes, animators can create realistic dialogue for their characters and convey different emotions and moods through their expressions. The use of mouth shapes is essential in creating believable characters and making them relatable to the audience.
Mouth shapes are an essential element in animation. They are used to create the illusion of speech and make characters appear more lifelike. There are several common mouth shapes used in animation, each representing a specific sound or phoneme. By using a combination of these shapes, animators can create realistic dialogue for their characters and convey different emotions and moods through their expressions. The use of mouth shapes is a critical aspect of creating believable characters and engaging stories in animation.
Network rendering is when multiple computers collaborate to create an animated movie faster and with better results.
Network rendering is a technique used in animation to distribute the rendering workload across multiple computers connected to a network. Instead of relying on a single computer to render an entire project, network rendering allows the workload to be distributed among multiple computers, which can significantly reduce the time required for rendering.
By using network rendering, animators can take advantage of the collective computing power of multiple machines to render high-quality animations more quickly. This technique is particularly useful for large-scale projects that require heavy processing power and can take days or even weeks to render on a single machine.
The process involves setting up a render farm - which is essentially a group of computers connected together on a network - and installing specific software that allows them to communicate with each other and work together. The animation files are then divided into smaller segments, with each segment assigned to a particular computer on the network for rendering.
Once all the segments have been rendered, they are automatically sent back to the main computer where they are combined into a completed animation. This results in significant time savings and allows animators to focus on other aspects of their work while the rendering process takes place in the background.
Non-linear editing lets animators jump around editing different parts of their project in whatever order they like.
Non-linear editing in animation is a process that’s made editing much easier and more creative. Unlike traditional editing, where you have to work in order, non-linear editing lets animators jump around between different parts of their project whenever they want.
This flexibility is a big advantage. Animators can try out ideas and work on different parts of their project at the same time, which speeds up the editing process. It also means they can make changes to specific parts without redoing everything, saving a lot of time and stress.
Non-linear editing systems also encourage creativity. Animators can experiment with new storytelling techniques and visual styles without being held back by old rules. They can rearrange, trim, and layer animations however they like, giving them more control over how their project feels and flows. This freedom lets them tell more interesting stories and connect with audiences in deeper ways.
Non-linear editing in animation is typically done using specialized software programs designed for this purpose. Some popular non-linear editing software tools used in animation include:
You can see some alternatives to these apps in this video editing software list.
These tools offer a range of features such as timeline editing, trimming, audio editing, visual effects, and color correction, allowing animators to create and edit their projects with precision and efficiency.
Non-linear editing has revolutionized animation by making editing more efficient and flexible. It’s given animators the tools they need to bring their ideas to life with ease and precision. As technology keeps improving, non-linear editing systems will keep playing a bigger role in shaping the future of animation.
Occlusion culling hides unseen elements in games/movies to improve performance by reducing unnecessary rendering.
Occlusion culling is an important technique used in animation to optimize the rendering performance of a scene. The process involves identifying objects that are not visible to the camera and excluding them from the rendering process. This not only improves performance but also allows for more complex scenes to be rendered.
One of the main benefits of occlusion culling is that it reduces the number of objects that need to be rendered, thereby improving the overall performance of the animation. This is particularly important in complex scenes where there may be a large number of objects that need to be rendered. By excluding objects that are not visible, rendering time can be significantly reduced.
There are several different methods for implementing occlusion culling in animation. One common technique is to use geometry-based techniques such as portals or occlusion meshes. Portals are essentially invisible doors that allow the camera to see into another part of the scene. By using portals, it is possible to limit the amount of geometry that needs to be rendered by only rendering what is visible through the portal.
Another method for implementing occlusion culling is to use image-based techniques such as depth buffer testing or stencil buffer masking. Depth buffer testing involves comparing the depth of each pixel in a scene with a pre-determined threshold value. If a pixel falls below this threshold, it is considered occluded and excluded from the rendering process. Stencil buffer masking involves using a mask to exclude objects that are not visible from the camera.
While occlusion culling can significantly improve performance, it is important to note that it can also introduce some limitations on what can be rendered. Objects that are partially occluded may not be rendered correctly, which can lead to visual artifacts or glitches in the animation. Additionally, implementing occlusion culling can add additional complexity to the animation pipeline, which may require additional resources and expertise.
Despite these limitations, occlusion culling remains an important technique for optimizing rendering performance in animation. By reducing the number of objects that need to be rendered, it allows for more complex scenes to be created without sacrificing performance. As animation technology continues to advance, it is likely that occlusion culling will continue to play an important role in optimizing rendering performance and enabling more complex and realistic animations to be created.
Onion skinning helps animators create smooth animations by overlaying previous and next frames on top of the current one.
Onion skinning is an essential technique for animators to create smooth and consistent animations. It enables the animator to visualize the character’s movement, ensuring that they move seamlessly from one pose to another. Onion skinning is especially useful in 2D animation, where each frame must be drawn manually.
In Brush Ninja Animation Maker the onion skinning tool can be toggled on by pressing the button that looks like an onion. This will overlay the 3 previous, and 3 following frames on top of the current frame. This allows you to see how the character moves over time and ensure that the movement is consistent across all frames.
The process of onion skinning involves displaying multiple frames of an animation at once, with each frame slightly transparent and superimposed on top of each other. This technique allows animators to see the previous and next frames as a reference point for the current frame they are working on. By doing so, they can ensure that the character’s movement is consistent across all frames.
Onion skinning helps animators to create smoother animations by allowing them to see how their characters move over time. Without this technique, it would be challenging to create seamless transitions between poses. Animators would have to rely solely on their memory or guesswork when drawing each frame.
Onion skinning is an incredibly useful technique for animators looking to create smooth and consistent animations. It allows them to see how their characters move over time and ensures that their movements are consistent across all frames. Whether using 2D or 3D animation software, onion skinning is an essential tool for every animator.
"Overlapping action" in animation: parts of a character move at different times to create natural movements, like swinging arms after legs start running.
Overlapping action is an essential principle of animation that can help bring life to otherwise static characters. It is a technique that involves the independent movement of one or more parts of an object, which creates a natural and fluid motion in the animation. This technique is widely used in various forms of animated media, including movies, television shows, and video games.
One common example of overlapping action is when a character runs and then suddenly stops. In this scenario, the character’s body would continue to move forward due to momentum. However, their hair or clothing would still be moving forward before settling back into place. The same principle can be applied to other parts of the character’s body, such as their arms or legs.
Another way that overlapping action can be used is by creating secondary actions within the animation. This could include a character’s arms swinging while they walk or talk or their hair swaying in the wind. These movements add depth and dimension to the animation, making it more interesting and engaging for the viewer.
Overlapping action can also be used as a storytelling device. For example, if a character is feeling nervous or anxious, their hands may shake or fidget independently from their body movements. This subtle movement can help convey emotion and provide insight into the character’s state of mind.
To effectively use overlapping action in an animation, it is important to consider the physics and mechanics of movement. Animators must understand how different parts of the body move independently from one another and how momentum plays a role in motion. They must also take into account factors like gravity and friction when creating realistic movements.
Overall, overlapping action is an essential principle of animation that helps bring characters to life on screen. By creating natural movements and secondary actions, animators can make their animations more engaging and immersive for viewers. To master this technique requires careful attention to detail and an understanding of the mechanics of movement, but the end result is a more dynamic and realistic animation.
PDF is a document file format designed to preserve layout and appearance across devices and platforms.
PDF stands for Portable Document Format.
PDFs files are designed to preserve layout, fonts, images, and page structure exactly as intended.
PDF files are commonly used when content needs to be shared or printed without changes.
Typical uses include documents, reports, forms, manuals, comics, and layouts where appearance matters more than editability.
Because PDFs look the same everywhere, they are widely used for distribution.
PDFs are not primarily designed for editing. While some software allows annotations or form filling, the underlying content is usually fixed.
PDFs can include interactive elements such as links, buttons, and embedded media, but support for advanced features varies between viewers.
When content is exported as a PDF, it represents a finished version of that work. The original source or project file is usually required to make further changes.
This makes PDFs suitable for sharing final output rather than ongoing editing.
Most modern devices can open PDF files using built-in viewers or web browsers. This makes PDFs a reliable choice for long-term access and sharing.
File sizes vary depending on content, especially when images are included.
A PDF is a fixed-layout document format designed to preserve appearance across platforms. It is widely supported, reliable for sharing, and best suited for finished content where layout consistency is important.
PNG is a file format for images.
PNG (Portable Network Graphics) is a file format that is primarily designed for use on the web. Unlike other popular image formats like JPEG and GIF, PNG uses lossless compression techniques that doesn’t degrade the quality of the image. This means that even after saving an image in PNG format, you won’t lose any of its original quality.
Brush Ninja animated gif maker has an option for saving all frames as PNG files. This is useful if you want to edit the frames in another program, or if you want to use the frames in a video editor.
PNG files support transparency and alpha channels, which means that parts of the image can be made transparent or semi-transparent. For animators, this feature is especially useful when creating animations with overlapping objects or when they want to blend multiple images together seamlessly.
Moreover, PNG’s lossless compression allows animators to work with high-quality images without worrying about losing any details during compression. This makes it ideal for creating animations that require precise color accuracy and sharp details.
Another advantage offered by PNG over other formats is its support for gamma correction and color profiles. Gamma correction ensures that colors appear consistent across different devices while color profiles ensure accurate color reproduction on different displays.
Additionally, unlike GIFs that have limitations on their color palette due to their 8-bit encoding scheme, PNGs support up to 24-bit RGB encoding which allows for a broader range of colors in animations.
Panning is a camera movement that adds depth, motion, and interest to animation scenes. It's used to follow moving objects, reveal new parts of a scene, and set the environment.
In animation, a pan is a useful way to make a scene feel more alive. It involves moving the camera sideways across the screen, giving viewers a sense of depth and motion. This smooth movement helps keep the audience engaged and directs their attention to specific parts of the scene.
One main use of panning is to follow something that’s moving. Whether it’s a character running or an object flying, panning helps viewers keep track of the action and feel like they’re right there with the characters. It adds excitement and energy to scenes like chase sequences or peaceful walks through landscapes.
Panning can also reveal new things in a scene. By slowly showing different parts of the scene, it builds suspense and makes viewers curious about what’s coming next. It’s like uncovering hidden surprises, whether it’s a character lurking in the shadows or a beautiful view just around the corner.
Besides, panning helps set the scene by showing the environment. Sweeping across the scene, it gives viewers a sense of the space and surroundings, like the layout of a city or the details in a room. This helps viewers understand where the story takes place and adds depth to the animation.
In summary, panning is a key technique in animation that adds movement, excitement, and depth to scenes. By using pans effectively, animators can make their scenes more engaging, evoke emotions, and transport viewers to captivating worlds.
Parallel rendering uses multiple computers to speed up the creation of animated movies or video games.
Parallel rendering has become increasingly popular in the animation industry as it allows for faster and more efficient creation of high-quality animated content. With the continuous advancements in technology, animation studios have access to more powerful hardware and software that can handle complex tasks, such as rendering. However, even with these powerful tools, rendering an animation can still take a significant amount of time.
One of the main advantages of parallel rendering is speed. By distributing the workload across multiple processors or computers, each machine can focus on a specific part of the rendering process simultaneously. This means that instead of waiting for one machine to complete rendering a frame before moving on to the next, multiple frames can be rendered at once. This results in significantly faster render times, which is especially important for studios working on tight deadlines.
Another benefit of parallel rendering is its ability to handle large-scale projects. As animations become more complex and detailed, they require more processing power to render. Parallel rendering allows studios to scale their processing power as needed by adding more machines or processors to the mix. This means that studios can take on bigger projects without having to worry about hardware limitations.
The implementation of parallel rendering can vary depending on the project’s size and resources available. In some cases, studios may use distributed computing systems where different machines work together over a network to complete a task. In other cases, parallel processing architectures may be used where multiple processors work together within a single machine.
However, implementing parallel rendering comes with its own set of challenges. For example, careful coordination and synchronization between the different processing units are necessary to ensure that the output is consistent and accurate. Additionally, not all tasks can be easily divided into smaller parts for parallel processing. This means that certain tasks may still need to be completed sequentially on a single machine.
Parallel rendering has revolutionized the animation industry by allowing studios to create high-quality animations faster and more efficiently than ever before. Although it requires careful coordination and synchronization between processing units, the benefits of parallel rendering, including faster render times and scalability, make it an essential technique for studios working on large-scale projects.
Particle systems are animation tools that create small objects (particles) to simulate fire, explosions, and sparkles by moving and interacting with each other.
Particle systems are an essential tool in the animation industry, allowing animators to create dynamic and visually impressive effects. These systems consist of small 2D or 3D objects called particles that are controlled by a set of rules and parameters. Each particle has its own properties such as mass, velocity, color, and lifespan.
One of the benefits of particle systems is their versatility. They can be used to create a wide range of visual effects, including fire, smoke, explosions, rain, snow, and more. These effects can be used in a variety of media, including movies, video games, and television shows.
To create a particle system, the animator first determines the type of effect they wish to create. For example, if they want to create a fire effect, they will need to determine the size and color of the flames and how they should behave. Once these parameters are defined, the animator can begin creating the individual particles that make up the system.
The particles are usually emitted from a specific point or area and then move according to the rules set by the animator. These rules can include gravity, wind speed and direction, turbulence, and more. The particles can also interact with other objects in the scene such as obstacles that they collide with or attractors that they are drawn towards.
One of the benefits of using a particle system is that it allows for realistic environmental effects like smoke or dust clouds. For example, in a video game set in a post-apocalyptic world, dust clouds created by a particle system could add to the atmosphere of the game.
Particle systems can also be used for special effects in movies. Explosions or magical effects can be created using particle systems to add realism to scenes that would otherwise be difficult or impossible to create using traditional animation techniques.
Particle systems are an important tool for animators looking to create dynamic and visually interesting effects in their work. They offer versatility in terms of the types of effects that can be created and are used in a variety of media, including movies, video games, and television shows.
The Persistence of Vision theory explains how our eyes and brains create the illusion of movement.
The concept of persistence of vision has been used in animation for over a century. It is the foundation for all animation techniques, including hand-drawn, stop-motion, and computer-generated animation.
In traditional hand-drawn animation, an animator creates a series of still images on separate sheets of paper. Each image shows a slight change in position or expression. These drawings are then photographed in sequence and played back at a fast enough rate to create the illusion of movement.
Stop-motion animation works in a similar way. Instead of drawing images, animators use physical objects that can be moved slightly between frames. For example, clay figures can be manipulated and photographed one frame at a time to create the illusion of movement.
Computer-generated animation uses persistence of vision as well. Animators create 3D models and then move them slightly between frames. The computer software then renders the frames into a video file that can be played back to create seamless motion.
Frame rate and motion blur also play an important role in Persistence of vision. The frame rate determines how many frames are shown per second. The higher the frame rate, the smoother the motion appears to the viewer. Motion blur is created by showing each frame slightly blurred at the edges to simulate how our eyes perceive objects in motion.
While persistence of vision is essential for creating animation, it is not perfect. The human eye has a limited frame rate, meaning it cannot perceive individual images that appear and disappear too quickly. This can lead to problems with flickering or stuttering animations if the frame rate is too low.
In recent years, advances in technology have allowed for even more realistic animations by increasing frame rates and improving motion blur techniques. Virtual reality and augmented reality have also pushed the limits of animation by requiring even higher frame rates to maintain immersion.
In conclusion, persistence of vision is a key concept in animation that allows animators to create the illusion of movement through exploiting how our eyes perceive images. It has been used for over a century in various animation techniques, including hand-drawn, stop-motion, and computer-generated animation. Advances in technology have allowed for even more realistic animations, and the demand for high-quality animation continues to grow in various industries.
Phonemes are the smallest sounds in our language. In animation, they help characters' mouths match their words using different mouth shapes and movements.
When it comes to animation, the smallest units of sound that make up a spoken language are known as phonemes. These sounds are incredibly important for animators when creating lip-syncing that matches the dialogue being spoken by their characters. Without accurate phoneme representation, the lip movements of a character can be jarring and unnatural, causing the viewer to become distracted from the story being told.
One of the biggest challenges facing animators is accurately syncing mouth movements to dialogue. By breaking down dialogue into individual phonemes, animators can create more realistic and believable characters. For instance, if an animator is working on a cartoon character that says “hello,” they would need to understand that this word contains three distinct phonemes - /h/ /e/ /l/ /o/. In order to make the character’s mouth movements match these sounds, the animator must adjust their model’s facial features accordingly.
Phonemes are also essential in helping animators create characters with unique speaking styles or accents. Different languages have different phonemes, which can make animating lip-syncing for foreign language dialogue challenging. However, understanding phonemes can help animators better understand how different languages are spoken and how to represent them in their animations.
Phonemes allow animators to accurately sync lip movements to dialogue while also providing opportunities for creative expression through facial features and emotional nuances. By taking the time to understand these small units of sound, animators can create truly immersive and believable animated worlds that captivate viewers from start to finish.
Playback speed determines the speed of an animation.
Playback speed is a fundamental aspect of animation that can make the difference between a stunning and engaging piece, and a choppy, unappealing one. The rate at which frames are played back in sequence to create the illusion of movement is referred to as fps (frames per second), and it is crucial for animators to pay close attention to this metric.
At higher fps rates, animations will appear smoother and more fluid as there are more frames per second to convey motion. On the other hand, lower fps rates will cause the animation to appear jerky or choppy, as there are fewer frames per second being displayed. As such, it is important for animators to choose an appropriate fps rate for their animations based on the desired output quality.
In addition to choosing the appropriate fps rate during initial production, playback speed can also be adjusted during the editing process. This adjustment can help achieve specific storytelling or artistic goals, such as when creating slow-motion effects or speeding up footage for comedic effect.
One common use for adjusting playback speed is in creating slow-motion effects. This technique involves reducing the fps rate of certain sequences of frames, resulting in an elongation of time and a feeling of suspended motion. This technique can be used to great effect in action scenes where every detail needs to be highlighted or emotional moments where time seems to slow down.
In Brush Ninja slow motion can be done by adjusting the duration of individual frames. If you only want slow motion for a few frames this can be better than changing the fps rate for the whole animation.
On the other hand, speeding up footage can be used for comedic effect or to convey a sense of urgency or excitement. By increasing the playback speed, animators can create a sense of rapid movement that can add energy and momentum to their work.
Another technique that can be used with playback speed is animating on “twos” or “threes”. Animating on twos involves displaying each frame twice (or every second frame) while animating on threes involves showing each frame three times (or every third frame). This technique can reduce the number of drawings required while still maintaining a smooth animation.
Playback speed is a crucial aspect of animation that animators must pay close attention to during production and editing. Choosing an appropriate fps rate and adjusting playback speed for artistic or storytelling purposes can greatly enhance the quality of an animation and help achieve specific goals. By utilizing techniques such as slow-motion, speeding up footage, or animating on twos or threes, animators can create engaging and visually appealing animations that captivate their audience.
Animation plot is the storyline of a movie or TV show, depicting events from start to finish.
The plot is the backbone of any animation project. It serves as a guide for the characters’ actions, motivations, and decisions, and ultimately determines the direction and success of the story. Without a strong plot, an animation can quickly become dull, confusing, or uninteresting to viewers.
One of the key elements of a good plot is structure. A well-structured plot follows a clear beginning, middle, and end format that builds upon itself throughout the story. At the beginning of an animation, viewers are introduced to the main character(s) and their world. This often includes establishing the setting, introducing conflicts or challenges that they need to overcome, and providing context for their motivations and goals.
As the animation progresses into its middle section, the main characters are faced with obstacles that challenge their goals and beliefs. This is where subplots and side stories can be introduced to add depth to the story while still serving the overall plot. These subplots can provide additional information about supporting characters, add complications or twists to the narrative, or provide background information that helps explain certain events.
The climax of an animation occurs towards the end of the story when the main character(s) face their biggest challenge yet. This is often where they are forced to make a difficult decision or sacrifice something important in order to achieve their goal. The resolution follows soon after, providing closure for both the characters and viewers alike.
A successful plot also has clearly defined goals for its main character(s). These goals can be anything from saving someone’s life to discovering a hidden treasure or even just finding happiness. Goals help drive the story forward by giving characters something to strive towards and overcome obstacles for.
Obstacles are another crucial component of a good plot. They create tension and conflict that keep viewers invested in what happens next. Obstacles can come in many forms - from physical barriers like mountains or rivers to emotional barriers like fear or self-doubt.
Ultimately, a well-crafted plot should provide a satisfying resolution for both the characters and viewers. This means that loose ends are tied up, questions are answered, and the story’s themes are fully explored. A strong plot is essential to creating an animation that resonates with audiences long after it is over.
Pose-to-pose animation: create key poses, then fill in the gaps with more drawings for smooth movement. Ensures intentional and realistic motion.
Animation has become a vital part of the entertainment industry. It is an art form that creates illusions of movement by rapidly displaying a sequence of static images. In animation, there are various techniques used to create engaging and captivating visuals. One of the most commonly used techniques is pose-to-pose animation.
Pose-to-pose animation is a process that involves defining key poses or keyframes of the character’s movement before creating additional frames that smoothly transition from one pose to another. This technique enables the animator to plan and refine their animations before adding in details.
The first step in creating a pose-to-pose animation is to determine the key poses. These poses are essential because they establish the most critical moments of the animation. They serve as reference points for the rest of the animation, providing guidance on how the character should move throughout the sequence.
Once these key poses are established, the animator will add additional frames in between them that transition smoothly from one pose to another. These frames are referred to as tweens or in-betweens. The number of tweens required depends on how fluid or jerky the animator wants the motion to be.
Pose-to-pose animation offers several benefits over other techniques. One significant advantage is that it provides more control over timing, spacing, and character movement. Animators can adjust these elements easily by manipulating key poses and adding or removing tweens until they achieve the desired effect.
Another benefit of this technique is that it allows animators to work efficiently. By establishing key poses first, they can focus on perfecting those moments before worrying about filling in details. This approach saves time and effort and can lead to better quality animations.
Pose-to-pose animation is a valuable technique used by animators worldwide. It provides greater control over character movement, timing, and spacing while allowing them to work more efficiently. The art form continues to evolve, and new techniques emerge regularly, but pose-to-pose animation remains a timeless classic that will remain relevant for years to come.
Props in animation are objects that characters use or interact with during the story.
In animation, props are more than just objects. They are tools that make characters and scenes come alive. Props can be everyday items like furniture or special things like futuristic gadgets. They help tell the story, show character traits, and make the animation more interesting.
When animators include props, they do it for a reason. Props give clues about characters. For example, clothes or accessories can tell us about a character’s personality or feelings. Tools or jewelry can show what a character does or what’s important to them.
Props also help create the world of the animation. By choosing and placing props carefully, animators can make viewers feel like they’re in a different time or place. The details of the props make the world seem real and draw viewers into the story.
Besides storytelling, props serve practical purposes. They give characters things to interact with, making their movements look more natural. Whether it’s using a sword in a fight or picking up objects from a desk, props make actions feel real.
Overall, paying attention to props in animation is important. They add depth to characters, make the story richer, and transport viewers to exciting new worlds. So next time you watch an animated movie or show, notice the props - they add a whole new layer to the story.
Puppet animation uses figures moved by people to tell a story. Puppets can be made of clay or fabric and have movable limbs and expressions.
Puppet animation is a fascinating style of animation that has been around for many years. The art of puppetry has been used to tell stories and entertain people for centuries. However, in recent years, puppet animation has become increasingly popular due to its unique look and feel.
One of the most significant advantages of puppet animation is that it allows animators to create characters and objects that have a tangible quality. Puppets are often made from materials such as foam, fabric, or plastic, which can be manipulated to create lifelike movements and expressions.
British TV Shows like Thunderbirds and Captain Scarlet used puppets to create realistic characters and objects. These shows were popular because they allowed viewers to see the characters and objects in a way that was not possible with traditional animation.
Stop-motion puppet animation is one of the oldest forms of puppet animation and involves moving physical puppets one frame at a time. This technique requires a lot of patience and skill, but the results can be stunning. The animator must carefully manipulate each puppet and take a photograph after each movement. When these photographs are played back in sequence, the illusion of motion is created.
Well known examples of stop-motion puppet animation include “Wallace and Gromit” and “The Nightmare Before Christmas”. These films use stop-motion puppet animation to create unique and memorable characters and worlds.
2D puppet animation is a popular technique used in animation to bring characters to life. This form of animation involves manipulating 2D puppets, created from separate body parts, to mimic human movements and actions. 2D puppet animation allows for more flexibility and control, offering endless creative possibilities for storytellers and animators.
2D puppet animation is sometimes known as cutout animation, and is a technique that can be used on Brush Ninja.
Puppet animation can be used to create a wide range of styles, from realistic to stylized. The materials used and the animator’s skill level can significantly impact the final product. For example, animators can use foam puppets covered in fabric to create characters with soft features and realistic movements. Alternatively, plastic puppets can be used to create characters with exaggerated features and movements. These days people have even started using 3D printed puppets to create more complex characters.
Puppet animation can be used in various applications such as television shows, commercials, and feature films. One great example of the use of puppet animation is “The Nightmare Before Christmas” directed by Tim Burton. This film uses stop-motion puppet animation to create a unique and haunting world that has captivated audiences for years.
Puppet animation is a fascinating and versatile style of animation that has been used to tell stories and entertain people for centuries. It allows animators to create characters and objects with a tangible quality that is difficult to achieve with other animation techniques. Puppet animation can be used to create a wide range of styles, from realistic to stylized. It is an excellent choice for filmmakers who want to add a unique and creative touch to their projects.
A render farm is a team of computers that create animations and special effects. It provides more power for detailed projects, speeding up the process by dividing the work between multiple computers.
In today’s animation industry, the use of render farms has become increasingly important. A render farm is a group of computers that are connected to each other and work together to render complex computer-generated imagery. The creation of an animated movie or TV show involves the creation of thousands of individual frames that need to be compiled into a video. This process requires a lot of computing power, which can be difficult for just one computer to handle.
The idea behind a render farm is to divide the workload among multiple machines, thus speeding up the rendering process. Instead of relying on one computer to do all of the rendering, the workload is distributed among dozens or even hundreds of computers. This allows animation studios to complete their projects faster and more efficiently.
Render farms are commonly used by large animation studios, VFX companies, and video game developers. These types of companies require a lot of computing power in order to create their products, and a render farm can provide them with the necessary resources they need to accomplish their goals. In addition, render farms can be set up on-site or accessed remotely through cloud-based services.
There are companies that rent out their computers to use as a render farm. These companies typically charge a monthly fee for access to their resources. This is often more cost-effective than purchasing and maintaining your own hardware.
Render farms offer scalability as they can easily accommodate changing needs. Studios can start small and increase the amount of machines they rent as the projects becomes more complex.
The use of render farms has become an essential tool for animation studios and other companies in the industry. They offer numerous benefits, including cost savings, scalability, flexibility, and collaboration. As the animation industry continues to grow and evolve, it’s likely that render farms will become even more important in the years to come.
Rendering is the conversion of 3D models/animations to 2D images/videos. It applies lighting and materials to create final visuals for viewing on screens.
Rendering in animation is an essential process that brings the 3D models and scenes to life. It is a complex procedure that involves the calculation of various visual effects, including lighting, shadows, reflections, and texture. The final output of rendering is the image or video sequence that contains all the visual information of the scene.
Rendering is a time-consuming process that requires significant computing power. The more complex the scene and the higher the quality required, the longer it takes to render. High-quality animations with many frames can take days, weeks, or even months to render on a single machine. As a result, studios often use render farms - clusters of powerful computers - to speed up the process.
One of the most common rendering techniques used in animation is ray tracing. Ray tracing simulates how light travels through a scene by tracing individual rays from a virtual camera and calculating how they interact with objects in the scene. This technique can produce highly realistic images with accurate lighting and shadows. However, it can also be computationally expensive, especially for scenes with many reflective surfaces.
Another popular rendering technique is radiosity, which simulates how light bounces between surfaces in a scene. Radiosity can produce soft and natural-looking lighting but requires careful setup and tuning to achieve realistic results.
Rasterization is another rendering technique commonly used in real-time applications such as video games. Rather than simulating how light interacts with objects in a scene, rasterization projects 3D models onto a 2D screen space and determines which pixels should be drawn based on their position and visibility from the camera. While not as physically accurate as ray tracing or radiosity, rasterization can produce fast and efficient results suitable for real-time applications.
The output of rendering can be used in various ways depending on the project requirements. For example, animations rendered at high resolutions are suitable for use in films or TV shows. Lower resolution animations may be used in video games or real-time applications where performance is critical. Architectural visualizations may require rendering with specific lighting conditions to simulate how a building will look at different times of day or under different weather conditions.
Rendering is an important step in the animation production pipeline. It involves complex algorithms and techniques that simulate how light interacts with objects in a scene to produce the final image or animation. Different rendering techniques offer varying degrees of realism and performance depending on the requirements of the project. Ultimately, rendering plays a crucial role in bringing 3D models and scenes to life, enabling creators to tell compelling stories and create immersive experiences for their audiences.
Resolution in animation is the level of detail in an image. It refers to the number of pixels, with higher resolutions resulting in clearer and more detailed images.
One of the most important aspects of animation is resolution, which refers to the number of pixels that make up an image or video frame. In this article, we will take a closer look at resolution in animation and how it impacts the final product.
Resolution is typically expressed as the number of horizontal pixels multiplied by the number of vertical pixels. For example, 1920x1080 or 1280x720 are common animation resolutions. The higher the resolution, the more detail and clarity there will be in the image or video frame. However, higher resolutions also require more computing power and storage space to render and store.
When buying a new television or computer you will often see the resolution listed as part of the specifications - commonly referred to as HD or 4K. 4K is a resolution of 3840x2160 pixels, which is four times the resolution of HD (1920x1080 pixels). As of 2023 8K is the highest resolution available, with 7680x4320 pixels.
When creating animations, it is crucial to choose a suitable resolution based on the intended use of the animation. For large-scale projection or printing, a high-resolution animation will be necessary to ensure that the final product is clear and detailed. On the other hand, for online use or mobile devices, a lower resolution may be sufficient as smaller screens generally do not require as much detail.
If you are uploading content to Youtube (or other video sharing websites) then it’s best to use the highest possible video resolution. Youtube will automatically scale the video down to lower resolutions for viewers with slower internet connections or smaller screens.
Another factor to consider when choosing a resolution for animation is frame rate. Frame rate refers to the number of frames per second (fps) that make up an animation. A higher frame rate can result in smoother and more fluid animations but also requires more processing power and storage space. The standard frame rate for most animations is 24 fps, but some animations may require higher frame rates for specific effects.
In addition to choosing a suitable resolution and frame rate for an animation, it is also important to optimize other elements such as color depth and compression. Color depth refers to the number of colors that can be displayed in an image or video frame. Higher color depths can result in more vibrant and accurate colors but also require more storage space. Compression techniques can be used to reduce file size without sacrificing too much quality.
Resolution is a critical aspect of animation that can greatly impact the final product. It is essential to choose a suitable resolution based on the intended use of the animation and to optimize other elements such as frame rate, color depth, and compression. With careful consideration and planning, animators can create high-quality animations that meet the needs and expectations of their audience.
Rigging in animation is the process of creating a skeleton for a character, adding invisible bones to make it move when animated.
Animation is a complex and intricate art form, and rigging plays a crucial role in the creation of animated characters and objects. Rigging involves creating a digital skeleton for a character or object, which is used to animate it in a variety of ways. This process involves the use of interconnected bones (joints) that define the movement and range of motion of the character or object.
The rigging process begins with creating the basic structure of the skeleton, which involves placing joints in key locations throughout the character’s body. These joints are then connected together using a hierarchy, which defines how each joint should move relative to its parent joint. The hierarchy is crucial as it allows animators to manipulate the character or object in a natural and intuitive way.
Once the basic skeleton has been created, controls are added to each joint. These controls can take many forms, including sliders, buttons, and other tools that allow animators to easily move and pose the character or object in a variety of ways. For example, an animator might use a slider control to adjust the angle of an arm joint or a button control to switch between different facial expressions.
Constraints are also added during the rigging process to ensure that movements look more realistic. For example, an elbow joint might be constrained so that it only bends in one direction, which helps to prevent unnatural-looking animations. Other types of constraints might include limiting the rotation of certain joints or controlling how certain parts of the body move in relation to others.
Finally, deformations are added to the character’s mesh during rigging to ensure that it moves smoothly and realistically when animated. This can involve adding extra detail to areas such as elbows or knees where there is likely to be a lot of movement, or using complex algorithms to simulate muscle movement and skin deformation.
Rigging allows animators to create complex and lifelike movements for their characters or objects. Without rigging, it would be impossible to create the fluid and natural-looking animations that are so important in modern animation. As such, rigging is a key skill for anyone looking to pursue a career in animation.
Rotoscoping: animators trace real-life footage frame by frame to create realistic movements for animated characters.
Rotoscoping is a technique that has been widely used in the animation industry since the early days of cinema. The process involves taking live-action footage and creating a frame-by-frame animation that closely matches the movements of the original footage. This can be done manually, by tracing over each frame of the video, or with the help of specialized software that automates parts of the process.
One of the main advantages of rotoscoping is that it allows animators to create very naturalistic movement in their characters. By using live-action footage as reference, they can capture subtle nuances in body language and facial expressions that would be difficult to replicate from scratch. This makes rotoscoping an ideal technique for projects that require a high level of realism, such as historical dramas or science-fiction movies.
Another advantage of rotoscoping is that it allows animators to blend live-action footage with animated elements seamlessly. This is often used in movies and TV shows to create visual effects that would be impossible to achieve with practical effects alone. For example, in the movie Who Framed Roger Rabbit?, animators used rotoscoping to create scenes where cartoon characters interacted with real actors in a convincing way.
However, rotoscoping can also be a time-consuming process that requires a lot of skill and patience. Depending on the complexity of the scene being animated, it can take weeks or even months to complete. Moreover, because rotoscoping involves tracing over existing footage, it can be difficult to make changes once the animation has been completed. Animators must carefully plan out each stage of the process to ensure that they get the results they want.
Despite these challenges, rotoscoping remains a popular technique in the animation industry. It has been used in many iconic movies and TV shows over the years and continues to be an important tool for animators looking to achieve naturalistic movement and blend live-action footage with animated elements. With advances in technology, rotoscoping is likely to become even more sophisticated in the years to come, allowing animators to create even more realistic and seamless animations.
"Rule of thirds": Divide image into thirds, horizontally and vertically. Place important elements where lines intersect for balance and interest.
The rule of thirds is a basic principle of composition used in visual arts, including animation. It involves dividing an image or screen into three parts both horizontally and vertically, creating a grid with nine equal parts. The four points where the lines intersect are called the “power points”.
In animation, using the rule of thirds can help create visually engaging compositions that guide viewers’ attention within a scene. By placing important elements at the power points or along the lines, the animator can draw viewers’ attention to specific areas and create dynamic shots.
For example, if animating a character walking across the screen, placing them on one of the vertical lines instead of directly in the center can create a more interesting shot. Similarly, positioning a character’s face at one of the power points can draw attention to their expression.
Moreover, the rule of thirds also helps animators to balance their shots. A well-balanced shot has a focal point that draws the viewer’s eye while also having other elements that support it. By using this principle, animators can create balanced compositions that are pleasing to look at.
Additionally, animators may also use this principle to create tension or drama in their scenes. Placing characters or objects off-center can create a sense of unease or imbalance that adds tension to a scene. This technique is often used in horror or suspense animation.
To summarize, the rule of thirds is a fundamental principle of composition that animators can use to create visually engaging compositions. By dividing an image into thirds both horizontally and vertically, animators can draw attention to specific areas, create depth, balance their shots, and even add tension to their scenes. Ultimately, this principle allows animators to tell more compelling stories through their visuals.
A run cycle is a sequence of frames in animation that shows a character running. It saves time and effort for animators while maintaining realistic movements.
A run cycle is a sequence of frames or drawings that depict a character running. This sequence is used repeatedly in an animation to create the illusion of continuous motion. Animators use several key frames to create a run cycle, including the starting pose, the midpoint pose, and the ending pose. These keyframes are repeated over and over, with transitional poses added in between, to create smooth and convincing movement.
Creating a realistic run cycle requires careful observation of real-life movement. Animators often use reference footage of real people or animals running in order to accurately capture the nuances of movement. They study how weight shifts, how limbs move, and how bodies react to different surfaces and terrains.
Another important aspect of creating a convincing run cycle is paying attention to the character’s anatomy. Different characters have different body types, which can affect how they move when running. For example, a character with long legs may take bigger strides than one with shorter legs.
Finally, animators must also consider the character’s personality and emotions when creating a run cycle. A confident character may hold their head high and pump their arms aggressively when running, while a nervous character may hunch over and look around anxiously.
Overall, creating a convincing run cycle requires a lot of skill and attention to detail. Animators must carefully observe real-life movement, understand the principles of physics, consider the character’s anatomy and personality, and use their artistic skills to bring everything together into a seamless animation. With practice and dedication, animators can create run cycles that truly bring their characters to life.
Safe zone in animation ensures key information or characters are placed within screen limits to avoid being cut off on different devices.
When creating animations, it is important to understand the concept of safe zones. Safe zones are areas within a frame that can be seen on all devices and screens. This is particularly important in animation as it ensures that important elements are not cut off or obscured by display issues such as overscan.
The safe zone is typically defined as the innermost rectangle of a frame, with a margin of about 5-10% from the edges. This means that any important element should be placed within this rectangle to ensure that it is visible on all screens. By following these guidelines, animation professionals can ensure that their work looks consistent across different devices and platforms.
In addition to ensuring visibility, safe zones also serve as a guideline for framing and composition. By placing important elements within the safe zone, animators can create a visually appealing and effective animation that effectively communicates its message. This is particularly important in advertising and marketing where the goal is to capture the viewer’s attention and convey a message quickly and effectively.
Safe zones are also important when creating animations for television. In the past, televisions used overscan which meant that parts of the image were cut off at the edges. While most modern televisions no longer use overscan, it is still recommended to use safe zones to ensure that important elements are not cut off or obscured.
When creating animations for different platforms such as social media or mobile devices, it is important to consider the aspect ratios of the screen. Different platforms have different aspect ratios which means that the safe zone may need to be adjusted accordingly. For example, vertical videos for Instagram stories, or Tiktok require a different safe zone than videos designed for YouTube.
By using safe zones, animators can ensure that their work looks consistent across different devices and platforms while also creating visually appealing and effective animations that communicate their message effectively.
In animation, a "Scene" is a part of the story that happens in one location.
Animated stories are a collection of multiple scenes that work together to tell a story. Each scene is carefully crafted by animators, writers, and directors to ensure that it serves a purpose in the larger narrative. Scenes can vary in length, style, and complexity depending on the needs of the story.
When creating a scene, animators must consider several factors such as the setting, characters, props, and sound design. These elements must work together to create a cohesive and believable world for the audience. For example, if a scene takes place in a forest, the background will need to include trees, foliage, and other natural elements. The characters may also need to interact with animals or other creatures that inhabit the forest.
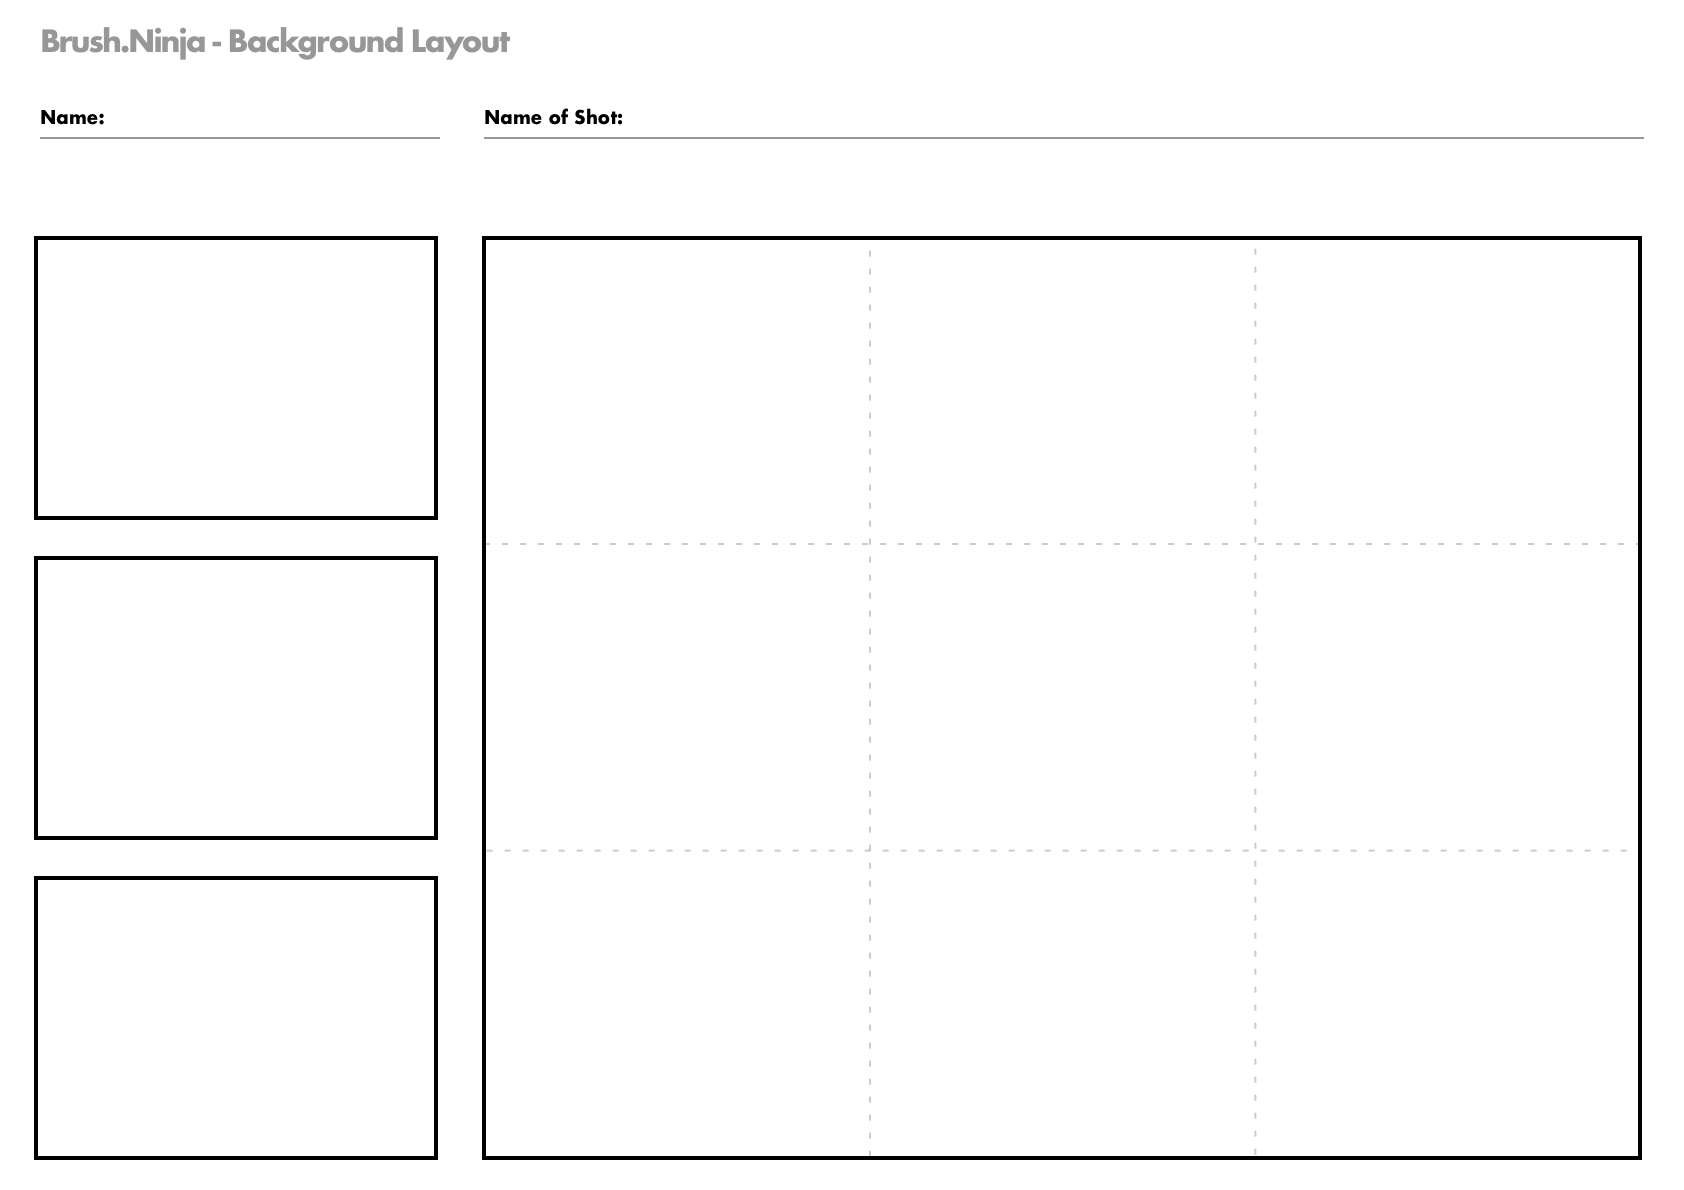
Example Background layout sheet
Download a free background layout template to help you plan your animation.
Download Background Sheet as PDF - Download Background Sheet as Png
In addition to the visual elements of a scene, sound design is also an important consideration. Sound effects and music can help to set the mood or tone of a scene and enhance the emotional impact on the audience. For example, if a scene is meant to be suspenseful or scary, the music may include tense strings or ominous tones.
The pacing of a scene is another important factor that animators must consider. The length of a scene can greatly impact its effectiveness in conveying information or emotions. A fast-paced action sequence may require shorter scenes with quick cuts between shots while a slower emotional moment may benefit from longer scenes with more time dedicated to character development.
Multiple scenes can be combined to form larger sequences or chapters within an animated film or show. These sequences may have their own distinct style or pacing but must still fit into the overall narrative of the story. For example, a montage sequence may feature multiple shorter scenes set to music that showcase character growth or progression over time.
Scenes are an integral part of any animated film or show. They serve as building blocks for the larger narrative and must be carefully crafted to ensure that they effectively convey information and emotions to the audience. Animators, writers, and directors must work together to create scenes that are visually stunning, emotionally impactful, and serve the larger story.
In animation, the music score is crucial for making stories come alive on screen.
In animation, the music score is crucial for making stories come alive on screen. It’s not just background music; it’s a powerful tool for making viewers feel emotions, enhancing the story, and pulling them into the world of the animation. Composers and sound designers work closely with animators to create a score that fits perfectly with the visuals and makes the animation even more impactful.
One big job of the score is to set the mood and feeling of a scene. With music and sound effects, composers can instantly make viewers feel different emotions, like excitement, suspense, happiness, or sadness. For example, fast and upbeat music can make action scenes more thrilling, while quiet music can bring out moments of reflection or sadness. By matching the music to the feelings of the story, animators can guide how viewers react and make them care more about the characters and plot.
Also, a good score helps create the atmosphere in the animated world. By adding sounds like nature or city noises into the music, composers make viewers feel like they’re really in the scene. For instance, hearing leaves rustle in a forest or machines in a cityscape helps make the world seem real and believable.
Besides setting the mood and atmosphere, the score also highlights important moments in the story. Whether it’s a big fight, a touching reunion, or a surprising plot twist, composers use changes in music to make these moments even more intense and memorable. By building tension, making big moments stand out, and wrapping up emotional parts with music, animators can make sure viewers stay focused and feel the story deeply.
The teamwork between animators, composers, and sound designers is crucial for making a great score that enhances animated films and videos. With attention to detail, trying out new musical ideas, and blending music seamlessly with the animation, scores can capture viewers’ attention, stir up strong feelings, and leave a lasting impression even after the animation ends.
A screenplay is a concise outline of the story for movies or TV shows, detailing scenes, dialogue, and actions of characters.
A well-written screenplay is critical for the success of an animated film or TV show. It must be engaging, entertaining and have a clear plot that captures the attention of the audience. The characters must be relatable, with distinct personalities that make them memorable. The dialogue must be convincing, and the action sequences should be thrilling.
Both screenplays and scripts have a similar purpose of describing the story, characters, and setting of an animated project. Nonetheless, there are significant differences between the two. The primary difference lies in the level of detail provided. Screenplays tend to be simpler as they are primarily used to pitch the project to movie studios. On the other hand, scripts are more complex and serve as a blueprint for the production team to bring the final product to life.
Screenplays for animated productions are often more complex than those for live-action films because animators have to create everything from scratch. Each character and setting must be designed, and every movement and detail must be thought out and planned. Therefore, screenwriters for animation must have a strong understanding of visual storytelling and how to bring characters to life through animation.
The process of writing a screenplay for animation typically involves many stages. Initially, the writer may create a treatment, which is a brief overview of the story and its main characters. Afterward, the writer will begin working on the first draft of the screenplay. This draft is usually more detailed than the treatment and includes dialogue, action sequences, and descriptions of settings.
Once the first draft is complete, it goes through several rounds of revisions. During this stage, feedback is given by producers and other members of the production team. The writer then makes changes based on this feedback until a final version is approved.
Screenplays are integral to the success of animated productions. They provide guidance and direction for all members of the production team while ensuring that the final product stays true to the vision of its creators. A well-written screenplay can make all the difference between a mediocre production and one that captivates audiences worldwide. Therefore, screenwriters for animation must possess strong visual storytelling skills along with excellent writing abilities to create compelling stories that resonate with viewers long after they’ve watched them on screen.
A script is a detailed plan for an animated movie or TV show, outlining dialogue, actions, settings, and scenes.
Animation is a form of storytelling that has the ability to bring characters and worlds to life on screen. However, this process does not happen without careful planning and preparation, starting with the script. The script is the foundation upon which the entire animation project is built, and it serves as a roadmap for all involved in the production process.
Scripts and screenplays have similar roles. They both describe the story, characters, and setting of an animated project. However, there are some key differences between the two. The biggest difference is that screenplays tends to be simpler than a script - they are often used to sell the project to movie studios. Scripts, on the other hand, are more detailed and are used by the production team to create the final product.
The first step in creating an effective animation script is to develop a strong storyline. This involves creating a plot that is engaging, unique, and memorable. The story should be able to capture the audience’s attention from the start and hold their interest throughout the animation. A great way to start developing a storyline is by identifying the theme of the animation and using it as a guide for creating a compelling story.
Once the storyline has been established, the next step is to create well-defined characters. Characters are an essential aspect of any animated project as they are what audiences connect with emotionally. It is important to give each character their own backstory, personality traits, and motivations. This helps make them feel more realistic and relatable to viewers.
In addition to creating well-defined characters, dialogue writing is also an important part of scripting an animation project. Dialogue adds depth to characters and helps move the story forward. It should be written in a way that captures the unique voice of each character while still maintaining coherence with the overall narrative.
Another crucial aspect of scripting an animation project is providing technical instructions for animators and editors. These instructions include camera angles, special effects, sound cues, and any other technical details needed to bring the animation to life on screen. This step helps ensure that everyone involved in the production process has a clear understanding of what needs to be done at each stage of development.
The final step in creating an effective animation script is going through multiple drafts before finalizing it. This process involves reviewing and refining every aspect of the script until it effectively communicates the intended story and vision for the animation project.
A well-written script is the foundation for creating a successful animated project. It provides a clear direction for everyone involved in the production process and ensures that the final product is engaging, unique, and memorable. By taking the time to carefully plan and prepare the script, animators can create animations that connect with audiences on an emotional level and tell compelling stories that will be remembered for years to come.
In animation, a "shot" is a single picture or camera movement displayed on the screen.
A shot is a series of images captured by the camera that are used to create a single scene or portion of a larger sequence. Each shot comprises several frames, each representing a single image captured by the camera at a specific moment in time.
The composition of shots can vary, depending on the desired effect or emotion that the animator wants to convey.
Storyboarding is an essential part of planning shots in animation. A storyboard is a sequence of sketches or illustrations that depict how each shot will look and fit into the larger sequence of animation. Storyboards help animators visualize how each shot will look and how it will contribute to the storytelling process. They also help to refine ideas and ensure that all elements of the animation align with the overall vision.
Example Background layout sheet
Download a free background layout template to help you plan your animation.
Download Background Sheet as PDF - Download Background Sheet as Png
Once shots have been created, they can be edited together to create a seamless flow between them and enhance storytelling. Editing involves rearranging shots, adding transitions, sound effects, music, and other elements to improve the overall quality of the animation.
Shots also play a crucial role in character development in animation. Shots can be used to reveal different aspects of characters’ personalities, such as their facial expressions, body language, and reactions to various situations. By manipulating shots creatively, animators can showcase characters’ strengths and weaknesses and create emotional connections between viewers and characters.
Shots are an essential part of animation as they help convey emotions, tell stories and develop characters. They allow animators to showcase their creativity while providing viewers with a unique and memorable experience. Through careful planning and editing, shots can be used to create an animation that is both visually stunning and emotionally compelling.
Silhouette in animation defines the outline and appearance of characters or objects, conveying posture, movement, and recognition for viewers.
One of the key benefits of using silhouettes in animation is that they allow viewers to quickly identify characters. This makes it much easier to understand the story, particularly during fast-paced action sequences, where there may not be time for detailed character introductions or explanations. For example, in an action scene where a hero is fighting against a group of villains, the silhouette of the hero can be used to distinguish them from the villains and help viewers follow the action.
Another benefit of using silhouettes in animation is that they can be used to convey emotion and personality. The shape or form of a character’s silhouette can suggest their physical attributes as well as their demeanor. For example, a character with a hunched-over silhouette might appear meek or timid, while one with an upright, confident silhouette might seem bold and assertive. By paying attention to the silhouettes of characters in an animated scene, viewers can quickly understand their personalities and motivations.
Silhouettes can also be used to create visual interest and contrast in an animated scene. By using contrasting shapes and colors, animators can create dynamic compositions that draw the viewer’s eye to specific areas of the screen. For example, a scene with multiple characters might use contrasting silhouettes to highlight the most important characters or objects in the frame.
One of the challenges of working with silhouettes in animation is ensuring that they are readable and recognizable to viewers. Animators must carefully balance simplicity with detail when creating silhouettes to ensure that they accurately convey the necessary information without becoming too complex or difficult to read. Additionally, silhouettes must be consistent throughout a scene or animation to avoid confusing viewers.
Silhouettes are an essential element of animation that can be used to convey important information about characters and objects, as well as create visual interest and contrast. By paying attention to the silhouettes in an animated scene, viewers can quickly understand what is happening on screen and connect with the characters and story being told. As such, animators should carefully consider the use of silhouettes in their work to create compelling and engaging animations that resonate with audiences.
Skeletal animation uses a digital skeleton to create character movement in animation.
Skeletal animation is a popular technique used in computer animation that has revolutionized the way 3D models are animated, and has even made it’s way into 2d animation. It has become an essential tool for animators in various fields, including video games, film, and television.
The process of skeletal animation involves creating a skeleton that serves as the underlying structure of a 3D model. The skeleton is made up of interconnected bones that define the model’s shape and form. The animator assigns movement to different bones within the skeleton, which creates the illusion of movement and flexibility in the model. The skeleton is then rigged to the model, allowing it to move in response to the animator’s commands.
One of the significant benefits of skeletal animation is its efficiency. Animators can manipulate the position and orientation of individual bones, which then affects the rest of the model accordingly. This makes it easier to create complex animations with fluid motion without having to manually adjust every point on a model.
In video games, skeletal animation is especially useful because it allows for real-time rendering and manipulation of 3D models. This means that players can interact with game characters that move realistically and respond to their actions in real-time.
Film and television animation also benefit from skeletal animation techniques. Animators can create complex scenes with multiple characters moving simultaneously by manipulating individual bones within each character’s skeleton.
Skeletal animation has become an essential technique in computer animation because it allows for efficient rendering and manipulation of both 2D and 3D characters. Its ability to create lifelike movements in character animations has made it a valuable tool for film, television, and video game industries. With the continued advancements in technology, it is expected that skeletal animation will continue to play a critical role in the future of computer animation.
Slow motion in animation slows down a part of the scene, creating a slow-motion effect like pressing the button on a remote control for videos.
Slow motion is a popular technique used in animation to create dramatic and emotional moments. It is an effective way to capture the attention of the audience and highlight specific details of an animated sequence. Slow motion can be used to show the weight and momentum of an object in motion, or to emphasize a character’s movements during a critical moment.
To achieve slow motion in animation, there are two primary methods that animators use. The first method involves animating at a higher frame rate than usual, and then playing back the animation at the normal rate. This approach allows for more frames to be captured, resulting in smoother movements.
The second method involves manipulating the timing of individual frames in post-production using software tools. This technique is often used when animators want to achieve slow motion effects on specific parts of an animation sequence.
By slowing down the action, viewers are given more time to appreciate the details of each frame, creating a more immersive experience. Additionally, slow motion can help convey a sense of tension or excitement during key moments in an animated sequence.
One example of slow motion being used effectively in animation can be seen in the hit anime series Attack on Titan. The show frequently uses slow motion during intense action scenes, allowing viewers to appreciate the complex movements of characters as they battle giant monsters known as Titans. By emphasizing the weight and power behind each attack, slow motion adds a layer of tension and drama that would not be present otherwise.
Slow motion is an essential tool in any animator’s toolkit. Whether it’s used to create dramatic moments or highlight specific details within an animation sequence, slow motion is an effective way to engage viewers and add depth to animated works. As technology continues to evolve, new techniques for achieving slow motion effects will undoubtedly emerge, further expanding the possibilities for this powerful animation technique.
Smears in animation are quick drawings used to show smooth and fast character movement.
Smears are an essential technique in animation, used to create an illusion of fast movement and add more energy and dynamism to action scenes. Smears help to show rapid movements that would be too fast to perceive in real life.
In hand-drawn animation, smears are created by stretching and distorting the shape of a character or object. Sometimest the animator draws multiple limbs or features to suggest motion blur. These exaggerated shapes are only visible for a few frames, but they create the illusion of a lot of extra frames being added. Hand-drawn animators use smear frames to emphasize the speed and intensity of a character’s movement. For instance, during a fight scene, smears can help depict the swift movements of the characters.
Stop-motion animators also use smears to add more energy and dynamism to their animation. Although stop-motion is known for its smooth and realistic movements, adding smears can make the animation more visually appealing. Stop-motion animators often use smear frames for fast camera movements or when objects move past the camera quickly.
In 3D animation, smears are created using software tools that allow animators to stretch and distort objects or characters’ shape. Animators often use these tools to create motion blur effects in fast-moving scenes. 3D animators commonly use smear frames for fast-moving car chases, fight scenes, or when characters move quickly through space.
Smears are not only effective in creating dynamic and exciting action scenes but also in expressing emotions. For example, a smear frame can be used to show the rapid change in facial expression when a character goes from happy to angry.
Sound design in animation involves selecting music, sound effects, and dialogue to enhance the visuals, creating a more engaging and enjoyable experience.
In animation, sound design is an essential component that helps to enhance the storytelling experience. It is the use of sound effects, music and dialogue to create a soundscape that complements the visuals in an animation. The sound designer in an animation production is responsible for creating and manipulating sound effects, composing music and recording voiceovers to provide a cohesive and immersive experience for the audience.
One of the most important techniques used in sound design is Foley sound creation. This involves recording various everyday sounds such as footsteps, doors opening and closing, or the rustle of clothing to create a realistic environment within the animation. These additional sounds help to immerse the audience in the story and make them feel like they are part of it. For instance, if a character is walking on a gravel path in an animation, Foley sound creation will help to create a realistic sound that matches their movement.
Another critical aspect of sound design in animation is voice acting. Voice actors bring characters to life by providing unique voices and mannerisms that match each character’s personality and behavior. The voice actor must be able to convey the character’s emotions accurately through their tone, pitch, and timing.
Musical composition is also an essential element of sound design in animation. Music can help create mood and atmosphere and evoke emotions in the audience. For example, if a scene requires tension or suspense, a composer may use strings or percussion instruments to create this effect.
Digital audio editing tools are used extensively in sound design for animations. These tools allow sound designers to edit and manipulate sounds to fit specific scenes or enhance particular emotions. The use of digital audio editing tools has made it easier for sound designers to create high-quality sounds for animations without having access to expensive recording studios.
Sound design is an integral part of any animation production. It helps to bring characters and environments to life by creating a sonic world that complements the visuals on screen. Sound designers work tirelessly with animators to ensure that every sound element in the animation enhances the story’s emotional impact. Foley sound creation, voice acting, musical composition, and digital audio editing are all important techniques used in sound design for animations. These techniques help to create a cohesive and immersive experience for the audience and make animation productions more engaging and memorable.
Sound effects are sounds added to animations to make the world come to life.
Sound effects in animation are a way to make the animated world feel real and immersive. Whether it’s the sound of leaves rustling or a big explosion, sound effects add emotion, set the mood, and make the story more exciting.
Making sound effects for animation is a careful job done by skilled sound designers and Foley artists. They pick or create sounds that match what’s happening in the animation. They might use real recordings, digital sounds, or big libraries of sounds. It’s not just about finding the right sounds; it’s also about timing them perfectly to match the action on screen.
Basically, sound effects bring animated characters and places to life. They make scenes funny, tense, or thrilling by using sounds like footsteps or music. For example, the sound of footsteps can add a fun vibe to a happy scene, while a sudden change in music can build suspense before something big happens.
Also, sound effects help create the world of the animation. They set the background noise for different places, like a busy city or a peaceful countryside. By layering sounds like birds chirping or cars honking, animators make viewers feel like they’re really in the scene.
Sound effects are crucial for telling stories in animation. They work together with visuals to make animations feel real and exciting. With the right sound effects, animators can make viewers feel emotions, get into the story, and remember the best moments long after the animation ends. It’s the perfect mix of what we see and what we hear that makes animated stories so captivating.
Animation soundtrack: music that enhances storytelling, evoking emotions like happiness, sadness, fear, and excitement based on the plot.
The soundtrack in animation plays a vital role in the overall success of a project. It adds another layer of depth to the storytelling, helping to create an immersive experience for the audience. The process of creating a soundtrack for animation is a complex and collaborative effort that involves multiple people with different skill sets.
The first step in crafting a soundtrack for animation is to develop a clear understanding of the story being told. This involves analyzing the script, storyboards, and other visual elements to determine what kind of emotions and tones need to be conveyed through sound. Once this is established, the team can begin to develop a plan for the soundtrack.
One of the most important elements of an animated soundtrack is music. Music can be used to set the tone for a scene or to emphasize specific emotions. For example, a romantic scene may feature slow, gentle music in order to convey intimacy and tenderness. On the other hand, an action scene may require fast-paced and intense music to create tension and excitement.
Sound effects are another crucial component of an animated soundtrack. They help to bring the visuals to life by adding realism and impact to movements and actions. This can range from subtle sounds like footsteps or rustling clothing, to more dramatic effects like explosions or crashing waves. Sound effects are carefully chosen and timed to match the visuals on screen, enhancing their impact and making them feel more realistic.
Dialogue and voice acting are also key aspects of an animated soundtrack. In many cases, they are used to convey important information about characters or plot points. Voice actors must bring their characters to life through their performances, conveying emotion, personality, and motivation through their voices alone.
Creating a high-quality soundtrack for animation requires collaboration between multiple skilled professionals. Composers, sound designers, audio engineers, and voice actors all play important roles in bringing an animated project to life through sound. By carefully crafting each element of the soundtrack to match the visuals on screen, animators can create a fully immersive and engaging experience for their audience.
Special effects in animation enhance the cartoon's appeal with explosions, magical sparks, weather effects, and fantastical creatures. They make it more captivating.
Animation has come a long way since its inception in the early 1900s. From traditional hand-drawn animation to computer-generated graphics, animators have been pushing the envelope to create visually stunning works of art. One of the ways they do this is through the use of special effects.
Particle effects are one of the most common types of special effects used in animation. This technique involves creating and animating small particles such as smoke, fire, water, or dust. By manipulating these particles, animators can create realistic-looking environments that would be impossible to achieve through traditional animation methods. For example, a scene depicting a wildfire could be made more realistic (and quicker) by using flames and smoke particles.
Lighting effects are another commonly used technique. This involves creating realistic lighting and shadows in a scene by manipulating the intensity, color, and direction of light sources. By adjusting these factors, animators can create the illusion of different times of day or add depth to a scene. For example, a scene set at sunset could be made more dramatic by adding warm colors and long shadows.
Motion graphics are also commonly used in animation. This involves creating animated graphics such as logos, typography, and other text-based elements that move and interact with the environment. This technique is often used in commercials or title sequences to add an extra layer of interest to the work.
Finally, 3D modeling is another popular technique used in animation. This involves creating three-dimensional objects and characters using specialized software and then animating them within a scene. This technique allows for greater detail and realism than traditional hand-drawn animation. Sometimes animators will combine 2d and 3d techniques to use the best parts of the different styles and make something unique.
Special effects in animation are an essential tool for creating visually stunning works of art. Whether it’s particle effects to create realistic environments or 3D modeling to create detailed characters, these techniques allow animators to push the boundaries of what is possible in animation. As technology continues to advance, it will be exciting to see how these techniques evolve and what new techniques will be developed in the future.
Split screen in animation is a way to show different scenes or viewpoints at the same time, making stories more interesting.
In animation, split screen means dividing the screen into sections to show different scenes or viewpoints. It’s like telling multiple stories at once in the same frame.
Using split screen helps animators contrast characters or settings and show different perspectives. For example, they can display two characters reacting differently to the same event side by side.
It’s also handy for showing actions happening at the same time in different places. This creates excitement and keeps viewers hooked, especially in action scenes or tense moments.
Split screen can also connect different parts of the story visually. By showing similar images in different sections, animators help viewers understand the story better and find deeper meanings.
Besides storytelling, split screen helps manage information and timelines effectively. By organizing the screen smartly, animators make sure viewers follow the story without getting confused.
Split screen is a useful tool in animation, giving creators many ways to make stories more interesting and keep audiences engaged.
Squash and stretch: an animation technique where characters change shape as they move, making them look bouncy and lively. Adds interest to animations.
Squash and stretch is one of the most fundamental principles of animation, and it is often considered the cornerstone of the art form. It involves exaggerating the shape of an object or character to create a sense of movement, weight, and impact. This technique is used in both traditional hand-drawn animation and computer-generated animation.
The purpose of squash and stretch animation is to add more life and realism to characters and objects, making them appear more dynamic and fluid in their movements. When you watch a character in an animated film move, you should feel as if they have weight, mass, and momentum. Squash and stretch helps to create this illusion by giving characters an organic sense of motion.
There are many different ways that squash and stretch can be used in animation. For example, if a character jumps up into the air, their body will squash down as they land on the ground before stretching up as they propel themselves back up again. This creates a sense of impact and momentum that makes the movement feel more realistic.
Another way that squash and stretch can be used is to convey emotion. For example, if a character is scared or surprised, their body might compress into a smaller shape before bouncing back up again. This creates a visual representation of how the character is feeling, without having to rely on dialogue or other cues.
Squash and stretch can also be used to create anticipation. For example, if a character is preparing to run, their body might stretch out slightly before contracting as they launch themselves forward. This gives the audience a sense of what’s about to happen before it actually does.
One thing to keep in mind when using squash and stretch in animation is that it needs to be balanced with other principles like timing and spacing. If you overuse squash and stretch, it can make your animations look too cartoony or exaggerated (which might be what you want). However, if you don’t use enough squash and stretch, your animations can look stiff and lifeless.
Squash and stretch is a fundamental principle of animation that is used to create a sense of movement, weight, and impact. It can be used in many different ways to convey emotion, anticipation, and other aspects of character and story. When used correctly, it can help bring your animated characters and objects to life.
Animation staging sets up scenes by positioning characters, objects, and backgrounds. It's like a movie director choosing actors' positions and props.
Staging in animation is an art that requires careful planning and execution. The placement and movement of characters, objects, and elements within the scene can make or break the entire animation. Effective staging is critical for an animation to be impactful and engaging as it helps the audience to understand what is happening on screen.
Camera angles are an important element of staging as they determine how the scene is viewed by the audience. Different camera angles can be used to highlight important elements or convey emotions. For example, a close-up shot can be used to show the expressions on a character’s face during an emotional moment, while a wide shot can be used to show the entire scene and provide context.
Lighting is another essential element of staging as it creates atmosphere and mood in a scene. The use of light and shadow can help to emphasize certain details or characters, creating depth and adding visual interest to the animation. For instance, a bright light shining on a character can indicate that they are important or powerful, while dim lighting can create a sense of mystery or suspense.
Composition refers to how characters and objects are placed within a scene. It involves determining their size, position, and placement in relation to each other. This helps to create balance and harmony within the scene, making it aesthetically pleasing to the eye. For example, placing characters on opposite sides of the screen can create a sense of conflict or tension between them.
Blocking is perhaps the most important element of staging as it involves planning out the movement of characters and objects within a scene. It ensures that their motion flows naturally and effectively conveys the story. Good blocking can help to create dynamic action sequences or emotional moments that resonate with the audience. For instance, carefully choreographed fight scenes can be thrilling to watch, while slow and deliberate movements can create a sense of calm or reflection.
Effective staging is critical for an animation to be impactful and engaging. It involves determining the most effective way to visually communicate the story and emotions to the audience through camera angles, lighting, composition, and blocking. By carefully planning and executing these elements, animators can create animations that are not only aesthetically pleasing but also emotionally resonant.
Stop motion animation involves taking pictures of objects/characters, moving them slightly, and then taking another picture. Famous examples include "Wallace and Gromit" and "The Nightmare Before Christmas".
Stop motion animation is a technique that has been around for over a century. The first known stop motion animation was made in 1898 by Arthur Melbourne-Cooper, who used paper cutouts to create a short film called Matches: An Appeal. Since then, stop motion animation has become increasingly popular and has been used to create some of the most beloved animated films and TV shows.
Brush Ninja has a simple Stop Motion Animator App that allows you to create your own stop motion animations using your camera. With this app, you can capture one photo at a time and create animations with paper cutouts, LEGO, toys, clay, and more. It’s a great way to get started with stop motion animation and experiment with different styles and techniques.
One of the reasons stop motion animation is so popular is because it allows animators to create unique and visually stunning results. Unlike traditional animation techniques, stop motion animators work with physical objects that can be manipulated and moved in real space. This gives them more control over the final product and allows them to create incredibly detailed and intricate animations.
Stop motion animation can also be used to create a wide range of different styles and aesthetics. For example, claymation is a type of stop motion animation that uses clay figures instead of paper or puppets. This technique has been used to create classic films like Wallace and Gromit and Chicken Run.
Another popular style of stop motion animation is puppetry. Puppetry involves creating small figurines or dolls that are then animated using stop motion techniques. This technique has been used in classic TV shows like Thunderbirds as well as modern-day hits like Robot Chicken.
Stop motion animation can also be combined with other techniques to create even more unique visuals. For example, Tim Burton’s The Nightmare Before Christmas combines stop motion animation with 3D computer graphics to create a truly unique visual style.
Despite its many benefits, stop motion animation can also be incredibly time-consuming and labor-intensive. Because each frame must be photographed individually, animating even a short scene can take days or even weeks. Additionally, because the objects being animated are physical, they are subject to wear and tear over time, which can make it difficult to achieve consistency across different shots.
Stop motion animation is a powerful tool that allows animators to create unique and visually stunning results. Whether you are interested in claymation, puppetry, or some other type of stop motion animation, there is no denying the incredible potential of this technique. So if you are interested in animation and looking for a new challenge, why not give stop motion animation a try?
You can create your own stop motion animations on this very website! The app is free and runs on your laptop/ computer, tablet, or phone.
A storyboard is a comic book version of an animated movie that helps animators plan out the story, characters, and scenes before drawing it.
Storyboarding is a critical aspect of the animation process, and it involves creating a visual representation of the story, scene by scene, shot by shot. It is a crucial step that ensures that the final product meets the desired creative vision. In animation, a storyboard consists of a sequence of drawings that depict the key moments and actions of the story. It serves as a blueprint for an animated film, TV show, or video game.
Brush Ninja animated gif maker has a built-in method for exporting a single image, which could be used as a story board. Combine this with the frame notes feature and you can add extra information to your storyboards.
The storyboard artist is responsible for translating the script into visual form, using images to convey the pacing, composition, and visual style of a project. To achieve this, they must have a deep understanding of the characters involved and the environment in which they exist. Each panel of the storyboard represents different camera angles or actions, with notes describing any dialogue or sound effects that will be added later.
Storyboarding offers several benefits to animators and filmmakers. First, it allows animators to work out pacing and flow before committing to expensive and time-consuming production. By having a clear plan in place before production starts, storyboard artists can save time and resources while creating better animation.
Secondly, storyboarding enables directors and producers to get a sense of how the final product will look and feel. This makes it easier to make changes or revisions before production begins. By making revisions at this early stage in the process, animators can avoid costly mistakes later on.
Example Storyboard layout
Download a free storyboard template to help you plan your animation.
Another benefit of storyboarding is that it allows for collaboration between writers, directors, producers, and animators. By working together during the storyboard process, everyone involved has a clear understanding of what is expected, reducing misunderstandings later on.
Storyboarding is an essential part of animation that ensures that the final product meets the desired creative vision. It provides many benefits to animators and filmmakers, including allowing them to work out pacing and flow before committing to expensive production, identifying potential problems early in the process, and allowing for collaboration between all parties involved. By taking the time to create a detailed storyboard, animators can save time and resources while creating better animation.
Straight-ahead animation is a method of creating movies by drawing frames one by one, making pictures appear to move. It's like flipping a picture book really fast!
Animation is a complex and dynamic art form that requires a lot of skill, creativity, and dedication. Animators use a variety of techniques to create the illusion of movement and bring characters and stories to life. One such technique is straight-ahead animation, which is a traditional animation technique that involves drawing each frame in order, from start to finish.
Straight-ahead animation is a popular technique for creating dynamic and expressive movement in animated sequences. It allows animators to be spontaneous and creative in the animation process, as they can add new details or adjust the movement as they go along. This makes it well-suited for fast-paced action scenes or sequences with a lot of movement.
However, straight-ahead animation can also be challenging due to its lack of planning and potential for inconsistencies in the animation. Because each frame is drawn in order, there is no going back once the animator has moved on to the next frame. This means that any mistakes or errors can be difficult to correct without starting over again.
To overcome these challenges, animators often use a combination of techniques when creating their animations. For example, they may use keyframe animation to plan out the main poses or movements in the sequence before filling in the details with straight-ahead animation. This allows them to ensure that the timing and movement are correct before committing to drawing each frame.
Another technique that animators use is pose-to-pose animation, which involves drawing only the key poses or frames in a sequence before filling in the details with straight-ahead animation. This allows them to focus on getting the main poses and movements just right before adding in all of the details.
Overall, straight-ahead animation is a powerful tool for animators looking to create dynamic and expressive movement in their animations. However, it requires a lot of skill and dedication to get right, and can be time-consuming due to its lack of planning. By combining different techniques and approaches, animators can create animations that are both fluid and consistent, bringing their characters and stories to life in exciting new ways.
Time remapping in animation allows you to alter video speed. It's like a magic button for speeding up or slowing down your animation, creating cool effects.
Time remapping is a technique in animation that allows animators to manipulate the timing and speed of an animation. It is a powerful tool that can be used to add emphasis, drama, or excitement to an animation.
One of the primary uses of time remapping is to slow down or speed up an animation sequence. By altering the playback speed of certain frames, animators can adjust the pacing of the animation to suit their needs. For instance, if a character is running towards a goal, the animator can use time remapping to slow down the character’s movement as they reach the goal, adding emphasis to this crucial moment.
On the other hand, time remapping can also be used to speed up an animation and make it more dynamic or exciting. This technique is often used in action sequences and fight scenes where a faster pace can create a sense of urgency and intensity.
Another use of time remapping is to create smooth transitions between different animation sequences. By altering the timing of specific frames, animators can create seamless transitions between different scenes or actions, making the animation feel more cohesive and polished.
Furthermore, time remapping can be used in combination with keyframing and interpolation techniques to create complex animations with precise control over timing and pacing. Keyframing involves setting specific points in an animation where changes occur, while interpolation involves filling in the gaps between these keyframes to create a smooth transition between them. Time remapping allows animators to manipulate these keyframes and interpolate between them at different speeds to achieve their desired effect.
Time remapping is a vital technique for any animator looking to create dynamic and engaging animations. By manipulating the timing and speed of specific frames in an animation sequence, animators can add emphasis, drama, or excitement to their animations while also creating smooth transitions between different scenes and actions. When used in conjunction with other animation techniques like keyframing and interpolation, time remapping offers a powerful toolset for creating complex and polished animations with precise control over timing and pacing.
An animation timeline is a sequence of frames or elements that form the story of a movie or show.
Animation is a complex process that involves the creation of moving images through the manipulation of individual frames or keyframes. These frames or keyframes are arranged in a specific sequence to create the illusion of movement, and the timeline is the tool that allows animators to control this sequence.
The timeline is essentially a visual representation of time, with each frame or keyframe designated a specific point on the horizontal axis. Animators can then add and manipulate individual frames or keyframes within the timeline to create complex animations with multiple moving parts and synchronized sound effects.
In Brush Ninja animated gif maker the timeline is the horizontal bar at the bottom of the screen and each frame is a separate image. It shows all the frames in your animation and allows you to move them around, add new ones, and delete old ones.
One of the primary advantages of using a timeline in animation is that it allows animators to adjust the timing and speed of individual frames or groups of frames. This feature enables them to create different effects such as slow-motion or fast-paced action.
Moreover, many animation software programs offer advanced timeline features that allow animators to create complex animations with ease. For instance, some tools enable them to adjust curves for motion paths, which can make movements look more natural and fluid.
Another useful feature offered by timelines is the ability to work with audio tracks. Animators can synchronize sound effects or music with specific frames or moments in their animation by adding audio clips to the timeline. This way, they can ensure that every aspect of their animation works together seamlessly.
Timelines are an important element in the creation of any animation. They enable animators to control the timing and duration of each frame or keyframe, adjust speeds and layers, use advanced features for motion paths curves, and synchronize audio tracks with specific moments in their animation. With these tools at their disposal, animators can create complex and engaging animations that captivate audiences and bring their stories to life.
Timing in animation determines the speed of events on screen. Good timing enhances realism and engagement, while bad timing creates awkwardness.
Timing is one of the most important aspects of animation. It is the key to creating believable and engaging character movement. Timing refers to the duration and spacing of movements within a sequence. It involves determining how long a movement takes to start, accelerate, decelerate, and stop. It also involves deciding how much space should be between each frame or keyframe in order to create smooth motion.
The art of timing is about manipulating time to create a sense of weight, momentum, and realism in character movement. This means that animators must have a deep understanding of physics, as well as the ability to observe and replicate natural movements.
In animation, timing can be used for different effects. Fast timing can create a sense of urgency or excitement, while slow timing can emphasize weight and gravity. Proper timing can also help convey emotions and personality traits of characters.
For example, if an animator wants to make a character look nervous or anxious, they might use fast timing to create jittery movements. On the other hand, if they want to make a character look strong and powerful, they might use slow timing to emphasize the weight and impact of their movements.
Good timing is crucial to making animation look believable and engaging. If the timing is off even slightly, it can ruin the illusion of movement and make the animation look stiff or robotic. This is why animators spend so much time refining their timing during the animation process.
To achieve good timing in animation, animators must first plan out their movements in detail. They must decide on the starting pose, ending pose, and all the poses in between. They must also consider the weight of the character, the environment they are in, and any other factors that might affect their movement.
Once they have planned out their movements, animators then create keyframes at specific points in time. These keyframes serve as reference points for the rest of the animation. Animators then fill in the gaps between keyframes to create smooth motion.
Timing is a crucial aspect of animation. It is the art of manipulating time to create a sense of weight, momentum, and realism in character movement. Good timing is essential to making animation look believable and engaging. Animators must have a deep understanding of physics and the ability to observe and replicate natural movements in order to achieve good timing in their animations. By planning out their movements in detail and creating keyframes at specific points in time, animators can ensure that their animations have proper timing and look as realistic as possible.
A title card is a picture or text at the start of a movie/TV show, showing its name, creator and sometimes providing a preview of what's to come.
A title card serves as an introduction to the content that follows. It typically appears at the beginning of a film, TV show, or other type of video content and displays the title of the production, as well as important information such as the names of the director and lead actors. In animation, a title card may also serve as an introduction to a specific episode or segment within a larger series.
Title cards in animation are designed to set the tone and mood for what is about to be presented to the audience. They can be created in a variety of styles and formats, from simple text on a solid background to elaborate illustrations or animations with sound effects and music. The design of a title card depends on the nature of the content it introduces, whether it is action-packed, comedic, or dramatic.
Title cards are also an opportunity for animators to showcase their creative skills. They can use unique artwork or animation that captures the mood or theme of the upcoming content. For example, if a show is set in space, the title card may feature planets and stars in its design.
Additionally, title cards can serve as branding for animated productions. A well-designed title card can help establish brand recognition for a particular show or studio. For example, Disney’s iconic “Walt Disney Pictures” logo serves as an instant identifier for any Disney-produced animated feature.
Title cards are an essential component in any animated production. They serve as an introduction to the content that follows and help set the tone and mood for what is about to be presented to the audience. With their unique designs and creative elements, title cards can also serve as branding for animated productions, establishing brand recognition for a particular show or studio.
Title sequence: intro to a show or movie displaying title and visuals.
Animated title sequences can include a variety of elements such as animated characters, graphics, and visual effects that bring the story to life. They can also incorporate the use of color, music, and sound effects to create an immersive and captivating experience for the audience.
One of the key advantages of animated title sequences is that they can be used to introduce characters or concepts that are integral to the story. For example, in the popular animated series “The Simpsons,” the iconic couch gag at the start of every episode showcases different scenarios involving the Simpson family on their couch. These gags not only provide a fun way to start each episode but also give viewers an idea of what they can expect from each episode.
Another advantage of animated title sequences is their ability to convey complex information quickly and effectively. In the hit television series “Game of Thrones,” the opening title sequence uses a map-like animation to show viewers where each location featured in the episode is located within the fictional world of Westeros. This not only helps viewers understand the geography of the show but also sets the tone for each episode.
Additionally, animated title sequences can be an excellent opportunity for animators to showcase their skills and creativity. They can experiment with different styles, techniques, and mediums to create something truly unique and captivating. For example, in the recent Netflix series “Love Death + Robots,” each episode features a different animated sequence that reflects the overall style and themes of that particular episode.
Animated title sequences serve as an introduction to the story, provide important information about its themes and setting, and are often memorable in their own right. With endless possibilities for creativity and innovation, animated title sequences are a great way for animators to showcase their skills and create something truly unique and engaging for audiences.
Tracking shots in animation are a way to make scenes more dynamic, show space better, add excitement, and help viewers stay focused.
In animation, a tracking shot involves a moving camera that follows characters and action, making the story feel more real. Animators carefully move the camera along with the characters to create smooth and exciting scenes that pull viewers into the story.
Tracking shots help show the space where the characters are. They let viewers see how characters relate to each other and their surroundings. Whether it’s exploring a city or traveling through big landscapes, tracking shots make viewers feel like they’re right there with the characters.
These shots also add energy to the story. When the camera moves smoothly with the characters, it makes scenes more thrilling or intense. It keeps the story moving forward and gets viewers emotionally involved. Whether it’s a chase scene or a character’s personal journey, tracking shots make it more exciting to watch.
Besides, tracking shots help focus on important things in a scene. As the camera moves around, it can highlight important objects or actions that matter to the story. This helps viewers understand what’s happening and feel the emotions of the characters.
In short, tracking shots in animation are a cool way to make stories feel alive. They make scenes more dynamic, show space better, add excitement, and help viewers stay focused. It’s like bringing the magic of movies into animation, making stories even more memorable for everyone watching.
Tweening is the process of creating smooth movements in animation by drawing lots of pictures between key poses.
Tweening is a term used in animation to describe the process of creating smooth movements between two key poses. It involves drawing lots of pictures in between the beginning and end of a movement to make it look fluid and natural.
The name Tweening comes from the word “in-betweening,” which refers to the frames that are drawn between two keyframes.
The use of automatic tweening in animation has revolutionized the way animators create motion pictures. With the help of computer software, it’s now possible to generate more realistic and fluid movements in a fraction of the time it used to take.
One of the significant advantages of Tweening is that it allows animators to create complex animations with fewer keyframes. In traditional frame-by-frame animation, each frame needs to be drawn manually (this is the method Brush Ninja animation maker uses). However, with Tweening, the computer generates most of the frames automatically by interpolating between the two keyframes. This not only saves time but also makes it easier to make changes to an animation during the editing process.
There are several types of Tweening that animators use to create different types of movements. One such type is linear Tweening, where the computer generates frames by evenly spacing them between two keyframes. This creates a simple, straight-line motion that is useful for basic animations such as moving objects from one point to another.
Another type of Tweening is Bezier Tweening, which allows animators to create more organic and natural-looking movements. Unlike linear Tweening, Bezier curves enable animators to adjust the speed and direction of an object’s movement at any point during the animation. This technique is particularly useful for creating complex animations such as facial expressions or character movements.
Finally there is easing which uses mathematical formulae to create the curves between keyframes. This is useful for creating more realistic movements such as bouncing balls or swinging pendulums.
Despite its many advantages, there are some limitations to using Tweening in animation. For example, while it’s great for creating smooth and realistic movements, it can sometimes result in repetitive or predictable animations. Additionally, because most of the frames are generated automatically by the computer, there may be some loss of control over the final output.
To overcome these limitations, many animators use a combination of both traditional frame-by-frame animation and tweening techniques in their work. By carefully balancing these two approaches, they can create animations that are both efficient and visually appealing.
Tweening is an essential technique in modern digital animation. It allows animators to create complex and realistic movements in a fraction of the time it used to take. While it has its limitations, it remains a powerful tool that every animator should have in their toolkit.
Vector graphics use shapes, lines, and colors to create scalable images. Ideal for smooth animations without blurriness or pixelation.
In the world of animation, vector graphics play a crucial role in creating high-quality visuals that are both scalable and manipulable. Vector graphics use mathematical equations to create images that are made up of lines, curves, and shapes. This allows for smooth animation and scaling without losing quality or pixelation. The flexibility of vector graphics has made them a popular choice among designers and animators for creating characters, backgrounds, and other elements.
One major advantage of using vector graphics in animation is their scalability. Unlike raster images, which are made up of individual pixels, vector graphics can be resized without losing clarity or resolution. This makes them ideal for animations that need to be viewed at different sizes or on different platforms. For example, an animated logo created with vector graphics can be used on a website, mobile app, or even printed materials like business cards or brochures.
Another advantage of using vector graphics is their ability to be easily manipulated and edited. Because they are created using mathematical equations rather than pixels, individual elements can be moved and adjusted without affecting the rest of the image. This allows animators to make quick changes to characters or backgrounds without having to redraw everything from scratch.
When you draw shapes in Brush Ninja animated gif maker you are creating vector graphics. This means that you can easily scale your drawings up and down without losing quality.
Vector graphics play an important role in modern animation by providing a flexible and scalable medium for creating high-quality visuals. Their ability to be easily edited and updated along with their smooth animation capabilities make them a popular choice among designers and animators alike. As technology continues to advance and new platforms emerge, vector graphics will undoubtedly continue to play a key role in the world of animation.
Visemes are facial expressions used by animators to create the illusion of speech in movies and cartoons, making characters more realistic and expressive. They mimic the shapes our mouths make when we speak different words.
Visemes are a crucial aspect of animation that allows characters to speak realistically and convey emotions through facial expressions. By using visemes, animators can create believable lip movements that match the spoken dialogue of the character. The process of matching the movements of an animated character’s mouth to the sounds of spoken dialogue is called lip syncing.
The importance of visemes in animation cannot be overstated. They allow for characters to appear more realistic and relatable to audiences, which in turn helps to create a stronger emotional connection between the viewer and the character. This connection is critical for creating engaging stories that keep viewers interested and invested in what happens to the characters.
There are a variety of different visemes that animators use, typically ranging from 15-20 depending on the complexity of the character’s speech. These visemes cover a range of sounds, from plosives like “p” and “b” to fricatives like “f” and “s.” By combining these different visemes in various ways, animators can create a wide range of mouth movements that accurately reflect the character’s speech.
Creating visemes can be done manually by animators, but it is often a time-consuming process. To speed up this process, some studios use motion capture technology or machine learning algorithms to automatically generate visemes based on recorded speech. While this method can be faster than manual animation, it also requires significant resources and expertise.
Regardless of how they are created, visemes play an essential role in bringing animated characters to life. By allowing them to speak realistically and convey emotions through facial expressions, visemes help to create engaging stories that resonate with viewers on an emotional level. As animation continues to evolve, it is likely that we will see even more advanced techniques for creating realistic lip syncing and facial expressions that further enhance the believability of animated characters.
Voice acting brings animated characters to life using only the voice.
Voice acting is a fundamental aspect of animation that brings the characters to life through their voice alone. The importance of voice acting cannot be overstated, as it can make or break an animated series or film. The job of a voice actor is to create a character and give them a unique personality and voice that audiences can connect with.
One of the essential skills required for voice acting is acting itself. Voice actors must have strong acting abilities that allow them to convey emotions and personality through their voices. This is especially important in animation, where the characters are two-dimensional and rely heavily on their voices to express themselves.
Another vital skill for voice actors is vocal range and control. They must be able to create different voices for different characters while maintaining consistency throughout the series or film. This requires good vocal range and control, which can be developed through practice and training.
Voice actors must also be able to read and interpret scripts effectively. They must understand the character’s motivations and emotions in each scene to deliver a compelling performance. This requires a deep understanding of the character’s backstory, personality, and motivations.
Additionally, voice actors must be able to take direction from the director or producer effectively. They may need to perform multiple takes of a line (sometimes dozens of takes) or scene to get it just right. This requires patience, focus, and a willingness to collaborate with others in the creative process.
The best voice actors are those who can bring their own unique style and personality to their performances while staying true to the character they are portraying. They must be able to infuse their performances with emotion, energy, and humor when called for.
Voice acting is an essential aspect of animation that brings the characters to life through their voices alone. Voice actors require strong acting skills, good vocal range and control, the ability to read and interpret scripts effectively, and a willingness to take direction from others in the creative process. The best voice actors bring their own unique style and personality to their performances while staying true to the character they are portraying.
Voice-over in animation is voice that talks over the animation, guiding the audience through the story.
In animation, voice-over narration is a powerful tool that enhances storytelling by providing an extra layer of immersion. It involves adding a voice to accompany the visuals on screen, guiding the audience through the narrative and providing context.
Voice-over narration sets the tone for the story, helping viewers understand the setting, character backgrounds, and plot developments. Whether it’s creating suspense, humor, drama, or excitement, the narration adds depth to the viewing experience.
Moreover, voice-over narration helps in world-building by providing additional information or exposition. It enriches the animated environment by introducing fantastical realms, explaining intricate backstories, or detailing complex concepts.
Voice-over narration also helps to make cartoons accessible to diverse audiences worldwide. Through dubbing or subtitling, animations can be translated into different languages while retaining the original intent and emotional impact of the narration.
Voice-over narration is an essential element in animation that enhances character development, world-building, and audience engagement. It adds depth to the story and captivates viewers, making the animated experience more immersive and enjoyable.
A walk cycle is a looping series of drawings animators use to make a character appear as if they're walking instead of standing still.
A walk cycle is a crucial aspect of animation as it is one of the most common actions a character performs. It is vital that the animator creates a realistic and believable walk cycle to ensure that the character’s movements appear natural.
When creating a walk cycle, the animator needs to pay close attention to each element of the character’s movement. Firstly, it is essential to consider weight distribution and balance. As the character takes a step, their weight shifts from one foot to the other, and this needs to be accurately reflected in the animation.
Timing is also crucial in creating a believable walk cycle. Each step needs to flow smoothly into the next, and there should be no sudden or jarring movements. The timing of each step must be consistent throughout the entire cycle to ensure that it looks natural.
Many animators use reference videos or even act out the walk themselves to gain a better understanding of how it should look. By observing real-life movements, animators can create more accurate animations that feel natural and believable.
Overall, creating a realistic walk cycle requires careful observation and attention to detail. Every aspect of the character’s movement must be considered, from weight distribution and balance to timing and rhythm. With these elements in mind, animators can create animations that bring their characters to life with fluid and natural movements.
Webm is a video file format for internet animations.
WebM is an open-source multimedia file format that was developed by Google in response to the proprietary formats like MP4 that were widely used at the time. It was created to offer animators and video creators a royalty-free alternative that offers high-quality video and audio compression while maintaining smaller file sizes.
One of the primary benefits of using WebM is its compatibility with all major web browsers, including Chrome, Firefox, Safari, and Edge. This ensures that anyone can view your animations without having to install any additional software or plugins.
Premium members can export Brush Ninja animations in WebM format. This gives you WebM animations that you can share on your website or social media. You can also use our WebM to MP4 converter to convert your WebM animations to MP4 animations.
WebM uses VP8 or VP9 video codecs, which are designed to be highly efficient while offering high-quality video compression. These codecs work by shrinking (compressing) the frames of a video into smaller units called macroblocks.
In addition to the efficient video codecs, WebM also supports Vorbis or Opus audio codecs which provide advanced sound compression techniques for superior quality sound. These codecs use a technique known as perceptual coding where redundant data is removed from audio files without affecting perceived quality.
WebM’s advanced compression techniques make it ideal for streaming over the internet where bandwidth is limited. Due to its ability to maintain high-quality videos at lower file sizes than other formats like MP4, it reduces buffering times on slower internet connections while still delivering exceptional viewing experiences.
Check out our WebM to MP4 converter to convert your WebM videos to MP4 videos.
Another added benefit of using WebM is its ease of use for animators and developers. Its open-source nature makes it easy to integrate into existing workflows and applications without requiring proprietary licenses or fees. Additionally, many popular animation tools like Adobe Animate and Blender natively export animations in WebM format.
WebM offers animators an excellent choice for sharing their work online due to its accessibility across major web browsers, support for high-quality audio and video codecs, small file size capabilities, and ease of integration with popular animation tools. As more individuals turn towards online media consumption as opposed to traditional broadcasting, it’s essential for animators to consider the benefits of utilizing a format like WebM when sharing their work with the world.
Animation weighting assigns importance to different parts of a character's body for realistic movement and behavior.
In animation, weighting is an essential step in bringing characters to life. The process of assigning values or strengths to the various joints or bones in a character’s skeletal structure allows animators to control how the character moves and deforms when animated.
Weighting is an integral part of rigging, which is the process of adding a digital skeleton to a character model. Rigging involves creating a hierarchical structure of bones that can be manipulated to pose the character in different positions. Each bone has a set of vertices assigned to it, which move along with the bone when it is manipulated.
When animating a character, an animator will typically start by posing the character in a neutral position, such as standing with arms at their sides. The animator will then create keyframes at different points in time, each representing a different pose or movement of the character. As the animator moves from one keyframe to another, the software interpolates between them, creating smooth motion.
Weighting plays an important role in this process because it determines how each joint or vertex contributes to the overall movement of the character. For example, if an animator wants to lift a character’s arm, they will need to ensure that the shoulder is properly weighted so that it moves realistically with the arm.
There are two main approaches to weighting: manual and automatic. Manual weighting involves selecting each joint or vertex and assigning weights manually using software tools. This method requires careful attention to detail and can be time-consuming but allows for greater control over the final result.
Automatic weighting involves using software algorithms to assign weights automatically based on factors such as proximity and connectivity between joints and vertices. This method is faster than manual weighting but may require additional tweaking to achieve a natural-looking result.
In addition to controlling movement, weighting also affects how a character deforms when animated. For example, if a character bends their arm, the skin around the elbow will need to stretch and compress realistically. Proper weighting is essential for achieving this effect and can make the difference between a stiff, robotic-looking character and a smooth, lifelike one.
Overall, weighting is an important animation process that requires careful attention to detail and an understanding of how different joints and vertices contribute to overall movement and deformation. Whether done manually or automatically, proper weighting is essential for creating convincing, realistic characters that audiences can connect with.
Wide shots in animation are a way to show the whole scene, including characters and the environment.
In animation, a wide shot shows the big picture. It moves the camera back and shows the whole scene, including characters and the setting. This helps viewers understand where everything is and how characters relate to each other and their surroundings.
Wide shots also give a sense of the scene’s size. Whether it’s a big landscape or a busy city, viewers get to feel the grandeur or the coziness of the place. This makes the animation more visually appealing and adds emotions to the story.
Additionally, starting with a wide shot lets animators zoom in later for more detailed storytelling. They can focus on specific characters or actions while still keeping the bigger scene in mind. This helps balance the overall view with important details.
In short, wide shots in animation are like opening windows to the animated world. They help viewers understand the scene, feel its size, and follow the story better. It’s a key technique that makes animations more immersive and enjoyable for everyone watching.
Z-depth is the measure of distance from the viewer in animation.
Z-depth, also known as depth sorting, is an essential aspect of modern animation.
In 2d animation Z-Depth refers to the order things are displayed on the screen. The things at the back will be drawn first, and then we move closer to the viewer. So we would draw the background, then the midground (trees, houses), and then the foreground (characters, objects).
By changing the depth of the objects in a scene you can create a sense of perspective. By amimating depth and scale you can give the impression of objects moving towards or away from the camera.
In 3d Z-depth refers to the depth of each pixel in the rendered image. The Z-depth value is calculated based on the distance between the camera and the object. Objects closer to the camera will have a higher Z-depth value compared to those further away.
The Z-Depth can be used after rendering to apply special effects such as fog or depth-of-field. In fact the blur effects seen in modern phone cameras uses a form of Z-Depth to determine which parts of the image to blur.
In animation, zooming is adjusting a camera to make things look closer or farther away. It’s a cool trick that helps tell better stories and make viewers feel more connected to the characters.
When animators zoom in, it’s like getting a close-up view of something. This lets viewers see details like facial expressions or movements, making the characters feel more real and the story more emotional.
Zooming out shows more of the scene around the characters. It helps set the scene and lets viewers see where everything is happening. This makes the animation feel bigger and more immersive.
Zooming isn’t just about moving the camera. It’s used to create intense moments or show changes in the story. Combining zoom with other tricks like moving the camera or changing lighting makes animations even more exciting to watch.
In the end, zooming in animation is a great way to make characters feel alive and stories more exciting. It adds depth to the scenes and makes the whole experience more enjoyable for everyone watching.
Brush Ninja is a free online animation tool for education. It is designed to be simple and accessible, while still powerful enough for creative expression, storytelling, and learning.
Brush Ninja is developed by Ben Gillbanks, a developer and digital creator based in the UK. It is supported by donations from users and organisations. If you find it useful, please consider supporting the project to help keep it free for everyone.
If you have any feedback on this guide, please get in touch to share your thoughts and suggestions.